

Personalised Drink Bottle Labels: How to Choose and Apply Them
The best-looking personalised drink bottle labels aren’t necessarily right for every bottle. Before choosing a name or colour, check the bottle’s surface: UV DTF transfers need a clean, dry, smooth, hard area to apply neatly. Textured, flexible or soft bottles may not be suitable.
Start by matching the label to the bottle, then choose a size and design that are easy to see. This guide explains what a no-background UV DTF finish looks like, how to apply a transfer and how to care for a labelled bottle. Hand washing is recommended, and how a label holds up can depend on the surface, application, curing time, washing conditions and everyday use. These checks can help you choose a label for a child’s school bottle or one used at kindy, daycare or sport.
Key Takeaways
- Check the bottle material and surface first. Textured, grooved, silicone and flexible surfaces aren’t suitable for UV DTF transfers.
- Measure the flat area where you want the label, then compare it with the label dimensions.
- Choose a name or design that’s easy to see against the bottle’s colour and place it where it can be read easily.
- Follow the transfer application steps and allow the recommended time for it to settle before use.
- Explore personalised UV DTF name labels for a clean, no-background finish on suitable smooth, hard bottles.
What makes personalised drink bottle labels suitable for a bottle?
A personalised drink bottle label adds a name or design to a compatible bottle. UV DTF transfers leave a clean, no-background finish, so the design appears directly on the bottle rather than inside a visible label shape.
The finish is only one part of the decision. The bottle’s material, texture, shape and the spot you choose all affect whether a transfer is suitable and can be applied smoothly. A broad, even area is a more practical choice than a section with deep ridges or a flexible body.
Which drink bottle surfaces can take a UV DTF label?
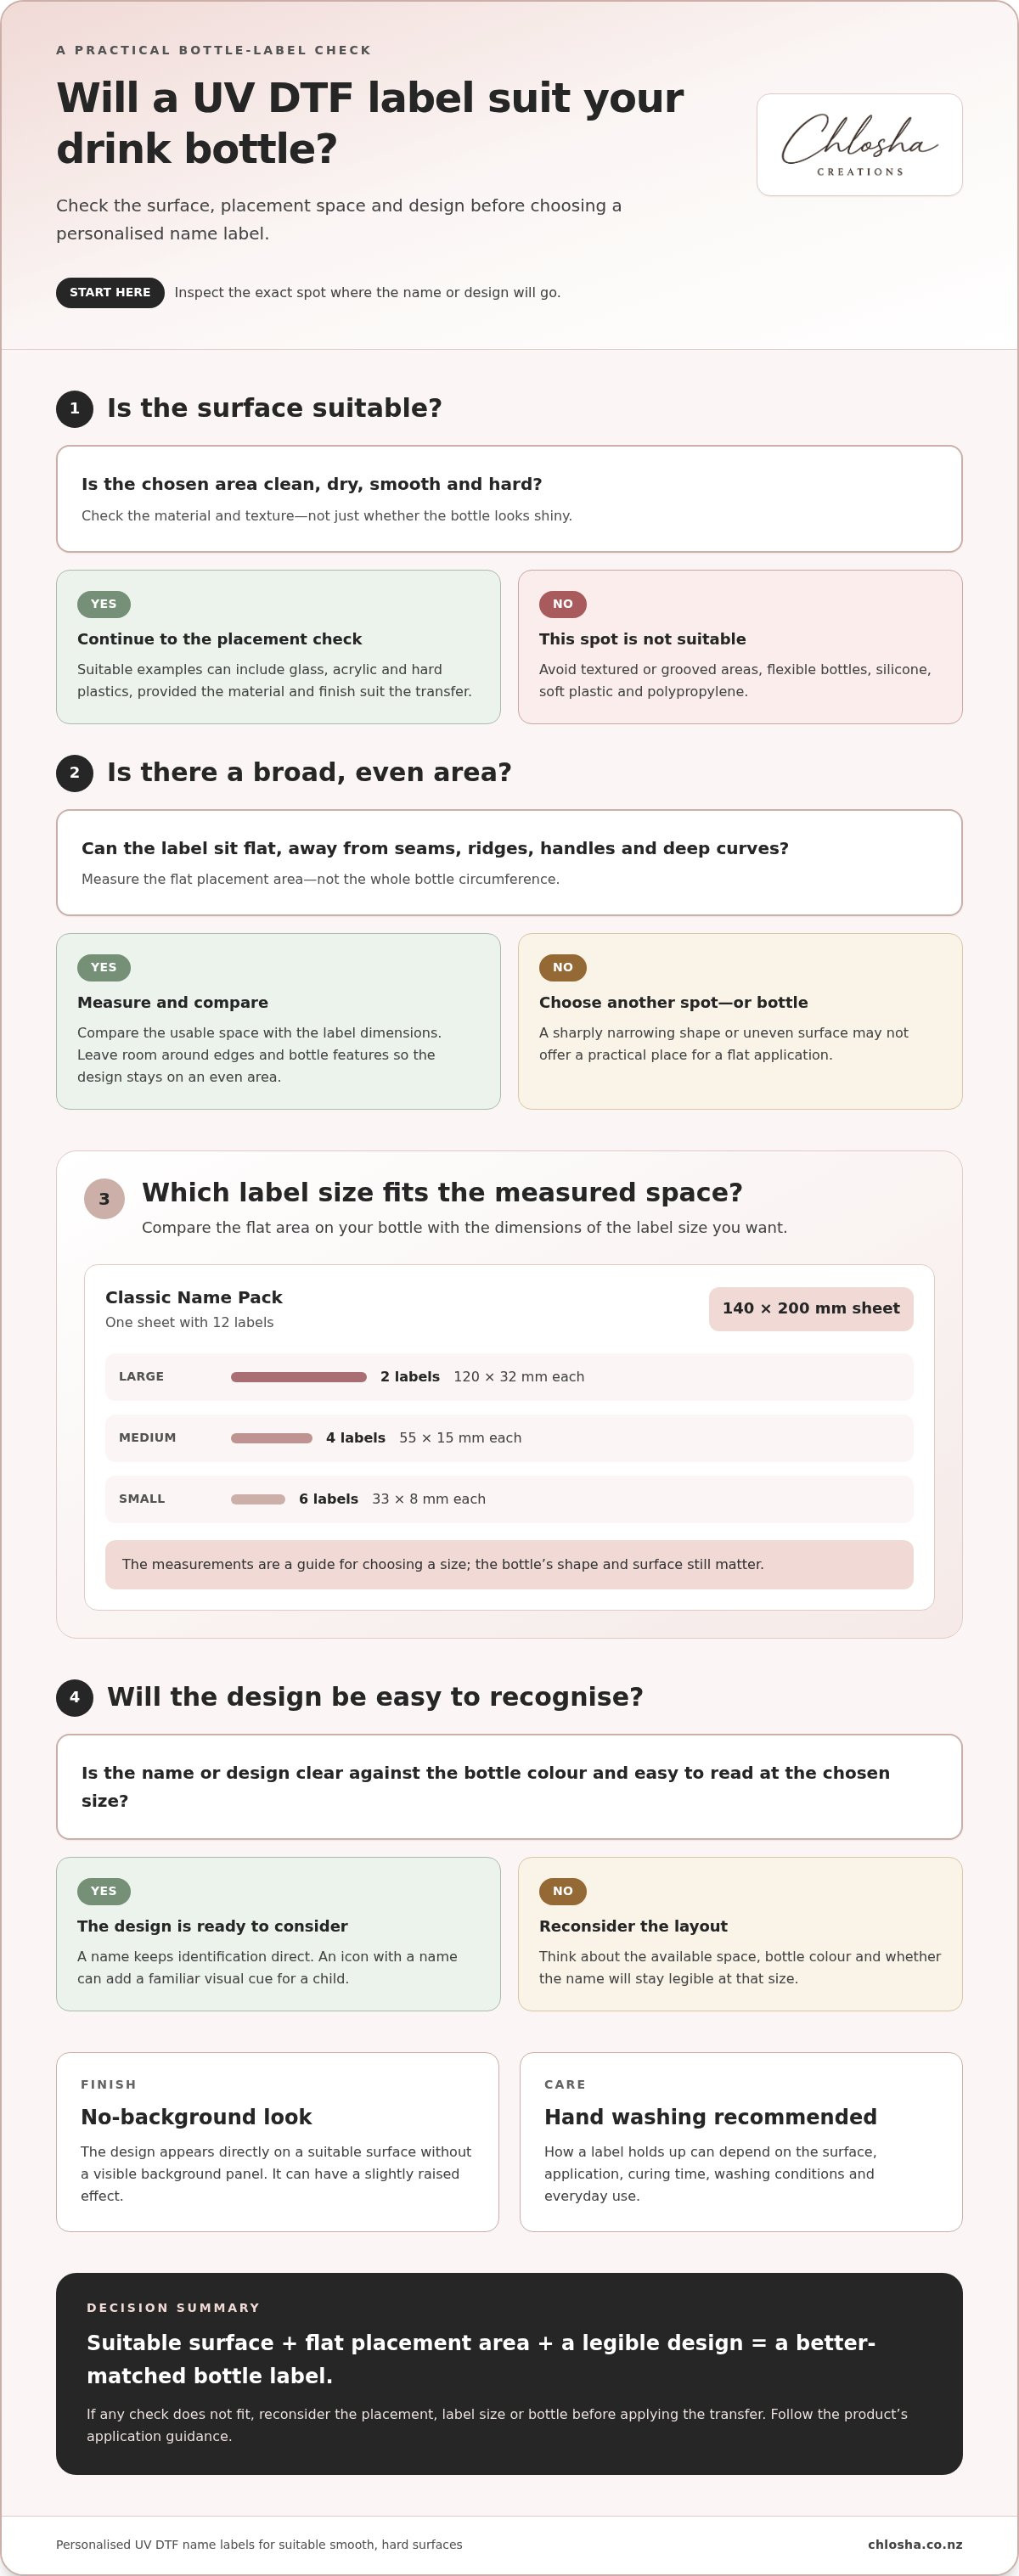
Choose a clean, dry, smooth, hard surface. Compatible glass, acrylic and hard plastics are examples, but the material and finish must be suitable for the transfer. A surface looking shiny doesn’t automatically mean it’s a good fit.
Avoid textured or grooved areas, flexible bottles, silicone and soft plastic. These surfaces can make it difficult for a transfer to sit flat. Polypropylene is also unsuitable. Check the bottle’s material and inspect the exact spot where you plan to place the name or design.
Some conventional self-adhesive labels work through a pressure-sensitive adhesive. UV DTF transfers use a different application method, so instructions for one label type may not apply to another. Follow the transfer’s surface and application guidance.
Why do bottle shape and label placement matter?
Find a broad, smooth area before choosing a label size. A flatter section gives you room to position the design and press it down evenly. Measure that area and compare it with the label dimensions, leaving space around the bottle’s edges and features.
Deep curves can make it harder to keep a transfer flat, while seams, ridges and moulded details can interrupt the placement area. A bottle that narrows sharply or has an uneven surface may not have a suitable spot. Consider both the shape and material, rather than assuming one label will fit every bottle.
For school, daycare or everyday family use, a clearly placed name can make a bottle easier to identify. Chlosha Creations’ personalised name labels include UV DTF options for suitable smooth, hard surfaces. Check the bottle first, then choose a size and placement to suit its shape.
How to choose personalised drink bottle labels for everyday use
Start with the bottle, then choose the name or design. The label needs to suit the surface and fit the available space, while staying easy to recognise during school, daycare, kindy or sports routines. Use this comparison to focus on the details that matter:
| Check | What to consider |
|---|---|
| Surface | Choose a clean, dry, smooth, hard area. Avoid textured, grooved, flexible, soft or silicone surfaces. |
| Available space | Look for a flat area away from seams, ridges, handles and deep curves. |
| Design | Decide whether a name alone is clearest or an icon and colour will help the bottle stand out. |
| User | Think about who needs to identify the bottle. A familiar icon can be a useful visual cue for a child. |
| Routine | Consider where the bottle goes each day and how it will be washed. Hand washing is recommended. |
What should you check before choosing a label size?
Measure the smooth placement area, not the whole bottle circumference. A bottle may be wide around its body but still have only a small flat section suitable for a transfer. Leave room around curves, seams, handles and raised details so the design stays on an even area.
Compare your measurement with the dimensions shown for the label pack. For example, the Classic Name Pack is a 140 × 200 mm sheet with 12 labels: two large labels measuring 120 × 32 mm, four medium labels measuring 55 × 15 mm, and six small labels measuring 33 × 8 mm. Check the usable space on your bottle against the dimensions of the size you want. A measurement helps you choose, but the bottle’s shape and surface still matter.
Should you choose a name-only label or an icon and name?
A name keeps identification direct and easy to read. An icon adds a visual cue that may help a child recognise their bottle among similar belongings. Consider the bottle’s colour, the space available and whether the name will remain legible at the chosen size. No single colour, font or label size suits every bottle.
If a themed design feels right, explore Personalised Icon + Name Label Packs. Choose a layout that fits the bottle and the person using it, then follow the product’s application guidance.
Once you’ve checked the surface and measured the placement area, browse personalised name labels for a design to suit your bottle and routine.
UV DTF and other bottle labels: what differences matter?
Different bottle labels can look similar online but vary in finish, application and suitable surfaces. Match the format to the bottle rather than assuming one type suits every material. When comparing personalised drink bottle labels, consider how the design will look and what applying it involves.
What is distinctive about a no-background UV DTF finish?
A UV DTF transfer places a design on a suitable surface without a visible background panel around it. The result is a clean, no-background look, and the design can have a slightly raised effect. This describes the finish, not a promise about how the transfer will perform over time or through washing.
Unlike a label that stays on a backing sheet as one complete panel, a transfer is positioned on the surface and applied according to its instructions. Careful placement helps the elements sit neatly where intended. You can read more about the process and materials in the UV DTF transfer guide.
How should you compare transfer labels with other formats?
Compare three practical differences:
- Visible finish: A UV DTF transfer leaves the design without a background panel. Other label formats may have a visible edge or backing shape, which can be part of their look.
- Application: Transfers are positioned and pressed onto the surface according to their application guidance. Other formats may be applied as a complete label, so the steps can differ.
- Suitable surface: UV DTF transfers are intended for suitable smooth, hard surfaces. Other formats may be designed for different materials or uses, so check the product guidance.
A format designed for one surface shouldn’t be assumed to work on another. UV DTF transfers aren’t suitable for fabric, silicone or flexible surfaces. Bottle shape and finish matter too, so focus on the exact area where the design will sit.
Chlosha Creations’ UV DTF name labels provide a no-background option for compatible hard-surface bottles. Whichever format you choose, follow its application and care guidance. For bottles with UV DTF labels, hand washing is recommended.
How to apply and care for drink bottle labels
Careful preparation and steady application help a UV DTF transfer sit neatly on a suitable bottle. Check the product instructions first, then choose a clean, dry, smooth, hard area. Dust, moisture or residue under the transfer can affect the result, so prepare the surface before you begin.
How do you apply a UV DTF bottle label?
Follow these steps in order:
- Clean: Remove dust, grease and residue from the chosen area.
- Dry: Make sure the surface is completely dry before applying the transfer.
- Position: Line up the design carefully and check its placement before pressing. Repositioning may not be straightforward.
- Press: Rub or squeegee firmly across the design so it makes even contact with the bottle.
- Peel: Slowly peel the carrier back at a low angle instead of pulling it straight away from the surface.
If part of the design doesn’t release cleanly, press it down again before continuing. A warm hair dryer on a low setting may help if needed.
How should you wash a labelled drink bottle?
Wait about 24 hours before normal use to give the transfer time to settle. Hand washing is recommended for labelled bottles. Don’t assume a bottle with a UV DTF transfer is dishwasher-safe or microwave-safe.
If a bottle is exposed to a dishwasher, wait about 72 hours after application first, where appropriate. This isn’t a guarantee of a particular wash result. Heat and washing conditions can affect the transfer, so hand washing remains the recommended approach.
Wash gently and avoid scrubbing directly over the label. How it holds up can depend on the bottle surface, correct application, curing time, washing conditions and ongoing use. Everyday handling can also affect the finish over time.
For a bottle with a suitable smooth, hard surface, explore personalised name labels and follow the application guidance supplied with your transfer.
Where to find personalised drink bottle labels in New Zealand
Work through the choice in order: check the bottle’s material, find a smooth, flat area, measure it, then choose a design that fits. Follow the transfer’s application guidance and remember that hand washing is recommended. These checks help you choose for the bottle you have, rather than relying on its appearance alone.
Who may find personalised bottle labels useful?
A named bottle can be handy for school, daycare, kindy, sports practice and shared family routines. In a classroom or sports bag, several bottles may look alike. A clearly readable name helps teachers, caregivers and family members identify which bottle belongs to whom.
For younger children, an icon alongside their name can provide an extra visual cue. They may recognise a familiar design before they can easily read every name. Choose a layout that’s clear at the size you’ve measured, and consider the bottle’s colour so the lettering and design are easy to see. A label can help with identification, but it can’t guarantee a bottle won’t be misplaced or that the design will remain unchanged in every condition.
What should you do before placing an order?
Check the bottle itself. Look for its material and identify a clean, smooth, flat area away from seams, ridges and deep curves. Measure that usable patch, then compare it with the dimensions shown for the label option you’re considering. Measuring the bottle’s full circumference won’t show how much flat space is available for a transfer.
Next, decide what will make the bottle easiest to recognise: a name alone or a name with an icon. Consider who will use it and where it will go, whether that’s in a school bag, at kindy or with sports gear. Choose a design and size for the actual placement area, not a one-size-fits-all assumption.
Chlosha Creations’ personalised UV DTF name labels are designed for suitable smooth, hard surfaces. Customers can choose from different colours, fonts and name-label pack formats. For more guidance on choosing labels for belongings, the personalised name labels NZ guide covers additional selection considerations.
Once you’ve checked the surface and measured the space, explore the personalised name label range for designs to suit a compatible drink bottle.
Choose a label that fits your bottle and routine
Choose personalised drink bottle labels by starting with the bottle’s surface. Check that the placement area is smooth and hard, then measure the flat space before choosing a size and design. A name or icon can make a bottle easier to recognise at school, kindy, daycare or sport.
UV DTF transfers have a clean, no-background finish, but the surface and application still matter. Follow the application guidance, allow time for the transfer to settle and hand wash the bottle. How a label holds up can depend on the surface, application, curing time, washing conditions and everyday use.
Ready to find a design for your bottle? Explore personalised name labels and choose an option to fit the space you’ve measured.
Frequently Asked Questions
Will personalised drink bottle labels stick to every bottle?
No. Personalised drink bottle labels are suitable only for compatible surfaces, so check the bottle material and finish first. UV DTF transfers need a clean, dry, smooth, hard surface, such as compatible glass, acrylic or hard plastic. Textured, grooved, silicone, flexible and soft plastic surfaces aren’t suitable. Polypropylene is also unsuitable. The bottle’s shape and placement area matter too.
Are UV DTF drink bottle labels dishwasher safe?
Don’t assume they are. Hand washing is recommended for bottles with UV DTF labels. Heat, detergents and washing conditions may affect how a transfer holds up, along with the bottle surface, application, curing time and ongoing use. Application guidance may advise waiting about 72 hours before dishwasher exposure where appropriate, but that isn’t a dishwasher-safe claim or a guarantee of a particular result.
How do I apply a personalised label to a drink bottle?
Apply it to a clean, dry, smooth, hard surface. Position the transfer carefully, then press or squeegee firmly across the design. Peel the carrier back slowly at a low angle. If the design needs help releasing, press it down again before continuing. A warm hair dryer on a low setting may help if needed. Follow the application instructions supplied with your label.
How long should I wait before using a newly labelled bottle?
Wait about 24 hours before normal use to give the transfer time to settle. Hand washing is recommended once the bottle is in use. If considering dishwasher exposure where appropriate, wait about 72 hours after application, but this doesn’t mean the bottle or label is dishwasher-safe. Washing conditions, surface suitability, application and ongoing use can all affect how the transfer holds up.
Can I put a UV DTF label on a silicone drink bottle?
No. Silicone is flexible and isn’t suitable for UV DTF transfers. These labels are intended for clean, dry, smooth, hard surfaces. Flexible bottles can move during use, while the transfer needs a suitable surface to sit against. Check the bottle material, not just its appearance, before choosing a label. Compatible glass, acrylic and hard plastic may be suitable depending on their finish.
How do I choose the right size name label for a drink bottle?
Measure the flat, smooth area where you plan to place the name, rather than measuring around the whole bottle. Leave room around curves, seams, ridges and handles, then compare the usable space with the label dimensions shown for the pack. Consider whether the name will be clear at that size. Bottle shapes vary, so a size that suits one bottle may not suit another.
Are personalised drink bottle labels suitable for children’s school bottles?
They can be a practical choice for a school bottle if its surface is compatible and the label is applied as directed. A child’s name makes the bottle easier to identify among similar belongings, and an icon can add a recognisable visual cue. Check the bottle material and placement area first. A label can help with identification, but it can’t guarantee a bottle won’t be misplaced.
What is the difference between a UV DTF label and a traditional sticker?
A UV DTF transfer leaves the design on a suitable hard surface without a visible background panel, and it can have a slightly raised finish. A traditional sticker is generally applied as a complete piece, which may include a visible backing shape or edge. Application methods and suitable surfaces differ between formats. Check the guidance for the particular label, and don’t use UV DTF transfers on fabric, silicone or flexible surfaces.
