

The Ultimate Buying Guide to Home Organisation Labels in NZ (2026)
What if your pantry jars didn't just look organised, but actually looked like they were professionally printed? Finding high-quality home organisation labels nz families can rely on is often harder than the actual tidying. You've likely dealt with those annoying clear stickers that leave a messy outline or, even worse, peel off the moment they hit the dishwasher. It's frustrating when your hard work starts looking tatty after just a few weeks of real-world use.
We understand that you want a Pinterest-worthy home without the constant maintenance. That's why we focus on UV DTF transfers. These aren't your standard vinyl stickers. They provide a smooth, raised, no-background finish that blends seamlessly into your decor. Whether you're prepping for kindy or sorting the spice rack, the right choice makes all the difference to the longevity of your hard work.
This guide will help you choose the perfect, durable labels to beautifully organise every corner of your New Zealand home. We'll cover everything from selecting the right fonts to the essential 72-hour curing time for dishwasher resistance. By the end, you'll know exactly how to create a system that handles the rigours of daily Kiwi life while looking absolutely stunning.
Key Takeaways
- Learn why UV DTF technology is the gold standard for home organisation labels nz, offering a premium "no-background" finish that looks printed directly onto your containers.
- Discover the secret to perfect placement by measuring the flat surface area of your jars and choosing between Classic or Mega Name Pack sizes.
- Identify which surfaces work best for your transfers, prioritising smooth materials like glass and acrylic while avoiding textured wood or flexible silicone.
- Master the application process using simple cleaning steps and allow for a 72-hour curing period to ensure your labels are ready for the dishwasher.
- Find the best style for every room, from minimalist pantry designs to durable icon packs that help keep the kids' school gear from ending up in the lost property.
Why UV DTF is the New Standard for NZ Home Organisation
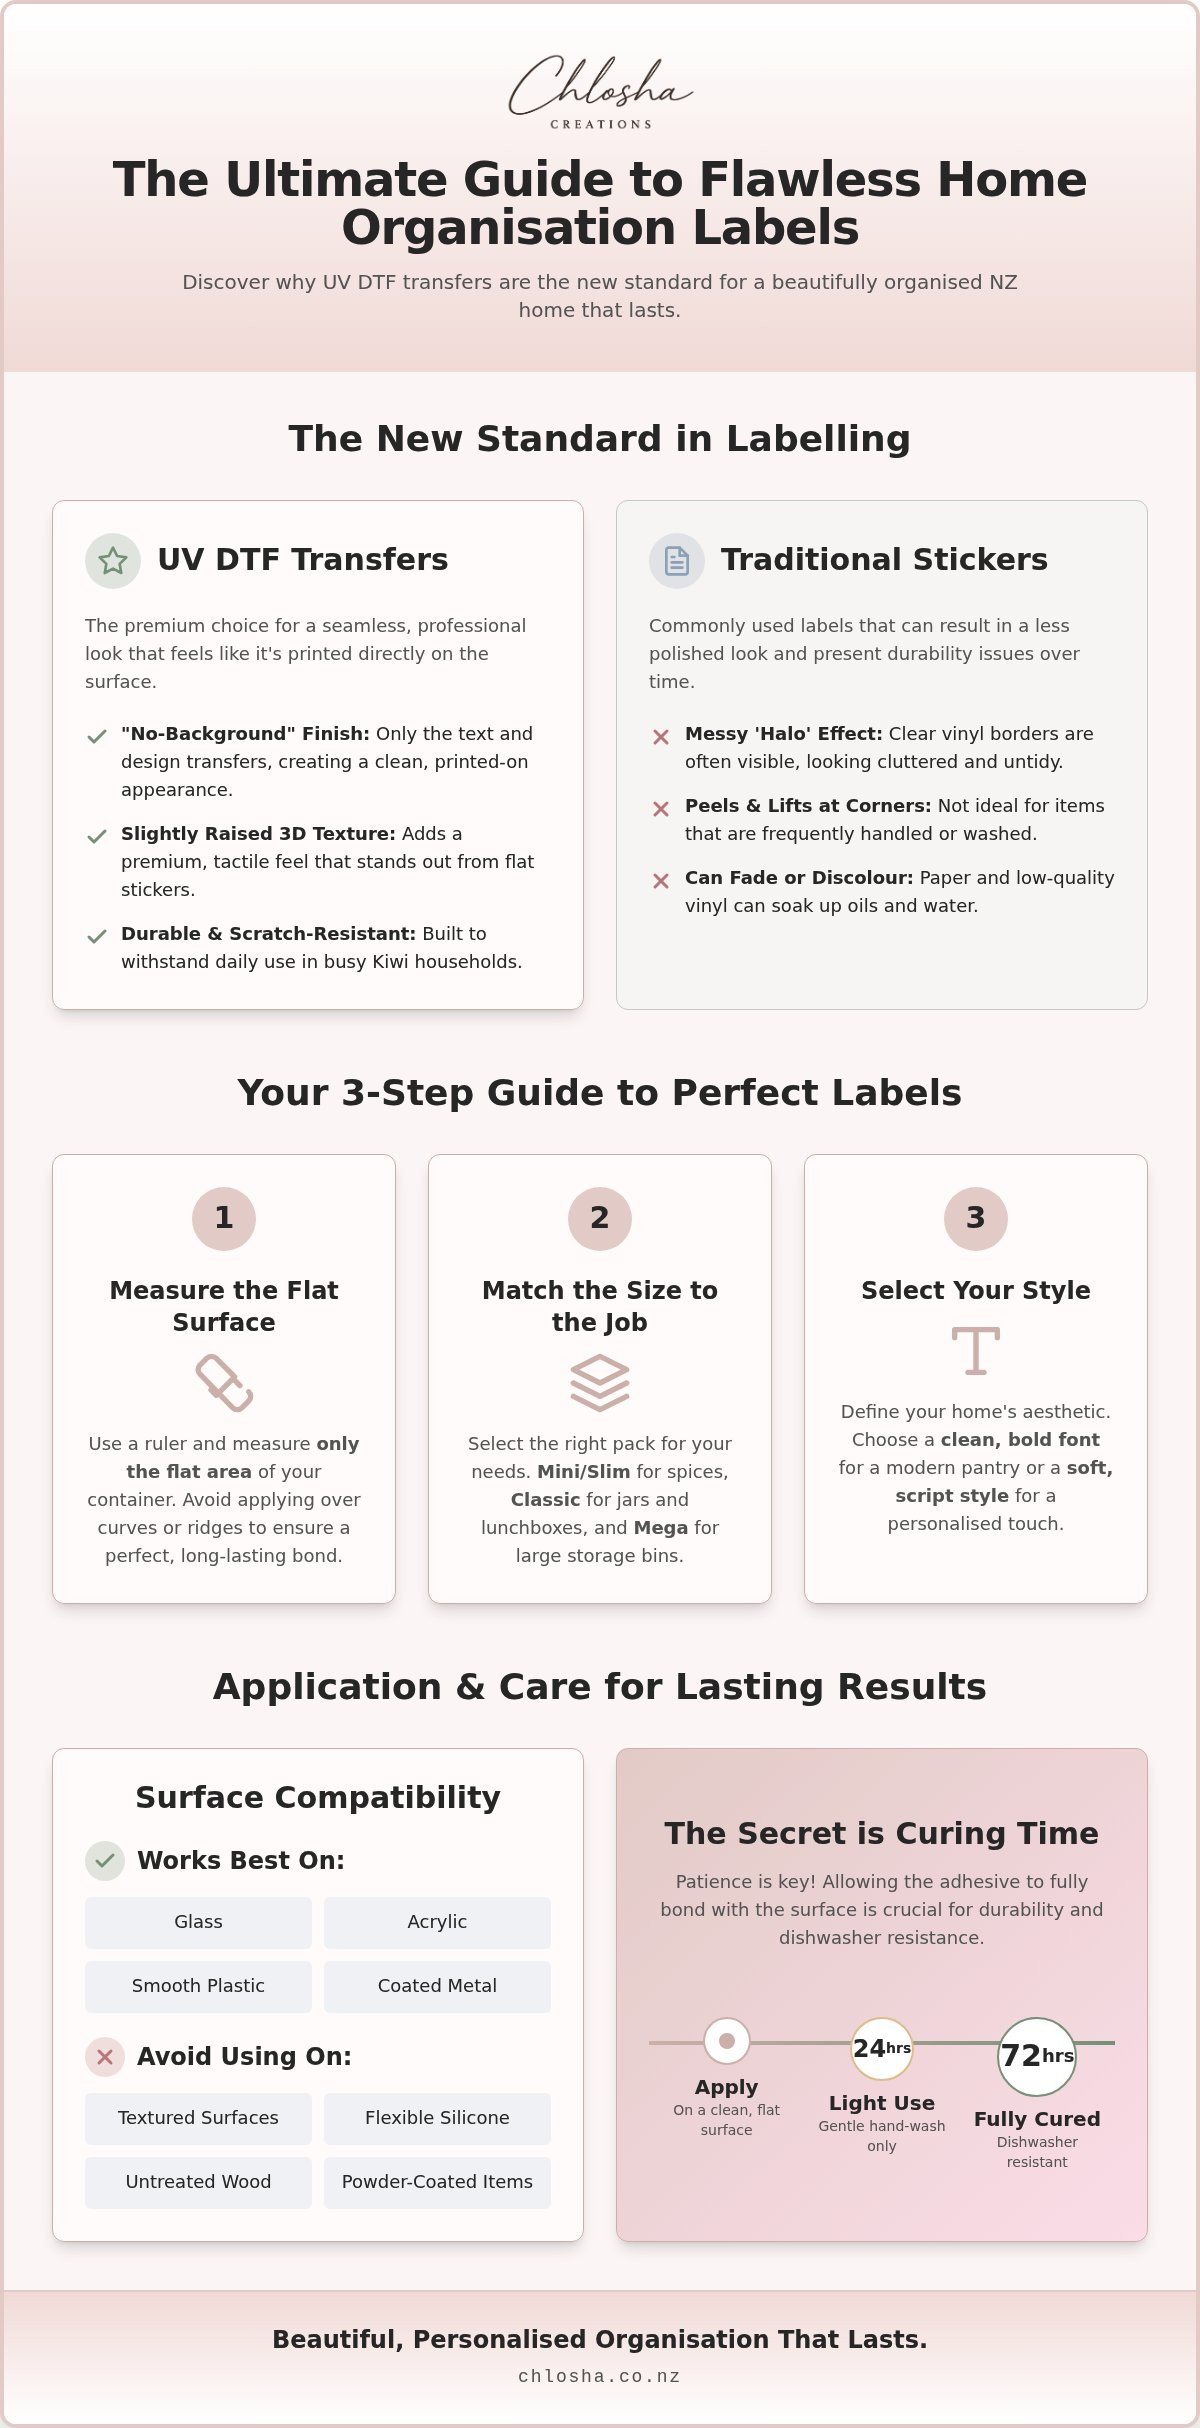
Organising your home should feel rewarding; not like a chore that needs redoing every six months. For years, the history of adhesive labels has seen us settle for paper stickers or vinyl decals that eventually lift at the corners. But things have changed. UV DTF (Direct-to-Film) technology has arrived as the premium standard for home organisation labels nz families use to transform their spaces. This isn't just another sticker. It's a high-quality transfer that brings a professional, permanent feel to your pantry, laundry, and kids' gear.
The Aesthetic Advantage: No Backgrounds or Borders
Have you ever applied a clear label to a glass jar only to see a messy "halo" or a visible rectangle around the text? It's a common frustration that can make even the tidiest pantry look a bit cluttered. UV DTF transfers solve this by providing a clean, no-background finish. The ink is cured with UV light and transferred directly onto your container, leaving only the letters or icons behind. It's about more than just a name; it's about how that name interacts with the light and the surface of your favourite glass jars.
This creates a seamless look that perfectly suits the minimalist, nature-inspired interiors popular in New Zealand right now. Unlike traditional stickers, these transfers have a slightly raised, 3D texture that feels premium to the touch. UV DTF is the superior alternative to vinyl for anyone wanting that high-end, printed-directly-on-the-glass appearance without the professional price tag of custom-printed jars.
Durability for Everyday Kiwi Life
Our homes are busy places. Between the humidity of an Auckland kitchen and the rough-and-tumble of kids' lunchboxes, your labels need to be tough. These transfers are designed to be scratch-resistant and handle daily handling without fading or losing their crisp edges. While they aren't indestructible, they're far more resilient than standard paper options that soak up oils and water. No one wants to see their hard work peeling off after a single wash. By following the correct application steps, you're investing in a system that lasts.
For those sorting out the whole family, check out The Ultimate Guide to Personalised Name Labels in NZ to see how these hold up on school gear. Just remember that patience is key. While your items are ready for light use after 24 hours, you'll need to wait a full 72 hours before putting them in the dishwasher. This curing time allows the adhesive to bond properly with the surface, ensuring your home organisation labels nz stay looking sharp through countless snack times and school days. It's a small wait for a long-term result.
Choosing the Perfect Label Size and Style for Your Space
Selecting the right home organisation labels nz depends entirely on the surface you're working with. Before you start browsing font styles, you'll need to grab a ruler. UV DTF transfers are permanent and don't like to be repositioned, so the "measure twice, stick once" rule is your best friend. When measuring your jars or lunchboxes, focus only on the flat surface area. If a label overlaps onto a curve, a ridge, or a lid, it won't bond as effectively; leading to lifting over time.
Our Classic Name Pack is designed to give you versatility across different rooms. You'll generally find large, medium, and small options within these sets. Large labels are perfect for focal points like main pantry bins, while smaller sizes work beautifully for more discreet sorting. Mixing and matching fonts can also help define your home's aesthetic. You might choose a bold, clean font for the laundry and a softer, script style for the bathroom to create distinct "zones" in your house.
Pantry vs. School Gear: Finding the Right Dimensions
The size you need for a spice jar is vastly different from what works on a large flour bin. For those tiny spice containers, Slim or Mini packs are the unsung heroes of drawer organisation. They provide enough clarity to read the contents without overwhelming the small glass surface. On the other hand, large bulk-buy containers often require Mega packs to ensure the text is visible from across the kitchen. This balance keeps your home organisation labels nz looking intentional and professional rather than cluttered.
Don't forget about the smaller items that often go missing. Stationery, pens, and markers require very thin, durable transfers to stay put. Because our transfers have no background, they look like they're part of the item itself. This is especially useful for high-use school gear that gets handled constantly. If you're starting a big project, you might want to look at our range of personalised name labels to find a style that fits your specific container sizes.
The Psychology of Icons for Kids
For the younger members of the family, icons are a powerful tool for independence. Kindy-aged children who can't yet read fluently can still recognise their own drink bottles or lunchboxes by spotting a familiar dinosaur, flower, or rocket ship. It builds confidence and ensures their gear actually makes it home at the end of the day. Themed packs allow you to match the icon to your child's personality, making the organisation process fun for them too.
Using these visual cues in the playroom or bedroom can also help with the "tidy up" routine. If a toy bin has a picture of a car or a block, kids know exactly where things belong. Our Icon + Name Packs are the go-to choice for school prep because they combine this visual recognition with clear text for teachers. It's a practical way to manage the chaos of a busy household while keeping everything looking beautifully coordinated.
Surface Secrets: Getting the Most Out of Your Labels
"Smooth and dry" is the golden rule for any home organisation labels nz project. While UV DTF technology is incredibly versatile, it relies on a strong bond with the surface to stay put. Your kitchen jars might look clean. They aren't. Even a tiny bit of invisible residue from your fingers or a previous label can compromise the bond. For the best results, you'll want to stick to hard, non-porous materials. Glass, acrylic, hard plastics, and stainless steel are the absolute champions here. These surfaces allow the transfer to lay flat and cure perfectly, giving you that professional, printed-on look that lasts.
However, not every container is a good candidate. You should avoid applying these transfers to silicone, fabric, or heavily textured wood. Soft, flexible plastics are also tricky. If you can squeeze the container and it deforms easily, the label will likely lift as the material moves. When you're working with curved items like drink bottles, start your application from the centre of the label and work your way out. This helps prevent air bubbles and ensures the edges wrap smoothly around the curve without creasing.
Compatible Materials for Long-Lasting Results
Glass and hard acrylic offer the most reliable "bond" because they are completely non-porous. This is why they are the top choice for pantry organisation. If you're labelling stainless steel drink bottles, ensure they are uncoated. Some modern bottles have a "powder-coated" or "stone-like" finish that feels slightly rough. These textures create tiny air gaps under the transfer, which can lead to peeling. Always look for a smooth, shiny metal finish for the most durable results.
It's also worth checking the bottom of your plastic bins for a recycling symbol. Plastics like polypropylene (often marked with a '5' or 'PP') are known as low-surface-energy materials. They are designed to be "non-stick," which can sometimes make them resist even the strongest adhesives. If you're unsure, try a small test area first. Most high-quality storage bins from local NZ retailers work perfectly, but a quick check can save you a lot of frustration later.
Common Mistakes to Avoid During Application
The most common reason a transfer fails isn't the label itself; it's oily fingerprints. Even if your hands feel clean, natural oils can sit on the surface of a jar and prevent the adhesive from grabbing. This is why cleaning with isopropyl alcohol or warm, soapy water is a must. If you use soap, make sure it doesn't contain moisturisers, and dry the surface thoroughly with a lint-free cloth. Any moisture trapped under the transfer will cause it to bubble and lift once it gets warm.
You should also be wary of "micro-textures." Some plastic containers look smooth from a distance but have a very fine "frosted" feel. If you run your fingernail across it and it makes a sound, it's likely too textured for a permanent transfer. For a deep dive into the specific techniques we recommend, take a look at our guide on How to Apply UV DTF Decals for a Professional Finish. Taking those extra few minutes to prep your surface properly ensures your home organisation labels nz stay looking beautiful for years to come.
Standout Icon + Name Packs for Every Corner of the Home
Choosing the right set of home organisation labels nz depends on the scale of your project. For a sleek kitchen, the Classic Name Pack is our go-to. It offers a clean, minimalist look that makes your pantry feel like a high-end boutique. If you're tackling the garage or the kids' sports gear, the Mega Name Pack provides the larger, bolder text needed for heavy-duty storage bins. These larger transfers ensure you can see exactly what is inside a container even when it's tucked away on a high shelf.
Families with multiple children often find the Sibling Pack to be the most practical choice. It's a cost-effective way to get high-quality transfers for two children on a single sheet. This makes sorting out new school gear or kindy supplies much simpler. Beyond just names, we also offer specialty Allergy and Medical packs. These provide essential peace of mind for parents, ensuring that teachers and caregivers can quickly identify important health information on lunchboxes and drink bottles.
Personalised Icon + Name Packs: The Best-Seller
Our Personalised Icon + Name Packs are a favourite for New Zealand families because they combine function with a bit of personality. Each pack comes on a 140x200mm sheet and includes a variety of label sizes to fit everything from tiny snack pots to large drink bottles. You can choose from a range of themes like "Boho," "Transport," or "Nature" to match your child's interests. These icons aren't just for show; they help younger children identify their belongings before they can even read. It's a simple way to foster independence while keeping the "lost property" pile to a minimum.
Custom Branding for Small NZ Businesses
The same professional finish used for home organisation labels nz is also a brilliant solution for local entrepreneurs. If you run a small business in Auckland or beyond, you can use these transfers for product branding. The "no-background" look is particularly effective for glass candle jars, beauty products, and gift boxes. It gives your packaging a high-end, printed-on feel without the need for expensive machinery. We encourage local creators to explore our Logo Transfer service to see how these durable transfers can elevate their brand's presentation.
Ready to start your next sorting project? You can browse our full range of personalised name labels to find the perfect fit for your home.
Step-by-Step Success: How to Apply and Care for Your Transfers
Getting your home organisation labels nz perfectly placed is the final, most satisfying part of the project. Before you start, ensure your surface is spotless. We recommend cleaning the area with isopropyl alcohol or warm, soapy water to remove every trace of dust or invisible oils. Dry it thoroughly with a lint-free cloth. Any moisture left behind will prevent the adhesive from bonding properly, which is the most common cause of lifting later on.
Because these transfers are permanent, you'll want to "measure twice, stick once." Once the adhesive touches the surface, it starts to grab immediately. Take your time to align the text. You might even find it helpful to use a piece of masking tape as a temporary guide to ensure a perfectly straight line across your pantry jars. It's these small details that create that professional, high-end finish you're after.
Once positioned, apply the transfer and use a squeegee or firm thumb pressure to push out any air bubbles. Work from the centre outwards to ensure a smooth bond. When you're ready to peel, pull the carrier sheet back slowly at a low, sharp angle. If you notice any part of the design lifting with the sheet, simply lay it back down and rub firmly again before continuing. It's a methodical process that rewards a patient hand.
The Curing Countdown: 24 to 72 Hours
Patience is your best friend when it comes to longevity. While it's tempting to fill your jars or pack the lunchboxes immediately, give them 24 hours of resting time before normal handling. This initial window allows the bond to set without being disturbed. If you plan on washing the items, the wait is a bit longer. For maximum durability on drink bottles, allow 72 hours of curing time before exposing the label to a dishwasher cycle. This allows the transfer to reach its full strength, ensuring your hard work handles the rigours of daily Kiwi life.
Long-Term Maintenance Tips
Treat your labelled items with a bit of care to keep them looking fresh. While our transfers are resilient, hand-washing is always the gentlest option for any personalised item. If you do choose to use a dishwasher, always use the top rack and avoid the highest heat settings. It's also important to avoid using harsh abrasives, steel wool, or heavy scrubbing directly over the raised edges of the transfer. These simple maintenance steps will keep your home organisation labels nz looking crisp and professional for years to come.
Ready to organise your home? Shop our Icon + Name Packs today!
Ready to Transform Your Home?
Creating a calm, Pinterest-worthy space is finally within reach. By choosing the right home organisation labels nz families trust, you're not just tidying up; you're building a system that lasts. Remember that the secret to success lies in the details. Focus on smooth surfaces, take your time with the initial application, and respect that all-important 72-hour curing window before the first dishwasher cycle.
As an Auckland-based family business, we take pride in every premium UV DTF transfer we create. Our clean, no-background finish ensures your jars and lunchboxes look professionally printed rather than just stickered. If you're local, you can even choose our local pickup option to get started on your pantry or school gear sorting even sooner. We're here to help you turn the chaos of daily life into a beautifully coordinated home that works for everyone.
Are you feeling inspired to tackle that next cupboard? Browse our full range of Icon + Name Packs for your home and find the perfect style for your space. Happy organising!
Frequently Asked Questions
Are these labels permanently waterproof?
Our UV DTF transfers are highly water-resistant, but we don't claim they are permanently waterproof or indestructible. Their longevity depends on factors like the surface material and how well they were applied. While they handle splashes and washing beautifully, they aren't meant for constant submersion or harsh scrubbing. For the best results with your home organisation labels nz, always ensure the surface is bone-dry and clean before you start the application process.
Can I put my labelled drink bottles in the dishwasher?
You can put your labelled drink bottles in the dishwasher, but only after a full 72-hour curing period. This time allows the adhesive to form a strong bond with the surface. We always recommend using the top rack and avoiding heavy-duty or high-heat cycles. While the transfers are dishwasher-resistant, gentle hand-washing is the best way to keep the raised, no-background finish looking crisp and professional for as long as possible.
Will these labels work on my silicone lunchbox?
No, these transfers aren't suitable for silicone lunchboxes or other flexible, "rubbery" materials. Silicone has a non-stick surface that prevents the adhesive from grabbing properly. Additionally, because silicone is very flexible, any bending or stretching will cause the permanent transfer to lift or crack. For food storage, it's best to stick to hard plastics, glass, or stainless steel containers to ensure your organisation system stays looking its absolute best.
What is the difference between UV DTF and vinyl stickers?
The main difference is the finish and the application method. Traditional vinyl stickers often have a visible clear border or "halo" around the letters. UV DTF transfers have no background at all; only the ink stays on the surface. This creates a premium, 3D-like effect that looks like it was printed directly onto your jars. They are also generally more durable and scratch-resistant than standard vinyl for daily household use.
How long do I need to wait before using my labelled items?
We recommend waiting at least 24 hours before you start using your newly labelled items for normal handling. This gives the transfer enough time to settle. If you plan on washing the items or putting them in the dishwasher, you must wait a full 72 hours. Following this curing countdown is essential for ensuring the adhesive bonds correctly to your containers, especially for high-use items like school lunchboxes and drink bottles.
Can I remove the labels if I change my mind later?
Yes, you can remove them, though they are designed to be a permanent organisation solution. Unlike traditional stickers that often leave a sticky, messy residue, these transfers can usually be lifted by catching an edge with your fingernail and peeling them back. For stubborn bits on glass, a little bit of warm water or a gentle scraper can help. They won't come off easily by accident, but they won't ruin your containers either.
Do you offer local pickup in Auckland?
We certainly do. As an Auckland-based family business, we love offering local pickup for our customers. It's a great way to save on shipping costs and get your hands on your new home organisation labels nz even faster. Once your order is ready, we'll send you all the details you need to collect your items. If you aren't in Auckland, don't worry; we offer national shipping to every corner of New Zealand.
What surfaces are best for home organisation labels?
The best surfaces are hard, smooth, and non-porous. Glass jars, acrylic bins, and stainless steel drink bottles provide the strongest bond for UV DTF transfers. You'll want to avoid anything with a heavy texture, "frosted" finish, or fabric coating. Always check that the area is flat rather than curved in multiple directions. A smooth, clean surface ensures your labels look professional and stay in place through the rigours of a busy household.
