

UV DTF vs Vinyl Stickers: What’s the Difference?
Is there anything more annoying than a "waterproof" label that starts peeling after its first trip through the dishwasher? It is incredibly frustrating when you spend time and money on labels that fade in the harsh NZ sun or lift at the edges. You want your gear to look professional and organised, not messy and cheap. We all know the struggle of finding labels that actually survive the daily grind of kindy or the office.
Finding truly permanent decals for hard surfaces NZ families and business owners can trust shouldn't be a guessing game. This guide will show you how to choose and apply decals that actually stay put on your hardest-working gear without the usual fading. Whether you are labelling drink bottles for school or branding products for your small business, getting a durable finish is the goal.
We are going to explore the real differences between traditional vinyl stickers and the premium finish of UV DTF transfers. You will learn about durability, application tips, and how to achieve that sleek, "printed-on" look that stands up to daily use while looking like it was part of the original design.
Key Takeaways
- Understand the difference between traditional vinyl and UV DTF, focusing on the sleek, no-background finish that looks like it was printed directly onto your gear.
- Learn how to choose the right permanent decals for hard surfaces NZ conditions by matching the material to the specific needs of your lunchboxes and drink bottles.
- Discover the essential application steps and curing times needed to help your labels stay put through daily use and regular cleaning.
- Identify which materials, such as glass and stainless steel, provide the best bond for a professional, long-lasting result.
- Find out how to achieve high-quality branding or personalised gear without the peeling edges or fading common with standard adhesive stickers.
What Makes a Decal Truly Permanent on Hard Surfaces?
Defining permanence isn't just about how long a label lasts on a shelf. It's about how it handles your daily routine. In New Zealand, we ask a lot of our gear. A drink bottle might sit in a hot car, go through a high-temperature dishwasher cycle, and then get tossed into a sandy bag at the beach. When we talk about permanent decals for hard surfaces NZ families can rely on, we mean a bond that doesn't give up when things get tough.
Most people don't realise there's a huge difference between adhesive types. Removable adhesives are designed for temporary window displays or phone skins. Long-term adhesives might last a year on a laptop. Truly permanent options are meant to stay put for the life of the product. Surface tension also plays a massive role. Metals and glass have high surface energy, making them easy for adhesives to "grip." Some plastics are "low energy," which is why cheap stickers often slide right off them. This is where modern transfer technology changes the rules for personalised name labels.
The Science of Adhesion
Traditional stickers often fail because of their edges. Every sticker has a thickness, and that tiny raised edge is a magnet for friction. Over time, dust and oils from your hands get under the adhesive. Once that bond is broken at the corner, the rest of the label eventually peels away. UV DTF is a cured-ink transfer method where the design is printed with specialised inks and cured with ultraviolet light before being transferred to a surface. Because there's no thick plastic carrier film left behind, there's no edge for your fingernail or a dishcloth to catch on. The design becomes part of the surface rather than something sitting on top of it.
NZ Conditions and Durability
Our environment is uniquely challenging for any printed product. The high UV levels in New Zealand cause standard inks to fade or become brittle in just a few months. Temperature fluctuations also cause materials like stainless steel or plastic to expand and contract. This movement can crack standard vinyl stickers. Permanent decals for hard surfaces NZ must be flexible enough to move with the material.
- The Sun: UV-cured inks are chemically altered by light during production, making them much more resistant to fading.
- The Kitchen: While no decal is truly "indestructible," a well-applied transfer can handle the top rack of the dishwasher once it has properly cured.
- The Playground: Scratch resistance is vital for lunchboxes that spend their time being shoved into school bags.
Durability always depends on the surface being clean and the application being done correctly. If you take the time to prep the surface, these transfers offer a professional finish that stands up to the kiwi lifestyle far better than paper or basic vinyl ever could.
Understanding UV DTF: The New Standard for Permanent Decals
UV DTF stands for Direct to Film, but you can think of it as a high-tech transfer that skips the bulky carrier of a traditional sticker. Instead of a design printed on a piece of plastic that you then stick down, this process uses specialised inks and a varnish layer. These are cured instantly by ultraviolet light during the printing process. The result is a vibrant, slightly raised design that feels like it was printed directly onto your item.
This technology provides a tactile, premium feel that you just don't get with paper or vinyl. When you run your thumb over the design, you can feel the slight 3D texture. It is a subtle detail that makes your gear look like a custom-made product rather than something with a label slapped on. For anyone looking for permanent decals for hard surfaces NZ wide, this professional finish is the gold standard.
The "No-Background" Advantage
One of the biggest frustrations with standard labels is the border. Even clear stickers have a visible edge that catches the light. Over time, that sticky edge acts like a magnet for lint from school bags or crumbs from lunchboxes. It doesn't take long for a beautiful label to look grubby around the perimeter. UV DTF transfers don't have this problem because there is no background film. Only the ink and the varnish transfer to your surface.
This "floating" design allows the original colour and texture of your drink bottle or storage bin to show through between the letters or icons. It creates a clean, sophisticated look that is perfect for everything from organising your pantry to branding your small business products. If you want to see how this looks in practice, you might like to browse our personalised name labels to see the variety of designs available.
Industrial Strength for Home Use
Before it became popular for personalised gifts, UV DTF was a staple in industrial branding. It was designed to stay put on tools, machinery, and commercial equipment. We have taken that same heavy-duty technology and applied it to household items. The secret is the UV curing process, which creates a tough, scratch-resistant surface. The final varnish layer acts as a shield against the elements, protecting the ink from moisture and chemicals.
While standard stickers might peel if they get too warm or rub against other items, these transfers are built to endure. They are tough enough for the playground but look elegant enough for a wedding gift. It is the perfect balance of beauty and brawn for your hardest-working gear. Because the ink is chemically bonded during the curing phase, it is much harder to shift than traditional adhesive-backed paper.
UV DTF vs. Traditional Vinyl: Which is Truly Permanent?
Choosing between these two options often comes down to how much work you expect the item to do. Vinyl stickers are a classic peel-and-stick choice. They are great for flat surfaces like laptops where they won't be handled constantly or washed. However, when you need permanent decals for hard surfaces NZ families use daily, the pressure-transfer method of UV DTF offers a much higher level of resilience. The way the design bonds to the item is fundamentally different from a standard adhesive sticker.
The aesthetic difference is also quite striking. Vinyl always has that "plastic film" look because the design is printed on a carrier sheet. UV DTF has a "raised ink" feel that mimics professional screen printing. It looks expensive and bespoke. If you are branding products or labelling high-end drink bottles, the difference in quality is obvious immediately. One looks like a label; the other looks like it was manufactured that way.
The Peeling Problem
We have all seen it. A few weeks into the school term, the corners of name labels start to curl and turn grey with lint. This happens because vinyl is a physical layer sitting on top of the surface. Every time a drink bottle is pulled out of a bag, that edge is vulnerable. UV DTF transfers eliminate this "edge" problem because there is no clear background film. There is nothing for a stray thread or a fingernail to catch on. This is why they are the preferred choice for items that get a lot of heavy use, like lunchboxes or sports gear.
It is incredibly frustrating to buy "waterproof" labels only to have them slide off the first time they get warm. Traditional vinyl relies on a layer of glue that can soften with heat or moisture. Because UV DTF uses cured ink that is transferred under pressure, the bond is much more stable. It doesn't have a thick paper or plastic backing that can soak up water and pull the design away from the surface.
Application Versatility
Vinyl can be tricky on curved or tapered surfaces. If you aren't careful, you end up with tiny wrinkles or bubbles that eventually lead to peeling. These gaps allow moisture to get under the adhesive, ruining the bond. Transfers are much more forgiving. They mould to the contours of your item, making them perfect for rounded lunchboxes or bike helmets. While vinyl adhesive bonds almost instantly, UV DTF transfers require a curing period of 24 to 48 hours to reach their maximum strength on the surface.
Investing in quality means you do the job once. While vinyl might be cheaper for a bulk pack, the cost of replacing peeling labels every few months adds up. For permanent decals for hard surfaces NZ wide, choosing the right technology from the start saves both time and money. You get a professional, long-lasting result that keeps your gear looking organised and tidy for much longer than a standard sticker ever could.
Best Hard Surfaces for Permanent Decals and How to Apply Them
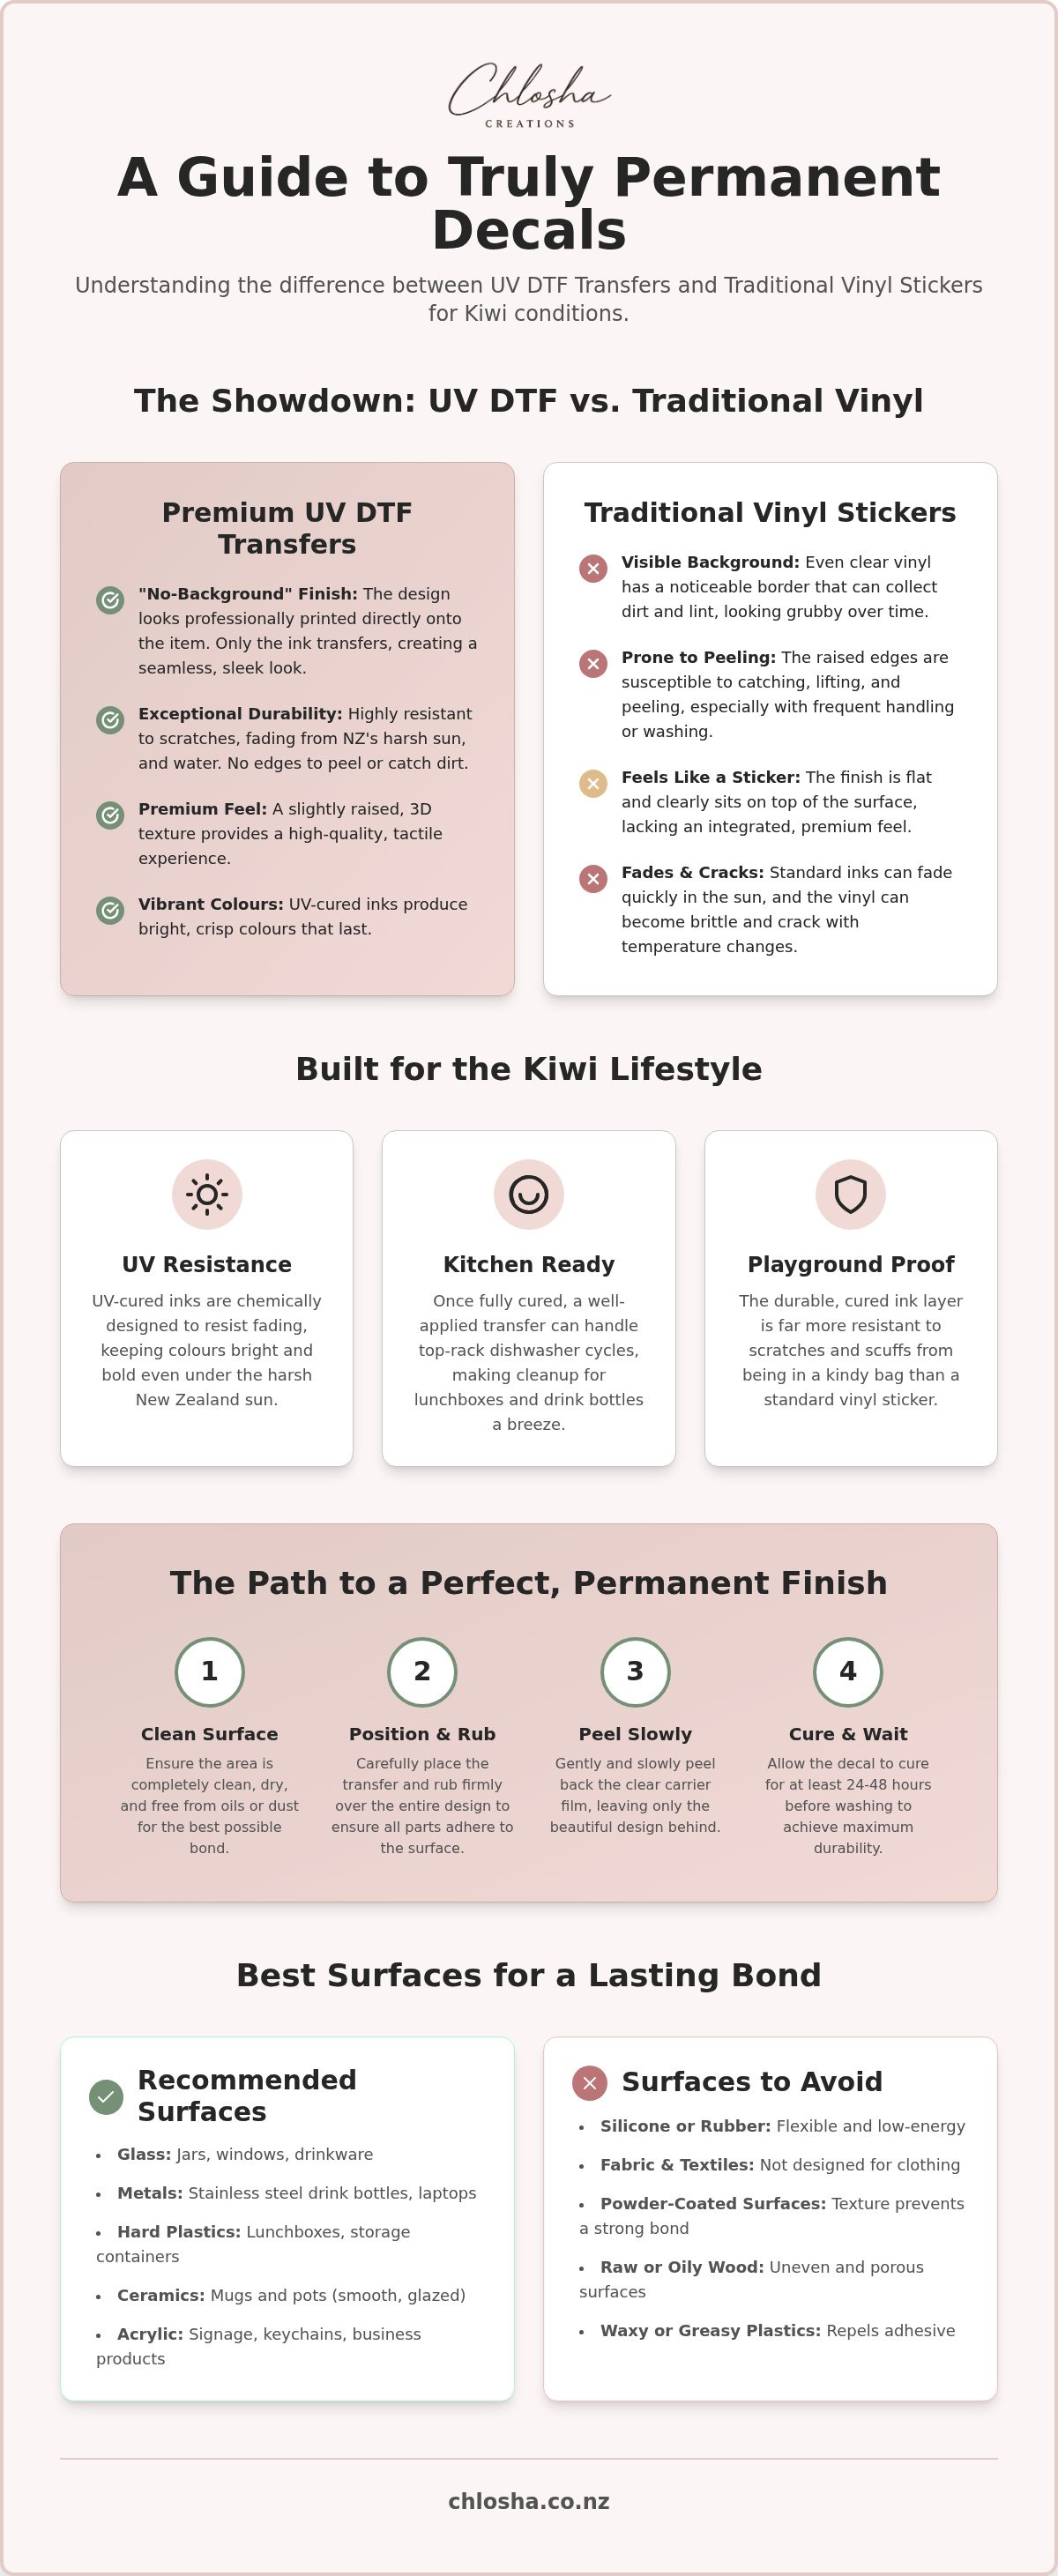
Choosing the right surface is just as important as choosing the right decal technology. For permanent decals for hard surfaces NZ weather and daily use won't wear down, you need a smooth, non-porous base. Glass, stainless steel, and hard plastics are the absolute best candidates. Think of your favourite glass pantry jars, stainless steel drink bottles, or those sturdy lunchboxes the kids take to kindy. These materials allow the transfer to create a tight, lasting bond that looks like it was part of the original product.
However, not every surface is a winner. You should avoid silicone, as its "non-stick" nature prevents almost any adhesive from grabbing hold. Similarly, highly textured or "soft-touch" matte coatings, specifically the ones that feel slightly rubbery or velvety, are prone to lifting. Fabric is also a no-go; these transfers are strictly designed for the hard stuff. If you are unsure if your item will work, a quick test on a hidden spot is always a good idea before you commit to the full design.
Surface Preparation Checklist
A professional finish starts with a clean slate. Even if a bottle looks clean, it likely has invisible oils from your hands or residue from the manufacturing process. Follow these steps for the best results:
- Clean: Wipe the area thoroughly with isopropyl alcohol to strip away oils and fingerprints. Avoid using window cleaners, as they often leave a film behind.
- Dry: Ensure the surface is 100% dry. Moisture is the enemy of a strong bond.
- Temperature: Apply at room temperature. Never apply decals to a cold bottle straight from the fridge or a damp one fresh from the dishwasher.
The Perfect Application Technique
Applying UV DTF transfers is a one-shot deal. Because the bond is so strong, you can't reposition them once they touch the surface. Take your time to align the design carefully before you let it make contact. Once you are happy with the placement, press it down firmly. Use a credit card or a small squeegee to rub over the entire design. Work from the centre outwards to the edges to push out any trapped air.
The final step is the most satisfying: the peel. Don't rip it off like a plaster. Instead, use a "slow peel" technique, pulling the carrier sheet back flat against itself. If any part of the design stays on the film, simply lay it back down, rub it firmly again, and continue. Once applied, let the design cure for at least 24 hours before getting it wet or washing it. Ready to get started? You can find your perfect set of personalised name labels in our shop today.
Organise Your Life with Chlosha’s Premium UV DTF Decals
At Chlosha Creations, we know that life in New Zealand is busy and often a bit messy. You need labelling solutions that work the first time and stay working. We specialise in high-quality permanent decals for hard surfaces NZ families can trust to stay put through the daily grind. Based in Auckland, we take personal pride in every transfer we produce. We ensure your gear looks professional from the first day of kindy through to the end of the school year. Our UV DTF technology provides that clean, no-background finish that makes your items look bespoke rather than just labelled.
Getting started is easy and fun. You can choose from our wide range of personalised name labels or even order DIY decal sheets to bring your own creative projects to life. We ship nationwide, so professional-grade transfers are available whether you are in Invercargill or Northland. It is about providing a local, reliable service that understands the practical needs of Kiwi households and small businesses alike.
Personalisation That Lasts
Every child has a unique personality. Their gear should reflect that. Our labels allow you to choose fonts and colours that your little ones will actually love. It is not just about the aesthetic, though. These transfers are a firm favourite for lunchboxes and sports gear because they handle the rough and tumble of the playground. They are perfect for drink bottles, helmets, and even the hardest-wearing scooter frames. Because they don't have a clear border, they look like part of the original item. This makes it much easier for teachers and coaches to identify gear quickly. Once applied and cured, they offer a "set and forget" durability that takes one more thing off your mental load as a parent. No more hunting through the school lost property bin for a bottle with a half-peeled sticker.
Branding for Small Business
For Kiwi entrepreneurs, first impressions are everything. You don't need a massive budget or huge setup costs to get a professional look for your products. Our custom business logo transfers allow you to elevate your packaging with a sleek, printed-on feel that standard stickers simply cannot match. It is the perfect solution for small batches. You can test new designs or offer limited editions without the bulk of traditional printing methods. By using our custom transfers, you avoid the messy look of clear sticker edges on your premium products. This helps your brand stand out in a crowded market. You can achieve a professional aesthetic on everything from honey jars and candle tins to cosmetic containers and gift boxes.
Ready to upgrade your gear? Explore Chlosha’s range of permanent decals today and see the difference that premium UV DTF technology can make for your home or business.
Ready for a Professional, Long-Lasting Finish?
Choosing the right labelling method doesn't have to be a headache. While traditional vinyl has its place, the sleek "printed-on" look and resilience of UV DTF transfers offer a clear advantage for items that work hard. By removing clear backgrounds and sticky edges, these transfers avoid the common peeling problems that plague standard stickers. It is the smartest way to ensure your gear stays organised and looking sharp through every school term or business cycle.
As a proudly NZ owned and operated business, we use high-quality UV DTF technology to create permanent decals for hard surfaces NZ families can rely on. We have tested our transfers on everything from lunchboxes to drink bottles to ensure they stand up to the unique kiwi lifestyle. You can feel confident that your personalised designs are built to endure. Our Auckland-based team is dedicated to providing a finish that looks professional and stays put.
If you are ready to stop wasting money on labels that fail, shop our range of durable, no-peel decals for school and business. We look forward to helping you get organised with a finish that actually lasts. Your gear deserves a label as hard-working as you are.
Frequently Asked Questions
Are these permanent decals really dishwasher safe?
Our UV DTF decals are generally dishwasher safe when applied to non-porous surfaces like glass or stainless steel. For the best results, we recommend placing your items on the top rack only and avoiding high-heat "heavy duty" cycles. It is vital to let the decal cure for at least 24 hours before the first wash. This ensures the bond has reached its maximum strength on your gear.
Can I use permanent decals on my car window or bumper?
You can certainly use them on car windows or hard bumper surfaces. These permanent decals for hard surfaces NZ drivers use are resistant to fading and rain. However, keep in mind they are designed for smaller applications. For large vehicle wraps, traditional vinyl is still the industry standard. For a small logo or a personalised touch on your rear window, these transfers provide a clean finish.
How do I remove a permanent UV DTF decal if I need to?
While they are designed to be permanent, you can remove them with a bit of patience. Gently heating the design with a hairdryer can soften the bond, allowing you to scrape it away with a plastic edge or your fingernail. Any remaining sticky residue can usually be cleaned off with eucalyptus oil or a dedicated adhesive remover. Be careful not to scratch the underlying surface during this process.
What is the difference between a sticker and a transfer?
A traditional sticker is a design printed onto a piece of adhesive paper or plastic film. When you apply it, you are sticking down the entire piece of material. A transfer, like our UV DTF decals, only moves the ink and a protective varnish layer onto your item. This leaves you with a "no-background" look that feels like it was printed directly onto the surface of your lunchboxes.
Will these decals stay on my child’s school drink bottle all year?
These decals are built to last the distance of a busy school year. When applied to a clean, dry surface and given time to cure, they handle the daily friction of being pulled in and out of bags. While no label is truly indestructible, our UV DTF technology is much more resistant to the peeling and fading often seen with standard school name labels used at kindy.
Can I apply these decals to curved surfaces like mugs?
Yes, these transfers are incredibly flexible and mould well to curved surfaces. They are a fantastic choice for ceramic mugs, rounded lunchboxes, or tapered drink bottles. Just be sure to apply firm pressure from the centre outwards to avoid any air bubbles. Because there is no thick plastic film, the design sits flush against the curve, creating a smooth and professional result every single time.
Do you offer custom designs for small businesses in NZ?
We absolutely do. We love supporting other local entrepreneurs by providing custom business logo transfers. These are perfect for branding your product packaging or creating professional merchandise without the need for large minimum orders. It is a cost-effective way to get a high-end, "printed-on" finish for your brand. Simply get in touch with us to discuss your specific design requirements and your preferred quantities.
What happens if I make a mistake during application?
Because the adhesive on these transfers is so strong, they are generally a one-shot application. You won't be able to peel it off and reposition it once it has touched the surface. We recommend taking your time to align the design perfectly before making contact. If a mistake does happen, you will likely need to remove the decal entirely and start fresh with a new one to maintain quality.
