

Apply UV DTF Decals: Guide for a Professional Finish
Have you ever spent an entire evening carefully labelling your child's new drink bottles only to watch the edges curl up after the very first wash? It is incredibly frustrating to see your hard work and money peel away before the school term even properly starts. We understand you want labels that don't just stay put but actually look like they were part of the original design. Unlike standard vinyl stickers that often leave a visible film or a clear border, learning how to apply UV DTF decals correctly gives you a sleek, raised finish with absolutely no background. It is the best way to get that high-end, "printed-on" look for everything from lunchboxes to kindy gear.
We have tested these transfers in the real world of busy Auckland households to ensure they can handle the daily grind. This guide walks you through the essential steps to master the application process like a professional. You will learn the importance of proper surface prep, the "low and slow" peeling technique, and the critical curing times needed for the best possible results. We are here to help you move past the confusion of bubbles and peeling. By following these practical steps, you can personalise your items with confidence, knowing they are ready to tackle the year ahead.
Key Takeaways
- Understand how the raised 3D effect and no-background finish create a professional, printed-on look for your gear.
- Identify the best surfaces for adhesion and why proper cleaning with isopropyl alcohol is essential for a bond that lasts.
- Follow our parent-tested guide on how to apply UV DTF decals correctly to avoid bubbles and ensure a smooth finish.
- Learn the specific curing times required before handling or washing your items to maximise the life of your decals.
- Find out how to select the perfect decal size for different school supplies or custom branding needs.
What Makes UV DTF Decals Different from Standard Stickers?
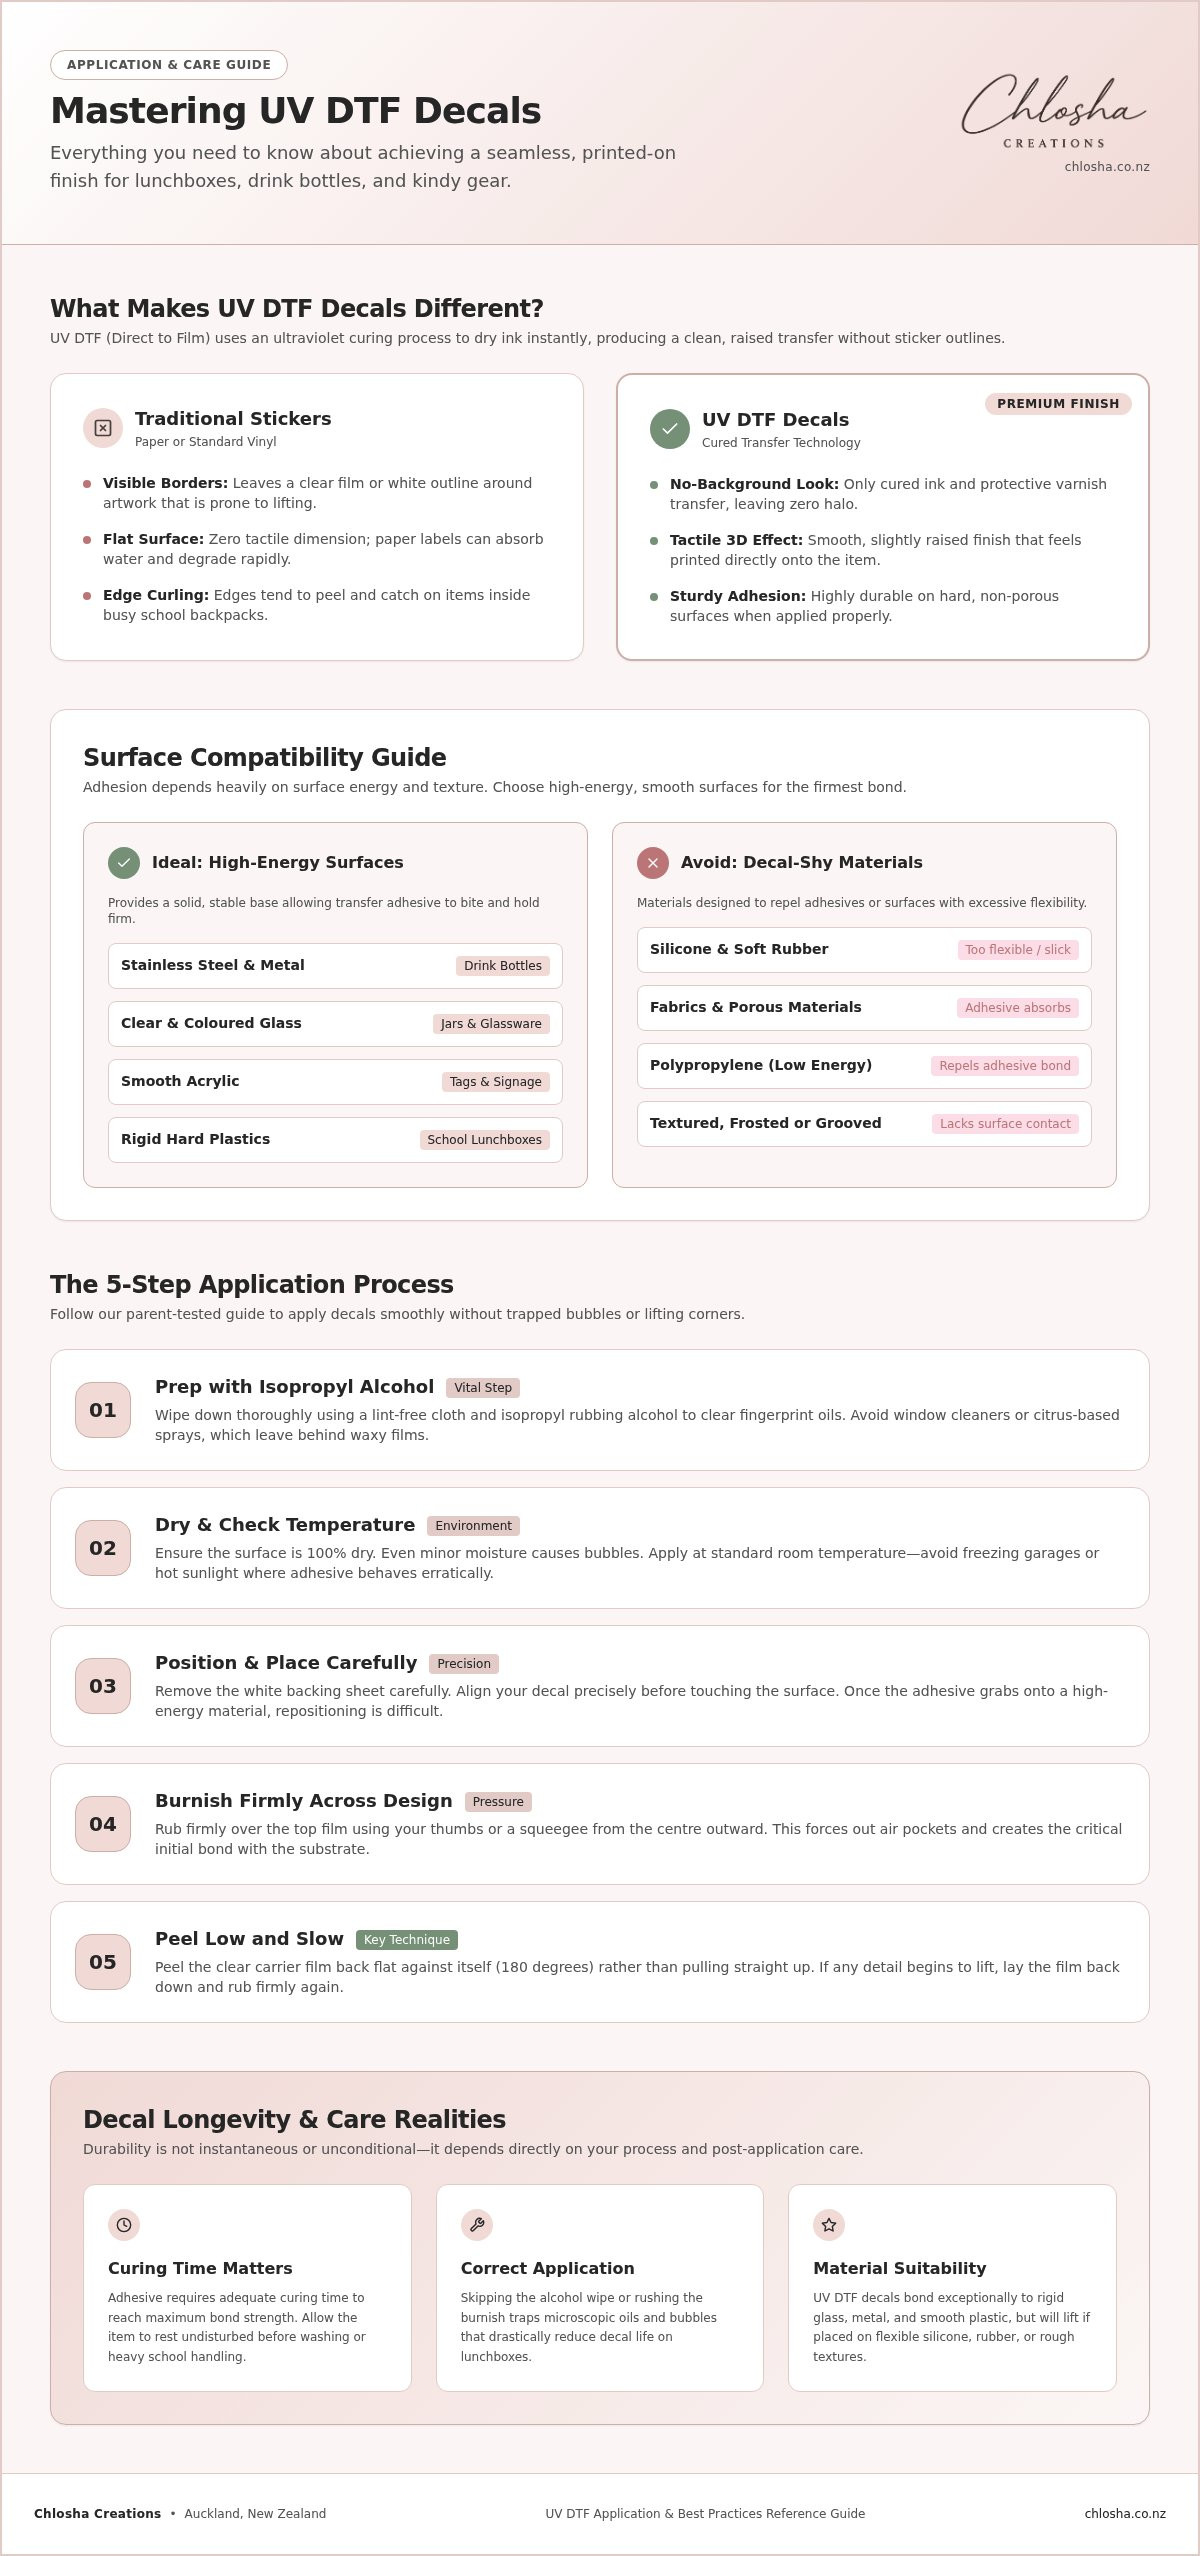
UV DTF stands for Direct to Film. This technology uses a specialised ultraviolet curing process to dry the ink instantly as it is printed. This creates a hard, durable finish that is quite different from your average sticker. While standard stickers are printed on paper or vinyl sheets, UV DTF transfers only leave the ink and a protective varnish behind. This means you get a "no-background" look. It looks like the design was printed directly onto your drink bottles or lunchboxes.
The most striking difference is the texture. UV DTF decals have a smooth, slightly raised 3D effect. You can feel the design with your fingertips. Traditional vinyl stickers often have a clear or white border around the edge; this can be a bit of a giveaway. With these transfers, there is no halo or film visible. It's just the crisp artwork. Knowing how to apply UV DTF decals correctly ensures this professional look stays intact without any lifting edges.
The Benefits of Using UV DTF Transfers
Parents love these because they offer superior durability on hard surfaces. Unlike paper labels that get soggy and peel, these are built to last through the school term. They're perfect for personalised name labels because they can handle being shoved in and out of backpacks. The professional aesthetic also makes them a top choice for small business branding. Whether it's glass, metal, or hard plastics, the finish remains sleek and high-end.
Why Application Technique Matters
Because this is a transfer process rather than a simple peel-and-stick sticker, the technique you use is vital. UV DTF relies on a specific carrier film to move the ink onto your item. If you rush, you might end up with air bubbles or edges that haven't bonded properly. UV DTF is a premium transfer technology that requires a specific two-step application process to achieve its signature 3D finish. Learning how to apply UV DTF decals correctly is the secret to making sure your gear looks amazing and stays that way.
Preparing Your Surface for Maximum Adhesion
Getting the prep right is the most important step in learning how to apply UV DTF decals correctly. Think of it like painting a fence; you wouldn't just slap paint over old moss and expect it to stay. These premium transfers need a high-energy, non-porous surface to grab onto. Glass, stainless steel metal, acrylic, and hard plastics are your best friends here. They provide a solid, stable base that allows the adhesive to bite and hold firm over time.
On the other hand, some materials are naturally "decal-shy." Silicone and rubber are too flexible and slippery for a permanent bond. Fabric is porous, so the adhesive just gets lost in the fibres. You also want to watch out for "low-surface-energy" plastics like polypropylene, which is often used for cheaper lunchboxes. These materials are designed to repel things, which makes the interfacial adhesion dynamics quite tricky. If the bond between the ink and your item isn't stronger than the bond between the ink and the carrier film, the design will just lift right back off when you peel. Choosing the right surface from the start saves a lot of heartache later.
The Best Cleaning Methods
Before you even touch your decal, you need to clear the way. Fingerprints are surprisingly oily and can create a microscopic barrier that ruins your work. We recommend using a lint-free cloth and isopropyl alcohol (rubbing alcohol) to wipe down the area thoroughly. Don't use standard window cleaners or citrus-based sprays. Many of these leave behind a waxy residue or a "moisturising" film that stops the adhesive from sticking. Make sure the surface is 100% dry. Even a tiny bit of moisture can trap bubbles and lead to peeling before the school term even begins.
Surface Selection Checklist
Texture is the enemy of a smooth, professional finish. If your drink bottle has a grainy, "frosted," or grooved feel, the decal might only be touching the tiny peaks of that texture. You want a surface that is as smooth as possible for maximum contact. Temperature plays a big role too. If you're working in a cold garage or if the item has been sitting in the hot Auckland sun, the adhesive might not behave. Aim for room temperature. It's the "Goldilocks" zone for getting that initial tack just right. If you're ready to start your next organising project, our personalised name labels are an excellent way to practice these prep steps on your family's gear.
Step-by-Step Guide: How to Apply UV DTF Decals Correctly
Learning how to apply UV DTF decals correctly is all about patience and pressure. Applying your new decals is the exciting part where your gear finally gets its personalised glow-up. Because the adhesive is incredibly strong, you really want to get it right the first time. We call it the "measure twice, stick once" rule. It's often helpful to have a second pair of eyes to check the alignment before you make contact. Once the design touches the surface, it's there to stay.
Positioning and Initial Placement
Start by carefully peeling the thick white backing paper away from the clear transfer film. You'll see the design stuck to the clear sheet. Hold the edges of this film and hover it over your item. Take your time to align it perfectly. Look at it from a few different angles; it's easy to get it slightly wonky if you only look from the top. Once you're happy, let the centre of the decal touch the surface first. This helps prevent air being trapped in the middle.
The Squeegee and Peel Process
Once you've committed and pressed the film down, it's time to bond it. Use a squeegee or even a plastic credit card to work from the centre outward. This pushes any tiny air bubbles to the edge. You need to apply firm, even pressure across every single part of the design. This ensures the ink, which has been through a professional ultraviolet curing process to become a durable solid, fully grips your item. Now comes the most satisfying part. Start at one corner and peel the clear carrier sheet back slowly. This is a key part of how to apply UV DTF decals correctly.
Finishing Touches
Keep a close eye on the design as you peel. Do this at a 180-degree angle, keeping the film flat against itself as you pull. If any part of the design lifts with the film, just stop. Lay the film back down and rub that spot firmly again with your squeegee or thumb. The low-angle peel is the most critical step for a clean transfer. Once the film is completely off, give the edges a final press with your thumb to make sure everything is sealed. If you're working on a tricky curved surface like a tapered drink bottle, a quick blast with a hair dryer on a low setting can help the decal conform to the shape beautifully.
Curing and Care: Making Your Decals Last
You've done the hard work. The design is straight, the bubbles are gone, and your gear looks fantastic. It's tempting to throw your lunchboxes straight into the school bag or fill up your drink bottles for a hike immediately. However, the secret to longevity isn't just about how to apply UV DTF decals correctly; it's about what happens next. The adhesive goes through a settling phase where it forms a deeper bond with the surface. If you rush this, you risk the edges lifting prematurely before they've had a chance to fully grip.
Curing Windows Explained
Think of the curing process in stages. The initial bond happens within minutes, which is why the decal stays put when you peel the film. But for a full set, you should wait at least 24 hours before the item leaves the house for normal daily handling. If you are planning to wash the item, the 72-hour rule is your best friend. Waiting three full days before any exposure to water or temperature changes allows the adhesive to reach its maximum strength. A cured decal will feel like a solid part of the item itself, whereas one that is still setting might feel slightly "soft" if you were to catch it with a fingernail. Taking this extra time is a vital part of how to apply UV DTF decals correctly for a professional result.
Daily Care Tips
While these transfers are incredibly tough, they aren't indestructible. To keep that beautiful 3D finish looking sharp, gentle hand-washing is always the safest method. Use a soft cloth or the soft side of a sponge. Abrasive green scrubbers or steel wool will scratch the protective UV varnish and dull the colours over time. It's also wise to avoid harsh chemicals or citrus-based dish soaps, as these can slowly break down the adhesive bond. While many items might survive a dishwasher cycle after the 72-hour mark, we always recommend hand-washing to preserve the life of the design.
Soaking is another habit to avoid. Leaving your personalised gear in a sink of hot water for hours can soften the bond, especially on tricky curved surfaces. Heat is a major factor in Auckland summers, so try not to leave decorated items on a hot car dashboard. High temperatures can cause materials to expand and contract, which might stress the decal. By following these simple care steps, your gear will be ready for the busiest school term. Ready to start your next project? Explore our range of personalised name labels to find the perfect match for your family's gear.
Choosing the Right UV DTF Decals for Your Project
Finding the right decal for your project is about more than just picking a pretty design. You need to think about the physical space you're working with. A large, intricate logo might look stunning on a flat lunchbox lid but could be a challenge to wrap around a thin pencil. Matching the decal size to your item is the first step in ensuring a professional finish. When you know how to apply UV DTF decals correctly, the size and shape of the design play a huge role in how easily the transfer bonds to the surface. A well-sized decal will sit flat and stay secure for much longer than one that is too large for its base.
Our premium NZ-made transfers offer a level of reliability that generic stickers simply cannot match. Because we produce these locally, we ensure every sheet meets high standards of craftsmanship. These transfers are designed to handle the daily grind of New Zealand life. Whether it is a drink bottle sitting in a hot car or a lunchbox being scrubbed after school, the raised 3D effect and no-background finish stay looking sharp. Choosing a local creator also means you are getting a product tailored for our families and small businesses.
Personalisation for Families
For parents getting ready for the new school term, personalised name labels NZ are a total lifesaver. They help keep track of everything from drink bottles to cricket bats. If you have younger children in kindy, personalised icon name labels nz add a fun, visual element that helps them recognise their gear before they can even read their own name. You can even use them on sports gear, helmets, and scooters. These items take a lot of knocks, so having a durable finish that doesn't peel off after one weekend at the park is a huge advantage. It makes identifying lost gear in the school "lost property" bin much faster too.
Professional Branding for Small Businesses
Small business owners are also discovering the magic of these transfers for their packaging. Using UV DTF for custom logo transfers on glass jars, candle tins, or gift boxes gives you that high-end "printed-on" look without the massive upfront costs of screen printing. It is a brilliant way to build a cohesive brand. By using branding decals for small business, you can ensure every product leaving your studio looks professional and polished. The no-background finish is particularly effective here. It allows the colour and texture of your packaging to show through around the design. This creates a seamless look that suggests quality and attention to detail. Once you have picked your perfect design and size, simply follow our steps on how to apply UV DTF decals correctly to achieve that professional finish that sets your gear apart.
Ready to Personalise Your Gear with Confidence?
Mastering how to apply UV DTF decals correctly is the key to achieving a professional finish that lasts through the busiest school term. By focusing on thorough surface preparation and using the "low-angle" peeling technique, you ensure your designs bond perfectly without any bubbles or lifting. Remember to respect the curing times; 24 hours for daily use and 72 hours for washing; to give the adhesive the best possible start. These simple steps turn standard items into custom masterpieces with a sleek, no-background finish and a premium raised 3D effect.
We take pride in our NZ-made quality and love helping Kiwi families and makers create items they're proud to carry. Whether you're labelling school lunchboxes or branding your own small business products, these transfers offer a level of durability and style that really stands out. You're now equipped with the expert tips needed for a flawless finish every time. If you're ready to start your next project, browse our range of premium UV DTF labels and decals at Chlosha Creations and see the difference for yourself. Happy sticking!
Frequently Asked Questions
Are UV DTF decals dishwasher safe?
UV DTF decals can withstand dishwasher exposure after a 72-hour curing period, provided the underlying item is also dishwasher-safe. However, we always recommend gentle hand-washing to preserve the 3D finish and ensure your labels look their best for as long as possible. High heat and harsh detergents in some machines can eventually degrade the bond. Taking care during the initial set is part of learning how to apply UV DTF decals correctly for lasting results.
Can I apply these decals to silicone drink bottles?
No, UV DTF transfers are not suitable for silicone, rubber, or soft, flexible plastics. These materials have a "low-surface-energy" that prevents the adhesive from forming a permanent bond. The decals require a smooth, hard surface like glass, metal, or rigid plastic to stay put. If you try to personalise a silicone bottle, these transfers will likely peel off almost immediately because the material naturally repels the adhesive used in this technology.
What should I do if my decal has air bubbles after application?
If you notice air bubbles, the best approach is to use a squeegee or a plastic credit card to firmly push the air toward the nearest edge. It's much easier to prevent bubbles by working from the centre outward during the initial application. If a bubble is trapped after the carrier film is removed, you can sometimes gently press it out with your thumb, but being precise during the "measure twice, stick once" phase is the best prevention.
How long do I need to wait before using my labelled item?
You should wait approximately 24 hours before using your newly labelled item for normal daily handling. This gives the adhesive enough time to form a strong initial bond with the surface. If the item needs to be washed, it is essential to wait at least 72 hours. This extended window allows the transfer to fully cure and reach its maximum durability. Rushing this process is a common mistake when learning how to apply UV DTF decals correctly.
Will UV DTF decals work on powder-coated metal bottles?
UV DTF decals work beautifully on smooth metal bottles, but they can struggle with heavily textured or "grainy" powder coatings. For the best result, the surface needs to be as smooth as possible to ensure maximum contact between the adhesive and the bottle. If your powder-coated item has a very fine, smooth finish, the decal should bond well, but always ensure you have cleaned the area thoroughly with isopropyl alcohol first to remove any oils or fingerprints.
How do I remove a UV DTF decal if I change my mind?
To remove a decal, you can usually peel it off by catching an edge with your fingernail or a plastic scraper. If the bond is particularly strong, gently warming the design with a hair dryer on a low setting can help soften the adhesive. Once the decal is removed, any remaining residue can be cleaned away with isopropyl alcohol or a mild adhesive remover. These transfers are designed for durability, so they won't just fall off on their own over time.
Can these decals be used on clothing or fabric?
No, these transfers are designed strictly for hard, non-porous surfaces and will not work on clothing or fabric. Because UV DTF technology relies on a hard-cured ink and a specific adhesive for rigid items, it cannot flex with textiles or survive a laundry cycle. For school uniforms or kindy bags, you would need a different type of label. Our transfers are perfect for lunchboxes, drink bottles, and stationery but should never be applied to fabric items.
Why is my decal lifting when I peel the clear film?
If the design lifts during the peeling process, it usually means the adhesive hasn't fully bonded yet or the surface wasn't clean. Simply lay the clear film back down and rub the area firmly with your squeegee or thumb. Ensure you are peeling the carrier sheet back at a very low, flat angle, almost 180 degrees against itself. This technique is a vital part of how to apply UV DTF decals correctly to ensure the ink stays on the item.
