

Removing UV DTF Transfers: Guide for Personalised Gear
Ever looked at your child’s drink bottle and wished you could swap that "Kindy" label for something a bit more "Big School"? Learning how to remove UV DTF transfers is the secret to keeping your personalised gear fresh as your family's needs change. While these decals are famous for their tough, "no-background" finish, there comes a time when you might want a clean slate for a new design.
We understand the hesitation. Nobody wants to ruin an expensive stainless steel bottle or a favourite lunchbox with deep scratches or a layer of stubborn, grey adhesive. It is frustrating when a simple update turns into a messy chore. You want a process that is quick, effective, and leaves the surface looking brand new.
In this guide, you will learn the most reliable methods for removing transfers from hard surfaces without causing damage. We will cover the best tools to use, how to apply gentle heat safely, and which household solvents actually work on sticky residue. By the end, your gear will be smooth, clean, and ready for its next look.
Key Takeaways
- UV DTF creates a strong, raised bond that requires a specific approach rather than just peeling.
- Using a hair dryer and a plastic edge is the safest way to loosen the adhesive without scratching your expensive drink bottles.
- Discover exactly how to remove UV DTF transfers step-by-step to ensure a clean lift every time.
- A "soak and sit" method with a citrus cleaner will gently dissolve any leftover sticky residue without damaging the surface.
- A clean removal makes it easy to refresh lunchboxes and gear as your kids move from kindy to school.
Understanding the UV DTF Bond: Why Removal Requires Care
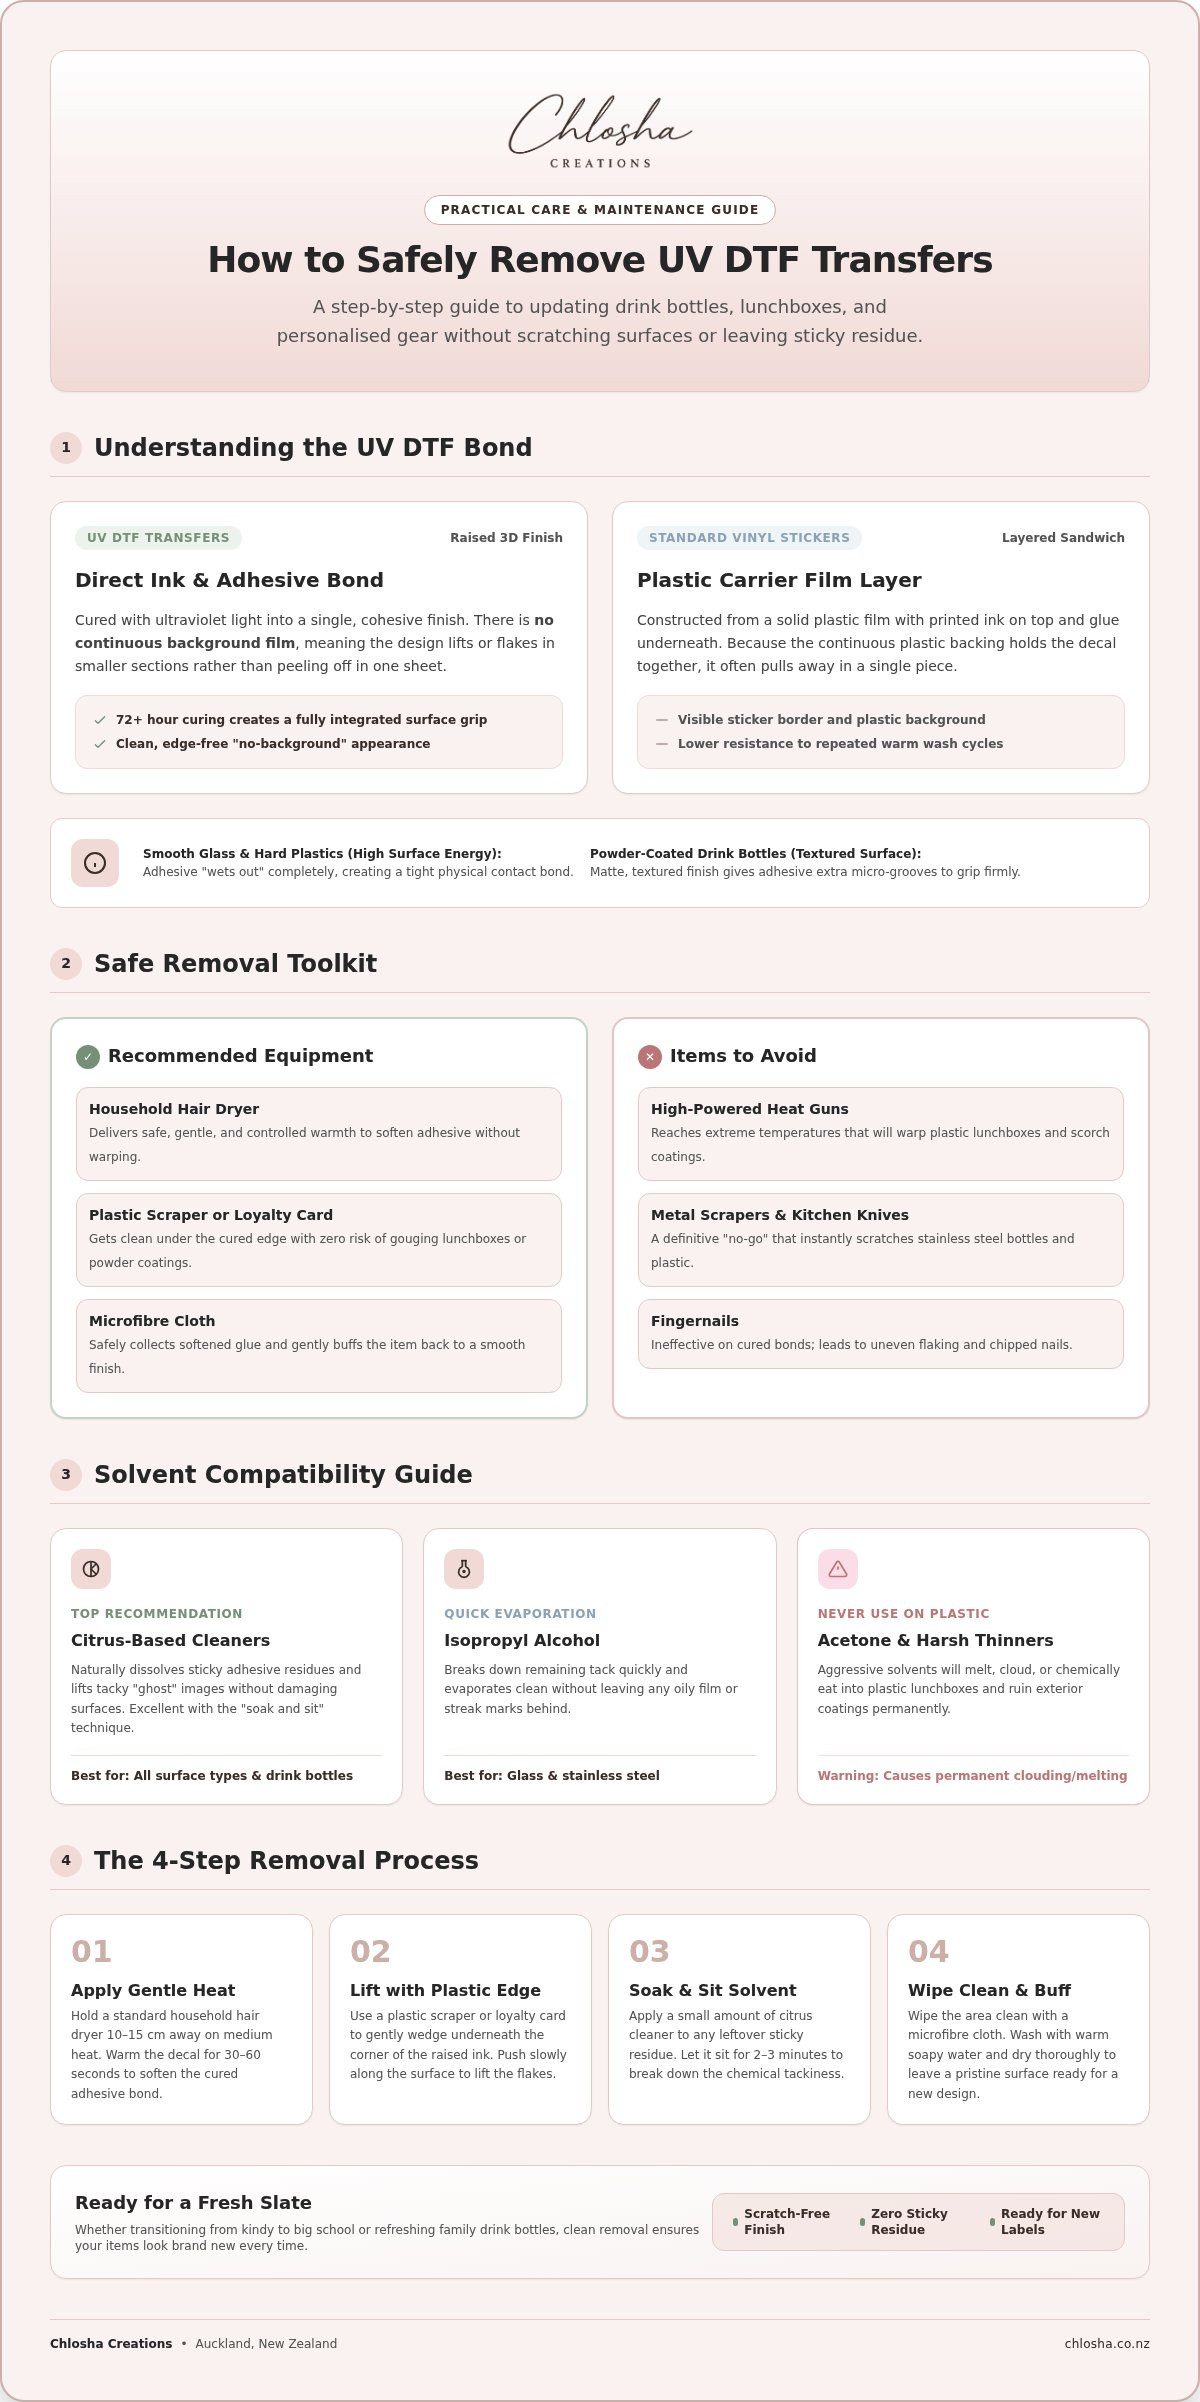
UV DTF transfers aren't your average stickers. They are a sophisticated combination of specialised ink and high-strength adhesive, all hardened through an ultraviolet curing process. This creates a raised, 3D finish that feels like it's part of the item. Because the bond is physical rather than just a light sticky film, learning how to remove UV DTF transfers requires a bit more patience than just picking at a corner with your fingernail.
The bond gets tougher as it sits. While a fresh decal might lift relatively easily, one that has cured for over 72 hours has fully integrated with the surface. This durability is why they are so popular for school gear and lunchboxes, but it means removal is a deliberate project. You aren't just peeling a label; you're breaking down a cured chemical bond. If you've ever tried to scrape off a cheap paper sticker, you know the mess it leaves. UV DTF is a different beast entirely. It isn't just sitting on top; it's practically fused. We have to treat the removal as a physical process of weakening that bond, especially if the label has been through many wash cycles.
How UV DTF Differs from Vinyl Stickers
Traditional vinyl stickers use a thin plastic film with a background. They are essentially a sandwich: a layer of plastic, a layer of ink, and a layer of glue. Because they have a continuous background film, they often pull away in one piece if you're lucky. UV DTF transfers don't have that carrier film. They consist of individual ink droplets stacked to create a premium, raised texture. When you're figuring out how to remove UV DTF transfers, you'll notice they tend to flake or come away in smaller sections because there's no plastic sheet holding the whole design together. This thickness requires a strategy that focuses on the adhesive layer underneath the ink.
The Role of Surface Energy in Decal Adhesion
The material of your drink bottle or lunchbox changes how the adhesive behaves. Smooth surfaces like glass or high-quality plastic have high surface energy, which lets the adhesive "wet out" and grip tightly. This results in a very strong bond that requires significant effort to break. Powder-coated metal is a bit different. The matte, bumpy texture of many modern drink bottles gives the adhesive a lot of surface area to cling to. You'll need to be methodical on these surfaces to avoid leaving a tacky "ghost" image of the old design behind. The combination of heat and the right tools is the only way to ensure the surface stays smooth and ready for a fresh, personalised look.
Essential Tools for Safe Decal Removal
Before you dive in, gathering the right kit is the most important step. Using the wrong tools can turn a quick refresh into a permanent scar on your favourite drink bottle. When you are learning how to remove UV DTF transfers, the goal is to work smarter, not harder. You want to focus on breaking down the bond without compromising the integrity of the material underneath. Most of what you need is likely already sitting in your kitchen or bathroom cupboards.
Heat is your best friend in this process. While professional sign writers might reach for a high-powered heat gun, a standard household hair dryer is much safer for home use. Heat guns can quickly reach temperatures that warp plastic lunchboxes or damage the powder coating on metal bottles. A hair dryer provides a gentler, more controlled warmth that softens the adhesive just enough to let it move. Once the transfer is warm, you will need a microfibre cloth to wipe away any softened residue and give the surface a final polish.
Choosing the Right Solvent for Your Surface
Once the main part of the transfer is gone, you might find a tacky layer left behind. For those looking for safer adhesive removal chemicals, citrus-based cleaners are a fantastic option. In New Zealand, products like De-Solv-it are widely available and very effective at lifting that "ghost" image. If you are working on glass or stainless steel, Isopropyl alcohol is another great choice as it evaporates quickly and leaves no oily film. Always avoid harsh thinners or acetone, especially on plastic. These chemicals can "eat" into the surface, leaving it cloudy or melted, which is a disaster for your personalised gear.
Mechanical Tools: Plastic vs. Metal
It is tempting to grab a metal scraper or a kitchen knife to speed things up. Don't do it. Metal blades are a "no-go" for lunchboxes and drink bottles because they will gouge the surface almost instantly. Instead, look for a dedicated plastic scraper or even an old credit card. These provide enough of an edge to get under the cured ink without the risk of deep scratches. If you don't have a scraper handy, a plastic loyalty card from your wallet works perfectly as a DIY alternative. Once the surface is clean and smooth, you will be ready to browse our latest personalised name labels to give your gear a brand new look.
Having these tools ready makes the whole experience feel less like a chore and more like a simple update. By using gentle heat and the right plastic edges, you ensure your items stay in top condition for years to come. It’s all about being methodical and protecting the items you’ve invested in.
Step-by-Step: How to Remove UV DTF Transfers Cleanly
Ready to refresh your gear for the new school year? Taking the time to follow a methodical process ensures your drink bottles and lunchboxes stay in pristine condition. Before you start, make sure the surface is clean and dry. Any grit or dust can cause micro-scratches when you start using your scraper. While the bond is strong, it isn't permanent if you use the right technique. Here is exactly how to remove UV DTF transfers without the stress.
Step 1: Softening the Adhesive with Gentle Heat
Apply heat using a hair dryer on a medium setting for about 30 to 45 seconds. Keep the dryer moving to avoid hotspots. You want the surface to feel comfortably warm, not burning. Perform a "touch test" every few seconds; if the material feels too hot to handle, pull the heat away immediately. This is especially important for plastic lunchboxes which can warp under high temperatures. Focus your heat on one corner of the design to soften the edge where you will begin the lift.
Step 2: Lifting and Peeling the Transfer
Once the edge is warm, use your plastic scraper or an old credit card to gently nudge the corner of the ink layer. As soon as you have enough of a grip, start peeling the transfer back. The best technique is to "roll" the decal back over itself at a low angle, almost 180 degrees. This reduces the vertical pull on the surface and helps prevent the cured ink from snapping or chipping. If the ink feels brittle or starts to flake, apply a few more seconds of heat to make the adhesive more pliable. This steady pressure is the secret to a clean lift.
Step 3: Managing Larger Decals and Logos
If you are dealing with a large business logo or a complex design with fine details, work in small sections. Don't try to pull the whole thing off at once. Keep the hair dryer handy to re-warm areas as you go, as the adhesive will quickly reset once it cools down. For intricate parts like thin letters or icons, be extra patient. If you encounter stubborn residue, you can look into safer adhesive removal chemicals to help dissolve the bond. By taking it slow and maintaining a steady, low-pressure pull, you'll achieve a clean finish that is ready for its next personalised update.
Dealing with Stubborn Adhesive Residue
You have successfully peeled away the raised ink layer, but now you're left with a tacky, slightly raised outline where the design used to be. This is the "ghost" of the adhesive. It's a common sight because the high-performance glue used in UV DTF transfers is designed to fill the micro-pores of the surface for maximum durability. If you are wondering how to remove UV DTF transfers completely, the job isn't finished until the surface is squeaky clean. Before you reach for any cleaning agents, do a quick safety check. Dab a tiny bit of your chosen solvent on the bottom of the bottle or inside the lunchbox lid. This ensures the chemical won't cloud the plastic or strip the colour before you apply it to the main surface.
The most effective approach for getting rid of that sticky film is the "soak and sit" method. Apply a small amount of a citrus-based cleaner, like De-Solv-it, directly to the residue. Let it sit for two to three minutes. This gives the citrus oils enough time to penetrate the adhesive bond and lift it from the surface. Once it has softened, use a microfibre cloth to gently rub the area in a circular motion. The friction, combined with the solvent, will lift the glue away without the need for heavy scrubbing. If the residue is particularly stubborn, a quick five-second blast of warmth from your hair dryer can help the cleaner work even faster.
The 'Ghosting' Effect and How to Fix It
Sometimes, a faint outline remains on certain types of plastic lunchboxes even after the glue feels gone. This isn't permanent damage; it's just microscopic amounts of adhesive trapped in the texture of the material. If a citrus cleaner doesn't quite do the trick, try a second round of gentle heat followed by a firm wipe with a clean microfibre cloth. Avoid using paper towels for this stage. They tend to break apart and leave tiny bits of lint stuck in the remaining glue, which creates a much bigger mess to clean up later.
Preparing the Surface for a New Label
Once the residue is gone, your drink bottle might feel a bit oily from the citrus cleaner. It's vital to remove every trace of these oils before you apply your next personalised name label. Any leftover solvent will act as a barrier, preventing the new adhesive from bonding correctly and leading to peeling edges within days. Give the area a final wipe with Isopropyl alcohol to strip away any remaining oils. It evaporates almost instantly and leaves no film behind.
To be absolutely sure the surface is ready, try the "water drop" test. Drop a tiny bit of water onto the cleaned spot. If the water beads up and rolls off, there is still an oily residue present. If it flattens out and wets the surface evenly, you have achieved a perfectly clean base. Now that you've mastered how to remove UV DTF transfers and prep the surface, you can confidently explore our latest personalised name labels to give your gear a fresh new look for the season.
Refreshing Your Gear with New Designs
Once you have mastered how to remove UV DTF transfers, the fun part begins. Refreshing your gear is more than just a chore; it's a way to mark new milestones in your family's life. Whether your little one is graduating from kindy to primary school or you're simply updating your business branding, a clean surface is your blank canvas. Having a smooth, residue-free base ensures your next set of labels will bond perfectly and look professional from day one.
When choosing your next set of decals, it is worth comparing UV DTF vs Vinyl Decals to see which option fits your specific needs. For hard surfaces like stainless steel drink bottles and plastic lunchboxes, our UV DTF transfers offer that premium, "no-background" look that truly stands out. To get the most out of your new application, check out The Ultimate Guide to Personalised Name Labels in NZ for expert tips on curing times and surface prep. Following these steps helps your new designs stay vibrant and secure through daily use.
When is it Time to Replace a Decal?
While our transfers are built for durability, they aren't meant to be permanent fixtures forever. You might notice slight lifting after several years of heavy use, or perhaps your contact details have changed. Physical damage from accidental drops can also be a sign that it's time for a fresh start. Styles evolve too. A drink bottle that was perfect for a toddler might need a more "grown-up" icon as they head into primary school. Changing labels is a quick, low-cost way to make old gear feel brand new again without the expense of buying new containers.
Why Quality Matters for Easy Future Removal
Not all transfers are created equal. High-quality UV DTF uses premium inks and adhesives that maintain their integrity over time. Cheap alternatives often use thin, low-grade inks that crumble or "bake" onto the surface, making them a nightmare to strip off later. When you know how to remove UV DTF transfers from a quality source like Chlosha Creations, the process is predictable and safe for your gear. Our labels are designed to stay put while you need them, but they won't fight you when it's time for a change. Ready to find your next favourite design? Explore our Best Sellers collection and start your next personalisation project today.
Ready for Your Next Refresh?
Managing your family's gear doesn't have to be a permanent commitment. Now that you've mastered how to remove UV DTF transfers safely, you can keep your drink bottles and lunchboxes in top shape as your kids grow. Stick to gentle heat and a plastic edge to keep surfaces scratch-free. A quick soak with a citrus cleaner handles any leftover residue; this leaves your items smooth and ready for a fresh update.
Refreshing your gear is a simple way to stay organised for school or kindy transitions. When you are looking for high-quality personalised name labels NZ, our premium transfers provide a professional, no-background finish that looks like it was printed directly onto the surface. We offer national shipping to make your next project effortless and exciting. There's no need to worry about sticky messes or damaged gear when you follow the right steps.
Ready for a fresh look? Explore our range of durable, no-background name labels at Chlosha Creations. We are here to help you keep your home organised and beautiful, one label at a time. Happy labelling!
Frequently Asked Questions
Will removing a UV DTF transfer scratch my stainless steel drink bottle?
No, removing a transfer won't scratch your stainless steel bottle if you use the right tools. Avoid metal scrapers or knives at all costs. Instead, use a plastic scraper or an old credit card to lift the edges. These materials are softer than the steel and won't leave marks. Always ensure the surface is free of grit or sand before you start, as rubbing debris against the metal can cause micro-scratches.
Can I reuse a UV DTF decal after I have removed it?
You cannot reuse a UV DTF decal once it has been removed. These transfers are designed for a single, high-strength application. The removal process involves stretching and breaking the cured ink layers, which destroys the design's integrity. Additionally, the adhesive loses its bonding strength once it is pulled away from the original surface. For a fresh look, it is best to choose a new design from our personalised name labels collection.
What is the best household solvent for removing sticky label residue in NZ?
Citrus-based cleaners like De-Solv-it are the most effective household solvents for NZ families. They are excellent at breaking down tacky glue without damaging the underlying material. Simply apply a small amount, let it sit for a few minutes, and wipe with a microfibre cloth. If you are working on glass, Isopropyl alcohol is another great option. It removes residue quickly and leaves a clean surface that is ready for a new label.
How do I remove a decal from a delicate surface like glass or acrylic?
Removing a decal from glass or acrylic requires a gentle touch and steady heat. Use a hair dryer to warm the transfer, then carefully lift the edge with a plastic scraper. Glass is quite resilient, but acrylic can scratch if you apply too much pressure. Avoid using acetone or harsh thinners on acrylic, as these chemicals can cause the material to become cloudy or permanently damaged. Stick to mild soapy water or citrus cleaners.
Is it safe to use a heat gun on plastic lunchboxes for decal removal?
It is much safer to use a hair dryer rather than a heat gun on plastic lunchboxes. Heat guns can reach temperatures high enough to warp or melt plastic almost instantly. A hair dryer on a medium setting provides enough warmth to soften the adhesive without risking a disaster. Always keep the dryer moving and perform a "touch test" to ensure the plastic isn't getting too hot to handle comfortably during the process.
How long should I wait before applying a new label to the same spot?
You can apply a new label as soon as the surface is clean, dry, and free from oils. After using a solvent to remove residue, wash the area with soapy water and finish with a wipe of Isopropyl alcohol. This ensures no oily film remains to interfere with the new adhesive. Once the alcohol has evaporated, which usually takes less than a minute, your gear is perfectly prepped for your next personalised name labels.
Do UV DTF transfers become harder to remove over time?
Yes, UV DTF transfers do become more difficult to remove as they age. The adhesive bond continues to strengthen as it cures, especially after the initial 72-hour window. Decals that have been through many dishwasher cycles or years of use will be more stubborn. When you are figuring out how to remove UV DTF transfers that have been on for a long time, using consistent, gentle heat is the most important step to loosen the bond.
What should I do if the transfer is chipping into tiny pieces as I peel it?
If the transfer is chipping, it usually means the ink is brittle or the adhesive hasn't been warmed enough. Apply more heat with your hair dryer to make the layers more pliable. If the design is very fine or quite old, it may still come off in smaller sections. Use a plastic scraper to gently nudge each piece away. Patience is key here to ensure you get every bit off without marking the surface.
