

Are UV DTF Labels Microwave Safe? A Guide for Aussie Parents
Have you ever pulled a lunchbox out of the microwave only to find your child's name label curling at the edges or smelling like burnt plastic? It is a common frustration for parents trying to keep track of gear at kindy or school. You might be wondering, are UV DTF labels microwave safe before you heat up today's leftovers. While these premium transfers offer a stunning, no-background finish that looks professional, the science of heat and adhesives is something every busy parent needs to understand.
We know you're tired of labels peeling off after a single wash or leaving behind that annoying sticky residue. Here at Chlosha Creations, we want you to feel confident that your personalised labels will actually survive the school year. In this guide, we'll explain exactly how UV DTF technology reacts to high temperatures and provide clear instructions on how to wash your items. You'll learn why the 72 hour curing window is vital and how to keep your kids' lunchboxes and drink bottles looking brilliant without any safety worries. We'll show you how to maintain that sleek look while keeping your family's gear functional and safe.
Key Takeaways
- Understand how heat affects adhesive bonds and finally get an answer to the question: are UV DTF labels microwave safe for your daily routine?
- Discover the 72 hour curing rule that helps your personalised labels stay secure even after a trip through the dishwasher.
- Learn why the sleek, no-background finish of UV DTF technology is a more durable and professional choice for busy Kiwi families.
- Get practical tips on surface preparation to ensure your name labels stay stuck through the entire school year.
- Find out how to safely reheat school lunches without risking damage to your beautiful custom decals or lunchboxes.
Understanding UV DTF Labels and Kitchen Heat
When you are preparing for a busy school term, you want labels that actually stay put. UV DTF (Direct to Film) transfers are a massive step up from the old-school stickers we used to rely on. Unlike a standard sticker that has a clear or white border, these transfers leave behind only the ink and a protective varnish. This creates a "no-background" look that makes your child's name appear as if it were printed directly onto their drink bottle or lunchbox at the factory. It's a clean, professional finish that doesn't have messy edges to catch on things in a school bag.
The process behind these labels is what makes them so unique. During production at our Auckland workshop, special inks are cured instantly using high-intensity UV light. This "baking" process turns the liquid ink into a solid, slightly raised 3D film. It feels premium to the touch and is significantly more durable than paper or standard adhesive labels. However, while the ink itself is incredibly tough, the way it handles high temperatures depends largely on the adhesive layer underneath. To answer the burning question are UV DTF labels microwave safe, we have to look at how that bond behaves when things get hot.
UV DTF vs. Traditional Vinyl Stickers
Many parents are used to traditional vinyl decals, which are essentially thin sheets of plastic film cut into shapes. These often feel bulky and can eventually peel at the corners, especially after a few trips through the sink. UV DTF is a cured-ink transfer rather than a plastic film sticker. Because there is no surrounding film to lift or trap dirt, the transfer stays flush against the surface. This "printed-on" look is why personalised name labels from Chlosha Creations have become such a favourite for Kiwi families who value both style and longevity.
The Science of UV Curing in the Kitchen
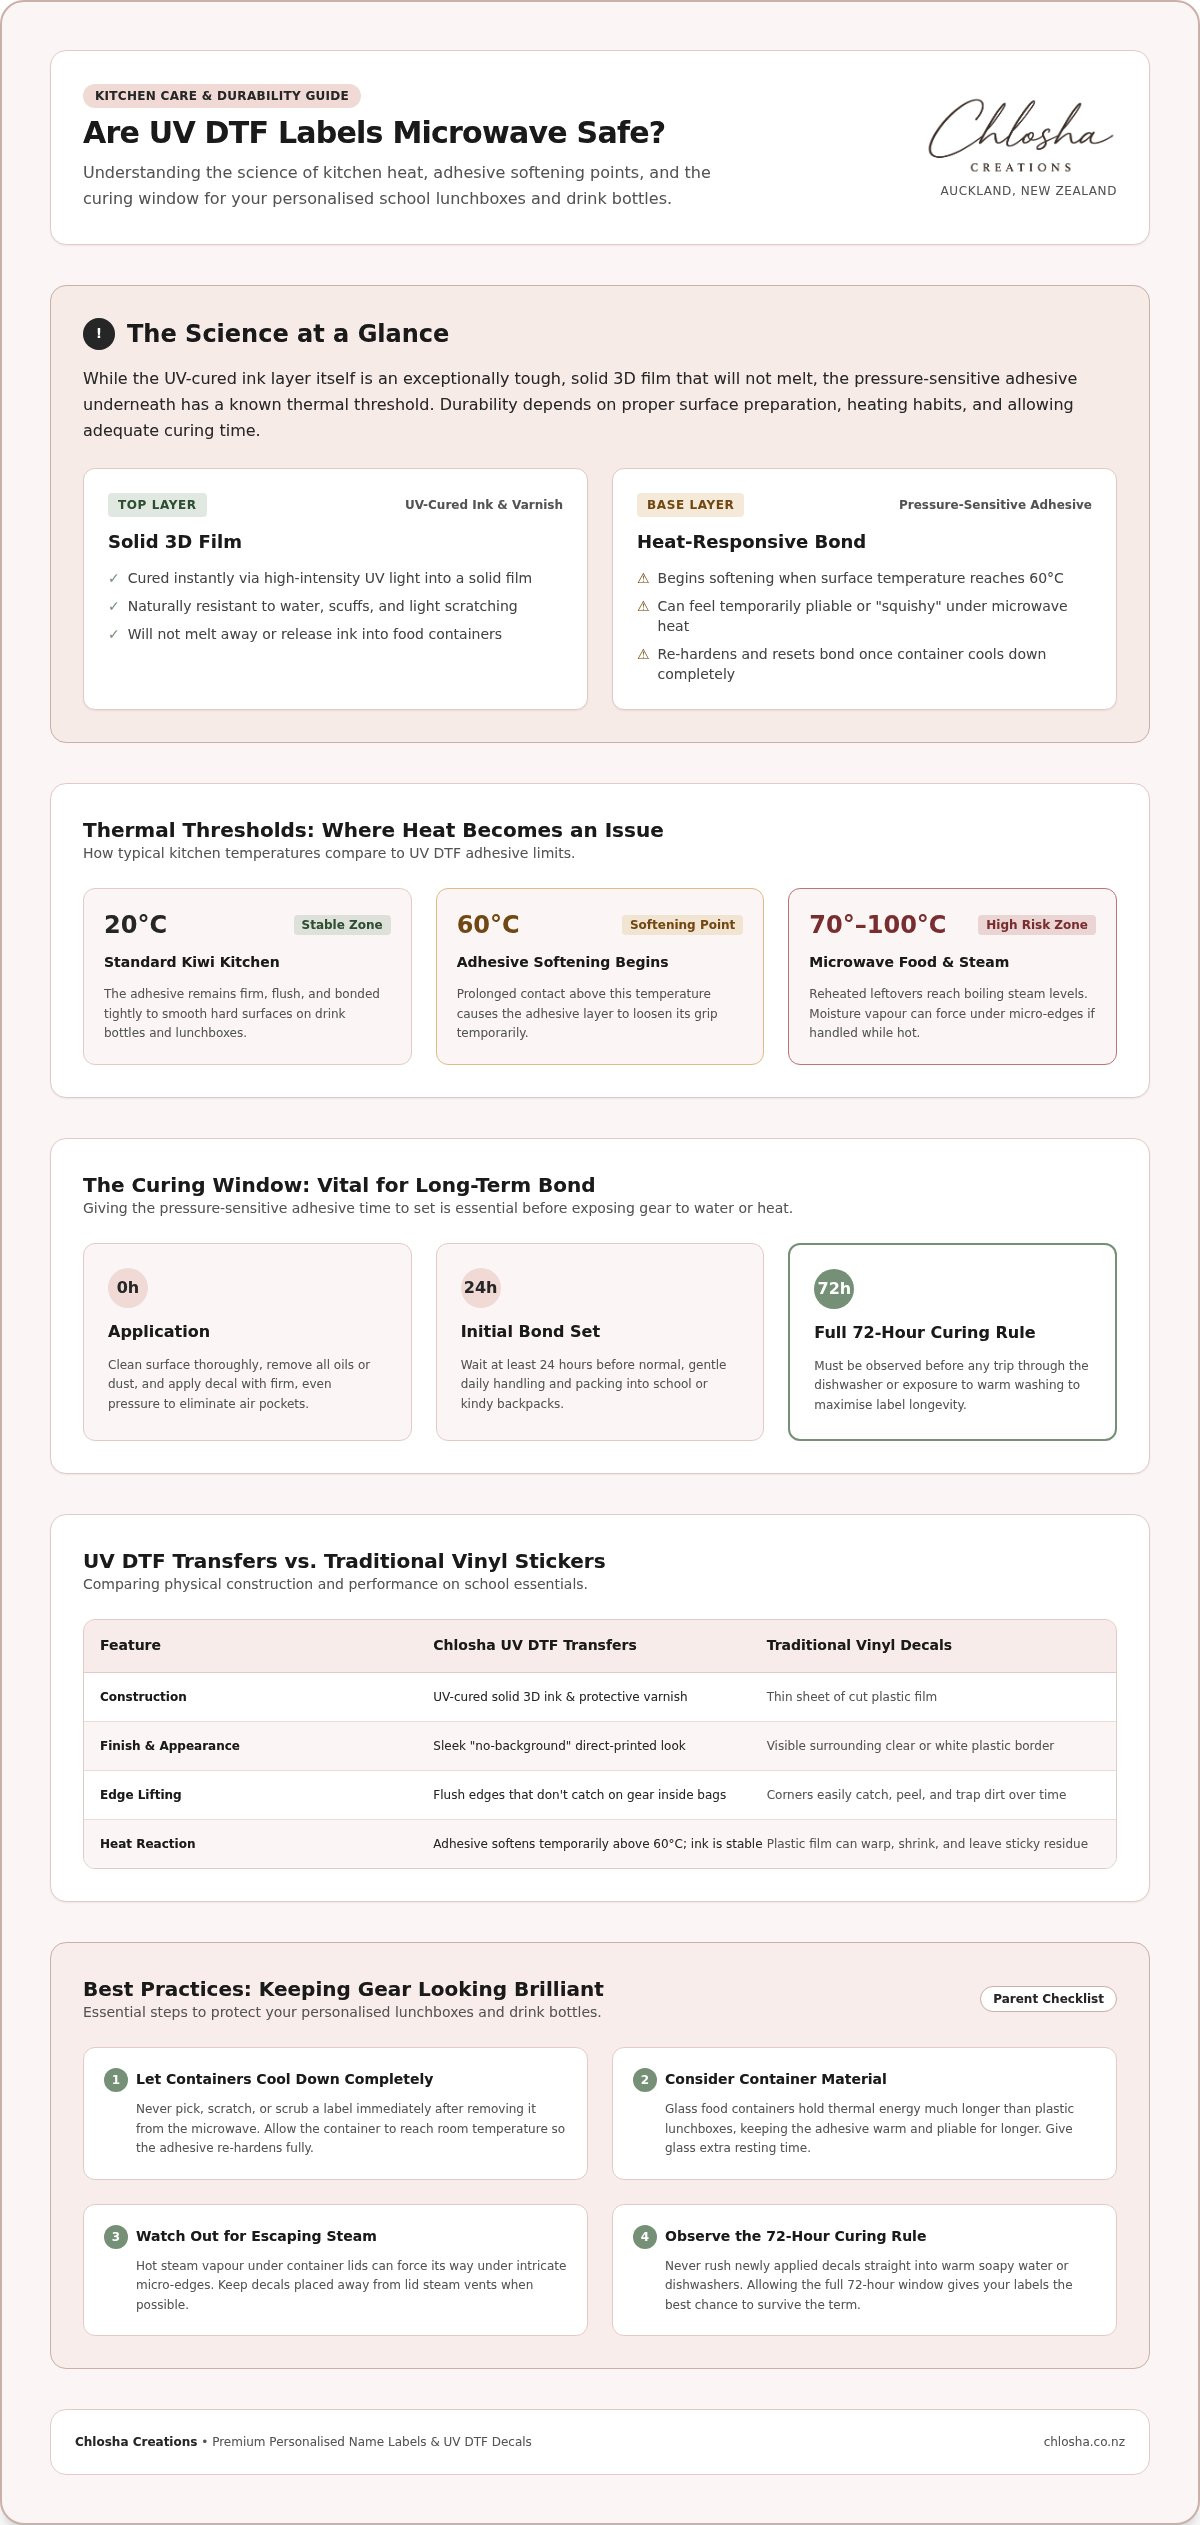
The UV curing process creates a finish that is naturally resistant to water and light scratches. This hardened layer handles the daily temperature changes of a New Zealand kitchen much better than a standard paper label would. But there is a catch. Most UV DTF adhesives begin to soften when they reach temperatures above 60°C. Since food and steam in a microwave can easily climb to 70°C or even 100°C, the bond can weaken if it's exposed to intense heat for too long.
This is why we stress the importance of the curing window. You must wait at least 24 hours before normal use and a full 72 hours before any exposure to the dishwasher. Giving the adhesive time to fully set is the best way to ensure your labels survive the rigours of school life. While the ink won't melt away, protecting that initial bond is the secret to keeping your gear looking brilliant all year round.
How Microwaves Affect UV DTF Adhesive and Ink
Understanding the science helps when you're wondering are UV DTF labels microwave safe for your daily school routine. It's best to think of a label as two separate parts: the tough, UV-cured ink on top and the pressure-sensitive adhesive underneath. While the ink itself is incredibly stable and won't melt away, the adhesive is the part that reacts most to the intense energy of a microwave. Knowing how these layers behave under heat will help you keep your kids' gear looking brand new for longer.
The material of the container also plays a massive role in heat transfer. A glass container will hold onto heat much longer than a plastic lunchbox, meaning the label stays at a higher temperature for an extended period. Because UV DTF transfers lack a bulky plastic background, they rely entirely on their adhesive bond to stay flush. When that bond is challenged by heat, the risk of lifting increases, especially on the edges of intricate designs.
The Softening Point: When Heat Becomes an Issue
Most high-quality UV DTF adhesives have a thermal threshold. Once the surface temperature of a drink bottle or lunchbox hits about 60°C, the adhesive starts to soften. In a standard microwave, food can reach 70°C to 100°C in just a minute or two. This heat transfers directly to the container's surface, causing the bond to temporarily lose its grip. If you're reheating a container, the heat can cause the label to feel slightly "squishy" or mobile.
Steam is another factor to watch out for. As moisture turns to vapour, it can force its way under the micro-edges of the transfer. If this happens, the label might bubble or lose its edge integrity. A golden rule for Kiwi parents: never scrub or pick at a label immediately after it comes out of the microwave. Let the container cool down completely so the adhesive can re-harden and reset its bond to the surface. Patience here prevents the label from shifting or peeling prematurely.
Ink Safety and Microwave Radiation
One worry parents often have is whether the inks will spark or leach chemicals during heating. You can rest easy knowing that premium UV inks don't contain metallic elements, so they won't cause any fireworks in your kitchen. The slightly raised 3D finish is also remarkably stable under standard radiation. As long as you keep reheating sessions short, usually under two minutes, the ink will maintain its vibrant colour and crisp detail without cracking or discolouring.
For items that need longer heating times, you might consider using a separate microwave-safe plate. This keeps your personalised name labels away from extreme heat while still getting the job done. By following these small steps, you ensure the labels stay as brilliant as the day you applied them. It's all about balancing the convenience of a quick heat-up with the long-term durability of your child's favourite gear.
UV DTF vs. Traditional Vinyl: Heat Resistance Compared
When choosing the right way to mark your kids' gear, it's helpful to look at how different materials handle the heat. Traditional vinyl stickers are made from a thin sheet of PVC plastic. This plastic has a relatively low melting point and often starts to warp or shrink when it gets too warm. You've likely seen old vinyl decals that look "shrivelled" after being left in the sun or a hot car. UV DTF transfers are different. Because they are made of layers of cured ink and varnish, they don't have that same plastic memory. They won't shrink or pull away from the surface like vinyl does.
Another big win for UV DTF is the lack of a background carrier. Standard stickers have a large border of adhesive-backed plastic that provides more surface area for heat to catch. If one corner of a vinyl sticker starts to lift in the microwave, the whole label usually follows. With the no-background finish of our personalised name labels, there is simply less material to curl. The raised, 3D finish also means the ink stays crisp even if the container surface gets hot. It's a much more resilient option for the daily wear and tear of a New Zealand household.
Microwave Safe vs. Microwave Resistant
It's a question we get often: are UV DTF labels microwave safe? In the world of kitchenware, "microwave safe" usually means an item won't melt, crack, or leach chemicals under normal use. We prefer to describe our transfers as "microwave resistant". While the UV-cured ink is incredibly tough, the adhesive bond is still subject to the laws of physics. Maximum resistance is only achieved after the full curing time. If you try to heat a lunchbox only an hour after applying the label, it likely won't survive. Give it the full 72 hours to bond properly before testing it with any heat or moisture.
Best Surfaces for Heat-Resistant Labelling
The surface you choose makes a huge difference in how well the label handles a microwave. Glass and ceramic are the gold standard. They provide a smooth, high-energy surface that allows the adhesive to bite in deep. Hard, BPA-free plastics used in most modern lunchboxes also work well, provided they aren't heavily textured. However, we recommend avoiding silicone or very flexible, "waxy" plastics. These materials expand and contract significantly when heated, which can stress the bond of even the best label. For the best results at kindy or school, stick to smooth, rigid containers that keep their shape when the microwave starts spinning.
Tips to Maximise the Life of Your Personalised Labels
Applying your labels correctly is the difference between a name that lasts all year and one that peels off by mid-term. While we've discussed whether are UV DTF labels microwave safe, the real key to durability is the initial bond you create. If the adhesive hasn't gripped the surface properly from day one, no amount of careful heating will save it. You want to give that premium, raised finish the best possible start so it can handle the daily rigours of kindy and school life.
The Perfect Application for Kitchen Gear
Before you even peel the backing, ensure your drink bottles and lunchboxes are bone dry. Even a tiny amount of moisture or invisible oil from your hands can compromise the transfer. Follow these simple steps for a professional result:
- Wipe the application area with rubbing alcohol or a quick spray of window cleaner to remove residue.
- Position your label carefully; once the adhesive touches the surface, it's very difficult to move.
- Use your thumb or a soft cloth to rub the design firmly from the centre outwards, ensuring every letter is pressed down.
- Peel the clear carrier sheet back slowly at a sharp angle, keeping it close to the surface.
A clean, oil-free surface is the secret to microwave resistance. For items with a slight curve or stubborn texture, a quick 10-second blast from a warm hair dryer can help the adhesive flow into the surface and set more permanently. This extra bit of warmth helps the bond "lock in" before the curing clock starts ticking.
Be mindful of the material you're labelling. Some containers made from "low-surface-energy" plastics, like certain types of polypropylene, are naturally non-stick. If your lunchbox feels slightly waxy or oily even after a thorough wash, the label might struggle to find a permanent home. Sticking to smooth, rigid plastics or glass ensures your personalised name labels stay exactly where you put them.
Dishwasher and Microwave Best Practices
Once you've applied your labels, the golden rule is patience. Wait 24 hours before sending the gear to school and a full 72 hours before it sees the inside of a dishwasher. When you do use the dishwasher, always choose the top rack. The heating elements at the bottom of most New Zealand dishwashers get far too hot for any adhesive to handle comfortably. While hand-washing is always the gentlest option for longevity, the top rack is a safe middle ground for busy parents who need a quick cleanup.
In the microwave, try to avoid "hot spots" where food heats unevenly. If a specific corner of a lunchbox gets scorching hot while the rest is lukewarm, it can cause the label to lift or bubble. It's normal to see some very light wear after hundreds of school lunches, but following these steps will keep that smooth, no-background finish looking brilliant for the long haul.
Why Chlosha Creations’ Labels are a Favourite for Kiwi Families
Choosing a local Auckland business means you are getting products designed for the reality of New Zealand life. We aren't a faceless factory. We are a family-run operation that understands exactly what a school bag goes through on a rainy Tuesday. When parents ask us are UV DTF labels microwave safe, they aren't just looking for a technical spec. They want to know if their investment will survive the morning rush and the afternoon cleanup. Our labels are crafted with this durability in mind; we use premium technology to ensure they stand up to the rigours of kindy cubbies and kitchen benches alike.
The Chlosha difference is visible the moment you apply your transfer. Traditional stickers often have a messy, clear background that traps dirt and begins to lift. Our UV DTF transfers offer a sleek, no-background look that appears as if it were printed directly onto the surface. It doesn't scream "sticker." Instead, it provides a professional, slightly raised 3D finish that feels high-end. This aesthetic appeal is matched by a commitment to longevity; we want your child's gear to look just as brilliant at the end of Term 4 as it did on day one.
Personalised for Every Occasion
Every child is unique, and their labels should be too. We offer a wide range of designs to help your little ones identify their gear instantly. This doesn't just look great; it's a practical way to reduce the "lost property" pile that grows at every school and kindy. From our popular Icon + Name packs to specialised allergy alert labels, we have a solution for every need. These allergy labels are particularly helpful for teachers and caregivers, providing a clear, durable warning that won't wash away. Check out our Name Labels collection for the latest designs and find the perfect match for your child's personality.
The Chlosha Commitment to Quality
We choose premium UV DTF technology because we refuse to settle for cheaper, less durable alternatives. While standard vinyl can shrink or warp in the heat, our cured-ink transfers maintain their integrity. We focus on providing a modern, professional finish for everyday items; it's about making organisation feel like a treat rather than a chore. Whether you are labelling a tiny snack container or a large drink bottle, you can trust that our materials are chosen for their resilience. Ready to organise your home? Explore our best sellers today and see why so many Kiwi families trust us with their labelling needs.
Supporting local means you get a partner in your household organisation. We are here to provide honest advice on care and application because your long-term satisfaction is our priority. While the question of are UV DTF labels microwave safe has a nuanced answer involving heat and adhesive bonds, our goal is to give you the confidence to use your gear without worry. By following our simple care tips, you'll ensure your personalised labels remain a beautiful, functional part of your family's daily routine for a long time to come.
Keep Your School Gear Looking Brilliant All Year
Finding the right balance between convenience and durability doesn't have to be a struggle. We have explored the science behind why are UV DTF labels microwave safe in short bursts, provided the adhesive has had time to fully cure. By waiting that vital 72 hours before a trip through the dishwasher or microwave, you're protecting the premium, no-background finish that makes our labels so special. Remember, a clean surface and a bit of patience are your best friends when it comes to keeping lunchboxes and drink bottles looking professional.
As an Auckland-based family business, we take pride in creating labels that actually stand up to the Kiwi lifestyle. Whether it's for school, kindy, or daycare, our transfers offer a smooth, raised look without the messy edges of traditional stickers. If you're local, you can even opt for Auckland pickup to get organised even faster. We are here to help you beat the lost property pile with style and ease.
Ready to get started? Shop our range of durable, personalised name labels for school and kindy today. We can't wait to see your kids' gear looking its absolute best!
Frequently Asked Questions
Can I put UV DTF labelled drink bottles in the dishwasher?
Yes, you can put labelled drink bottles in the dishwasher, but you must wait at least 72 hours after application. This vital curing time allows the adhesive to bond properly to the surface. Always place items on the top rack to avoid the intense heat from the bottom elements. While these transfers are highly durable, hand-washing remains the gentlest way to keep your labels looking smooth and vibrant for the entire school year.
Will the microwave cause my personalised name labels to peel off?
Short reheating bursts generally won't cause your labels to peel, but long microwave cycles can be risky. When you ask are UV DTF labels microwave safe, the answer depends on the temperature reached. Sustained heat above 60°C softens the adhesive bond. If a lunchbox gets too hot, the edges might lift or bubble. To prevent damage, keep microwave sessions under two minutes and let the item cool completely before handling the label.
Do I need to wait before using my labelled lunchbox in the microwave?
You should wait at least 24 hours for general use and 72 hours before exposing your lunchbox to microwave heat. The pressure-sensitive adhesive needs this window to create a permanent grip on the container. Using it too soon, especially in a high-heat environment like a microwave, can cause the transfer to shift or peel. Giving the label time to set ensures it stays secure through countless school lunches and snacks.
Are UV DTF labels safer for the microwave than standard vinyl stickers?
UV DTF transfers are significantly more heat-resistant than standard vinyl stickers because they lack a plastic film background. Traditional vinyl often shrinks or warps when heated, leading to unsightly curled edges. Since UV DTF is a cured-ink transfer, it maintains its shape much better under thermal stress. This clean, no-background finish provides a more professional look that is far less likely to catch or peel compared to bulky vinyl decals.
Can I use UV DTF transfers on silicone lunchboxes?
No, we do not recommend using UV DTF transfers on silicone lunchboxes or other flexible, "waxy" materials. Silicone has low surface energy, which means the adhesive cannot form a strong, permanent bond. Additionally, silicone expands and contracts during heating, which will eventually cause the label to crack or lift. For the best results, apply your personalised name labels to smooth, rigid surfaces like BPA-free hard plastic, glass, or stainless steel.
What happens if a UV DTF label gets too hot in the microwave?
If a label gets too hot, the adhesive layer underneath the UV-cured ink will temporarily soften and lose its grip. You might notice small bubbles forming or the edges feeling slightly mobile. If this happens, don't touch or scrub the label while it's hot. Once the container cools down to room temperature, the adhesive will usually re-harden and reset its bond. Avoiding "hot spots" in the microwave helps maintain the label's integrity.
Are the inks used in UV DTF labels non-toxic and food-safe?
The premium UV-cured inks used in our labels are stable and do not contain metallic elements that could spark or leach during microwave use. Because the labels are applied to the exterior of drink bottles and lunchboxes, they don't come into direct contact with food. This makes them a safe and practical choice for marking your family's gear. The raised, 3D finish is durable enough to handle the daily temperature changes in a busy kitchen.
How do I remove a UV DTF label if I want to change it?
Removing a UV DTF label is possible if you need to update your child's gear. Use a hair dryer on a low, warm setting for about 30 seconds to soften the adhesive bond. Carefully lift an edge with your fingernail and peel the transfer away slowly. If any sticky residue remains on the lunchbox or bottle, a quick wipe with rubbing alcohol or eucalyptus oil will clean the surface perfectly, leaving it ready for a fresh design.
