

Best No-Peel Labels for Plastic Lunchboxes: 2026 Guide
Have you ever wondered why even the "strongest" name stickers start peeling at the corners after just a few runs through the dishwasher? It's incredibly frustrating to spend your Sunday evening labelling gear for kindy or school, only to find a sticky, faded mess by the end of the term. If you are searching for the best labels for plastic lunchboxes, the secret isn't actually about finding stronger glue. It's about moving away from traditional vinyl and paper stickers that sit on top of the surface and switching to a modern, no-background finish that looks like it was printed right on the box.
We know you want a solution that actually lasts through the daily grind of New Zealand school life. In this 2026 guide, you'll discover how UV DTF transfers provide a durable, raised effect that handles the lunchroom much better than standard labels. We will walk you through the simple application process, explain why certain plastics are so tricky to stick to, and provide practical care tips to help your personalised designs stay vibrant. From bento boxes to drink bottles, you're about to learn how to achieve a professional, seamless finish that kids recognise and parents can trust.
Key Takeaways
- Understand the "plastic problem" and why low surface energy materials like polypropylene cause traditional stickers to lift and peel.
- Explore why UV DTF transfers are the best labels for plastic lunchboxes, offering a clean, raised, no-background finish that looks printed on.
- Learn the essential preparation and application techniques required to create a strong bond between the decal and the container.
- Identify the best ways to customise your gear, from choosing the right sizes to using icons that help kindy kids identify their own lunchboxes.
- Discover how to properly care for your personalised items to maintain their durability and aesthetic appeal through many lunch breaks.
Why Do Most Lunchbox Labels Peel Off? (The Plastic Problem)
It's a common Sunday night ritual. You're sitting at the kitchen table, carefully applying stickers to a new set of drink bottles and lunchboxes, hoping they'll last at least one term. Fast forward three weeks, and those same labels are curling at the corners or floating at the bottom of the dishwasher. It's incredibly frustrating. If you're hunting for the best labels for plastic lunchboxes, the real challenge isn't just the sticker quality. It's the plastic itself.
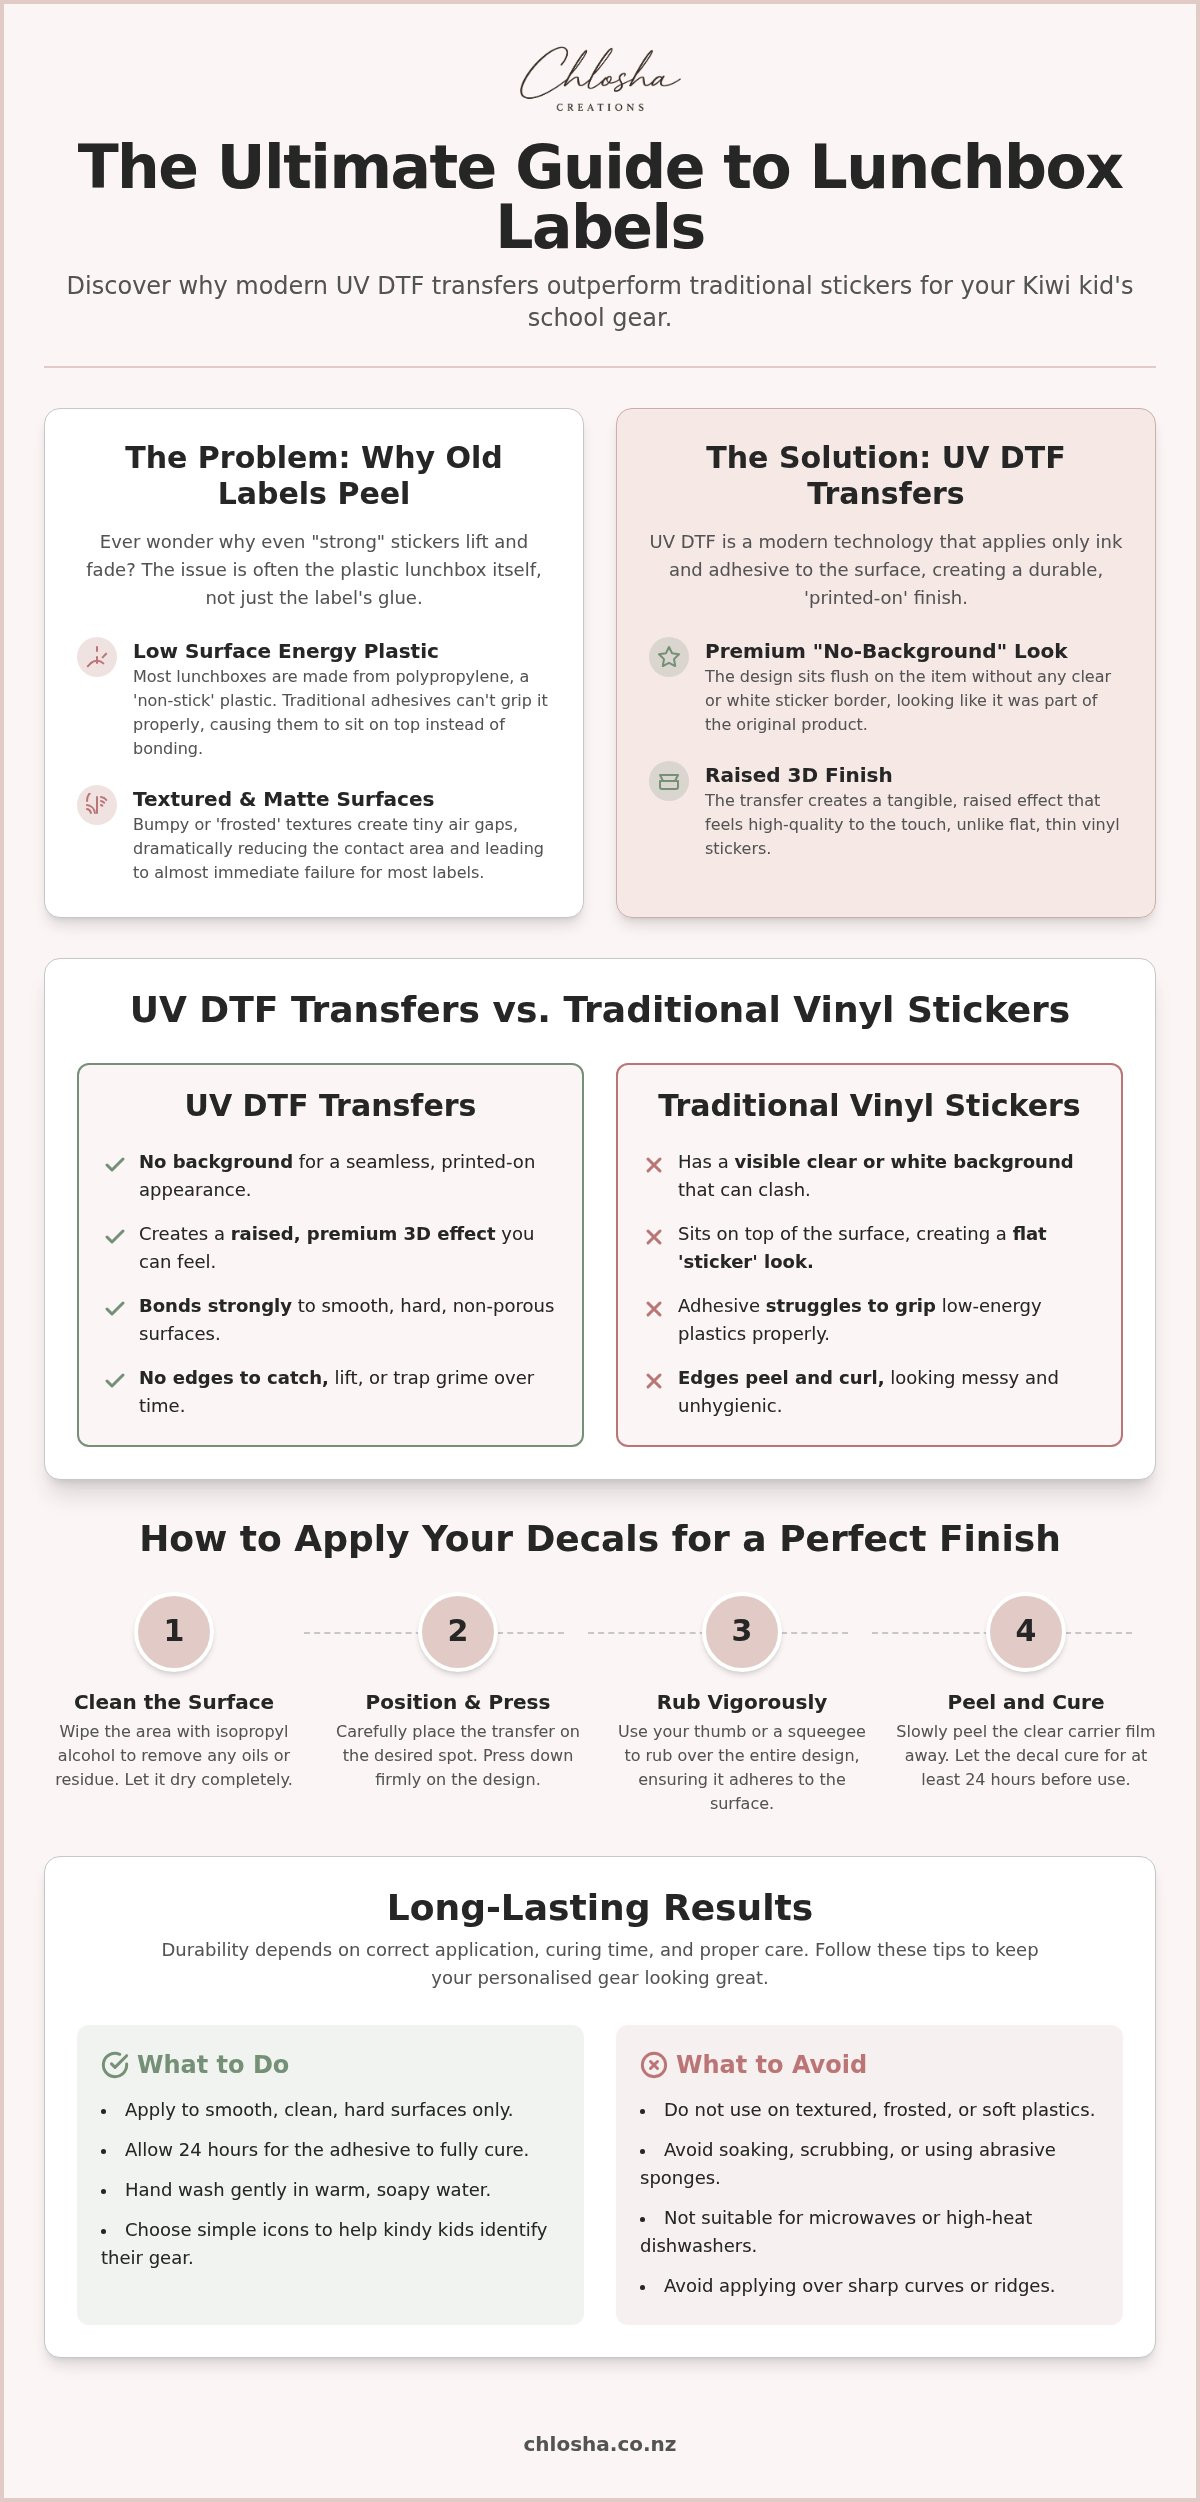
Most durable lunchboxes used by New Zealand families are made from plastics like polypropylene. These materials are chosen because they're tough and food-safe, but they're notoriously "non-stick" by nature. In technical terms, these are low-surface-energy plastics. To get a label to stay put, the adhesive needs to flow into the microscopic valleys of the surface. You can learn more about how pressure-sensitive adhesives work to see why this is so difficult. On these types of plastic, the adhesive often just sits on top, waiting for a bit of moisture or heat to break the bond entirely.
Smooth vs. Textured Plastic Surfaces
Not all plastic surfaces are created equal. Smooth, hard plastics provide the best foundation for any name decal. They allow for maximum contact, which is essential for a long-lasting finish. If you've ever tried to label a lunchbox with a "frosted" or matte texture, you've likely seen it fail almost immediately. Those tiny bumps in the texture create air gaps; this means the label is only touching about half of the surface area it should. When picking out gear for kindy or school, look for containers with a high-gloss, smooth finish. These are the gold standard for ensuring your UV DTF name labels stay exactly where you put them.
The Problem with Traditional Vinyl Stickers
Traditional vinyl stickers almost always have a background, whether it's white, clear, or a solid colour. This creates a physical "lip" or edge that sits quite high off the surface. Every time that lunchbox is shoved into a backpack, the edge of the vinyl catches on the fabric. Over time, the corners begin to lift. This is where the dreaded "grey gunk" starts. Dust, hair, and sandwich crumbs get trapped under the peeling edge, making the label look messy and unhygienic. Even labels marketed as "dishwasher safe" often struggle with the intense heat of a New Zealand summer or a heavy-duty wash cycle. This is why many parents are now choosing no-background transfers that bond more tightly to the surface without those vulnerable edges.
UV DTF vs Vinyl: The Best Labels for Plastic Lunchboxes
For years, parents have relied on standard vinyl stickers to keep track of school gear. While they served a purpose, 2026 has seen a major shift toward a more sophisticated solution. If you are looking for the best labels for plastic lunchboxes, the answer lies in UV DTF (Direct-to-Film) technology. This isn't just a slight improvement over the old way; it's a completely different method of marking your child's belongings. It moves away from the "sticker" look and provides a finish that feels integrated with the product.
Unlike traditional stickers that have a thick, flat layer of vinyl, UV DTF transfers create a professional, permanent-looking finish. The result is a 3D raised effect that feels premium to the touch. Because the ink is cured with ultraviolet light during the printing process, it bonds incredibly well to hard surfaces. This makes it a fantastic premium labelling alternative for families who are tired of standard stickers that look out of place on high-quality containers.
What is UV DTF Technology?
To keep it simple, UV DTF is a no-background transfer that gives a printed-on appearance. Instead of a pre-cut piece of plastic film, you are applying only the ink and a specialised adhesive directly to the lunchbox. This process ensures that the design sits flush against the container without any bulky borders. Many parents worry about what their children's hands are touching all day, so it is reassuring to know that high-quality materials often align with FDA safety standards for food-contact materials. This technology provides a clean, safe, and modern way to organise your household.
Why No-Background Labels Win
The most obvious benefit of a no-background design is the aesthetic. Whether your child has a bright teal bento box or a sleek navy drink bottle, the name appears as if it was part of the original product design. There is no white or clear border to clash with the container's colour. Beyond looks, these transfers are much harder for little fingers to pick at. Without a large surface area for friction, the labels are less likely to catch on the inside of school bags or lunch covers. This versatility means you can use the same high-quality personalised name labels on everything from plastic containers to metal scooters and helmets.
Step-by-Step: How to Apply Lunchbox Name Decals Perfectly
Even the best labels for plastic lunchboxes need a little help to reach their full potential. It's not a complicated task, but taking five extra minutes to prepare the surface makes all the difference for longevity. You want that clean, no-background finish to look like it was professionally printed on day one and stay that way throughout the school year. Following a few simple steps ensures the bond is as strong as possible right from the start.
Surface Prep and Positioning
Start by ensuring the lunchbox is completely clean. Avoid using baby wipes or oily kitchen cleaners; these leave behind a residue that prevents the adhesive from bonding properly. Instead, use a simple mix of warm water and a drop of dish soap, or a quick wipe with isopropyl alcohol. The surface must be bone-dry before you apply the transfer. If you're working with a curved or tricky shape, try using a hair dryer on a low, warm setting for a few seconds. This gentle heat helps the decal mould to the contours of the container more easily.
To get the positioning right, hold the decal above the lunchbox without letting it touch the surface. Once you're happy with the spot, press down firmly from the centre outward. You can use a credit card or a small squeegee to push out any tiny air bubbles. The goal is 100% contact between the transfer and the plastic. When you're ready to remove the carrier sheet, use the "low angle peel" secret. Instead of pulling the film straight up, peel it back slowly at a sharp, flat angle. This ensures the fine details of the name or icon stay firmly attached to the box.
The Curing Phase: Why Patience Pays Off
It's tempting to pack the lunchbox and send it off to school immediately, but patience is your best friend here. We recommend following the 24-hour rule. Let the decal sit at room temperature for at least a full day before it leaves the house. This gives the pressure-sensitive adhesive time to "wet out" and flow into the microscopic texture of the plastic surface.
If you plan on using a dishwasher, wait at least 72 hours before the first cycle. The bond continues to strengthen over the first few days, and exposing it to high heat too early can compromise the finish. While these transfers are incredibly resilient, giving them that initial window to cure ensures they handle the daily grind of the playground and the kitchen much more effectively. Taking this extra care at the beginning means you won't be re-labelling gear halfway through the term.
Choosing Your Labels: Size, Icons, and School Essentials
Choosing the right design is where the fun begins. While the technology ensures they stay put, the size and style ensure they are actually useful for daily life. If you're looking for the best labels for plastic lunchboxes, you need to think about the variety of gear in a school bag. From the main bento box to those tiny snack pots that always seem to go missing, one size rarely fits all. It's about finding a balance between looking great and being highly functional.
Matching your label to the container size prevents the edges from overlapping or looking cluttered. A large name on a small lid might be more prone to lifting if it's too close to a curved edge. On the flip side, a tiny label on a large lid might be missed by a busy teacher or a child in a hurry. Contrast also plays a huge role. Choosing a bright, high-contrast colour helps the name "pop" against the lunchbox lid, making it much easier to spot in a crowded cubby hole or a lost property bin.
Don't stop at just the lid. Labelling the base of the lunchbox and any internal inserts or snack pots is a smart move. If the lid gets separated during wash-up or lunch time, having the name on the base ensures the whole set finds its way back home. This extra step is especially helpful in a kindy environment where gear often gets mixed up during group snack times.
Sizing Guide for Common Lunchboxes
Different containers require different approaches. For those small yoghurt pots or fruit containers, Slim or Mini labels are ideal. They provide enough room for a name without overwhelming the small surface area. If you're dealing with a large bento-style lid, the Mega Name Pack is your best bet. It offers a bolder look that fills the space professionally and looks like it was part of the original design.
Families with multiple children often benefit from a "Sibling Pack" strategy. By ordering a mix of sizes and colours, you can organise everyone's gear in one go. This keeps the kitchen cupboard tidy and ensures every drink bottle and lunchbox is clearly marked before the first day of term. It's a practical way to stay on top of the household chaos.
Icons and Fonts for Early Learners
For kids who haven't quite mastered reading yet, personalised icons and name labels are a lifesaver. A simple picture of a dinosaur, a flower, or a rocket helps a kindy student identify their own belongings instantly. It builds confidence and reduces the chance of accidental lunch swaps.
When choosing your design, consider the font as well. Teachers and school staff appreciate clear, readable fonts that are easy to scan from a distance. You can browse our Icon + Name Packs for inspiration on how to combine fun graphics with practical text. Ready to get started? You can explore our full range of personalised name labels to find the perfect fit for your family.
Long-Lasting Results: Caring for Your Personalised Containers
Choosing the best labels for plastic lunchboxes is the first step toward a stress-free school year. The second step is looking after them so they stay as vibrant as the day you applied them. We want your kids to come home with the same gear they left with, and we want those labels looking sharp until the very last day of term. Adopting a "buy once, label once" mindset saves you time, money, and the headache of re-doing everything halfway through the year. While UV DTF transfers are incredibly hardy, they still appreciate a bit of kindness to stay in top condition.
Durability isn't just about the product; it's about how the item is treated during the daily rush. These transfers are designed to handle the rough and tumble of the playground, but following a few simple care guidelines will help maintain that premium, raised finish. It's all about protecting the bond between the ink and the plastic surface.
Dishwasher and Cleaning Tips
The biggest question we get from busy parents is about the dishwasher. While many families use them daily, the top rack is always the safest spot for your labelled gear. Most dishwashers have a heating element at the bottom that gets extremely hot. This intense heat causes plastic containers to expand and contract rapidly; this movement puts unnecessary stress on the bond of any name decal. Placing your lunchboxes and drink bottles on the top rack keeps them away from that direct heat source and extends the life of the transfer.
When you're doing a quick hand wash, skip the abrasive green sponges or metal scourers. Scrubbing directly on the raised edges of the transfer with a rough surface can cause premature wear or small chips in the design. A soft cloth and standard dish soap are all you need to keep things hygienic. Avoid harsh industrial chemicals or long soakings in bleach, as these can eventually break down the adhesive and fade the beautiful colours of your personalised designs.
Maintenance and Troubleshooting
Playgrounds are tough environments. Your child's gear will inevitably face scuffs, drops, and scratches during lunch breaks and sports practice. If you notice a tiny corner starting to lift, it's often just a sign that a bit of dust or oil was trapped during application. You can often press it back down firmly with your thumb to reseal the bond. If the label has been through a lot and you eventually need to remove it, perhaps to pass a quality bento box down to a younger sibling, you can gently pick at the edge to lift the transfer away.
Taking these small steps ensures your organisation efforts last the distance. It feels great to open the cupboard and see everything neatly marked and ready for the day ahead. If you're ready to get your household sorted for the school year, why not explore our best-sellers to find your perfect match? We've helped thousands of families across New Zealand keep their gear out of the lost property bin, and we'd love to help yours too.
Ready for a Stress-Free School Year?
Organising school gear doesn't have to be a recurring chore. By understanding the "plastic problem" and switching to UV DTF technology, you can move past the frustration of peeling corners and faded names. These transfers offer a smooth, no-background finish and a raised 3D effect that looks like it was printed directly onto the container. It's a professional look that stands up to the daily grind of New Zealand school life much better than traditional stickers.
Finding the best labels for plastic lunchboxes is about more than just a strong adhesive. It's about choosing a product designed for the specific challenges of low-surface-energy plastics. When you combine the right technology with careful preparation and top-rack dishwasher care, you create a bond that lasts. Every decal is designed and made in New Zealand; this ensures your family gets the quality and personal touch you deserve.
Ready to get your household sorted? Browse our range of premium UV DTF lunchbox name decals to find the perfect style for your little ones. We can't wait to help you keep those lunchboxes and drink bottles out of the lost property bin this year.
Frequently Asked Questions
Are these lunchbox labels really dishwasher safe?
Our UV DTF transfers are designed to handle many cycles in the dishwasher when applied correctly to a compatible surface. It is essential to wait at least 72 hours after application before exposing them to water or heat. We recommend using the top rack only to avoid the intense heat of the bottom element. While they are very resilient, avoiding harsh industrial chemicals will help maintain the vibrant colour and raised finish of the best labels for plastic lunchboxes.
Will these labels work on my Bento or Tupperware lunchbox?
These decals bond best to smooth, hard plastics found on many popular bento boxes. If your container has a very textured or "frosted" finish, the adhesive may struggle to make full contact. For tricky surfaces, using a hair dryer on a low setting during application can help the transfer mould to the shape. Always ensure the surface is bone-dry and free from any oily residues before you begin the application process.
Can I use these name decals on my child’s drink bottle too?
Yes, these transfers are perfect for personalising drink bottles made from hard plastic, glass, or stainless steel. The no-background design creates a seamless, printed-on look that won't catch on the inside of school bags. Because there is no bulky border, they are less likely to be picked at by curious fingers. They are a practical way to ensure your child's gear stays out of the lost property bin throughout the school year.
How do I remove the labels if I want to change them?
You can remove the decals by carefully picking at the edge with your fingernail or a plastic scraper. They are designed for long-term durability, but they won't leave behind the thick, sticky residue often associated with cheap vinyl stickers. If you need to pass a lunchbox down to a sibling or update a design, a slow and steady peel is all it takes to clear the surface for a fresh start.
What is the difference between these and standard vinyl stickers?
The primary difference is the no-background finish and the slightly raised 3D effect of UV DTF technology. Standard vinyl stickers sit on top of the plastic with a clear or white border that often catches and peels. Our transfers apply only the ink and adhesive directly to the surface. This creates a much cleaner, more professional appearance that looks integrated with the product rather than just stuck on as an afterthought.
Do you offer labels for kids with allergies?
We certainly do. Our Allergy & Medical range is designed to provide clear, high-contrast alerts on lunchboxes and drink bottles. These are vital for keeping kids safe at kindy or school by highlighting specific dietary needs to teachers and supervisors. You can choose from various icons and bold text options to make sure the information is impossible to miss during busy snack times or lunch breaks in the playground.
How long does it take to receive my personalised labels?
We process orders as quickly as possible to get your gear organised for the new term. Every label is custom-made right here in New Zealand, so lead times can vary depending on the time of year, especially during the busy back-to-school season. Once your order is ready, we ship nationally to families across the entire country. We also offer a local pickup option for those who prefer to collect their personalised items in person.
Can I apply these labels to fabric lunch bags?
No, these transfers are strictly for smooth, hard surfaces only. They will not bond to fabric lunch bags, soft silicone, or flexible plastics. For the best results, stick to items like hard plastic bento boxes, metal drink bottles, or stationery cases. If you are unsure if a surface is suitable, look for a high-gloss or smooth finish; this provides the best foundation for a permanent-looking bond that handles daily use.
