

Personalised Water Bottle Decals: The 2026 Guide to Durable Drinkware Labelling
Have you ever pulled your child's lunch bag out at the end of a long Monday only to find their name label curled up and peeling at the edges? It is a common frustration for Kiwi parents who just want gear to last the school term without looking tatty. We know how much effort goes into choosing the right gear, and seeing a cheap-looking sticker background ruin the aesthetic is disappointing. If you are searching for custom decals for drink bottles nz, you probably want a solution that looks integrated and professional rather than like a temporary afterthought.
We agree that your hard-earned money should go towards labelling that actually survives the daily school run. This guide will help you discover how to choose and apply high-quality decals that stay put on your drink bottles without peeling or fading. We will walk through the latest UV DTF technology, provide practical application tips for the best results, and show you how to achieve a stylish, no-background finish that looks like it was printed directly onto the bottle. By the end, you will know exactly how to create durable, personalised gear that your kids will be proud to carry.
Key Takeaways
- Traditional vinyl stickers often peel due to condensation and friction, but UV DTF technology offers a more durable, integrated look for Kiwi school gear.
- No-background decals provide a professional, slightly raised finish that looks like it was printed directly onto the surface rather than sitting on top of it.
- Identify the best surfaces for custom decals for drink bottles nz, including glass and stainless steel, while learning how to handle tricky plastics.
- Achieve a perfect application every time by following our simple surface preparation steps and the specific low-angle peel technique.
- Extend the life of your personalised labels by choosing gentle hand washing over harsh dishwashers to keep designs looking fresh for longer.
Why standard vinyl stickers often peel off drink bottles
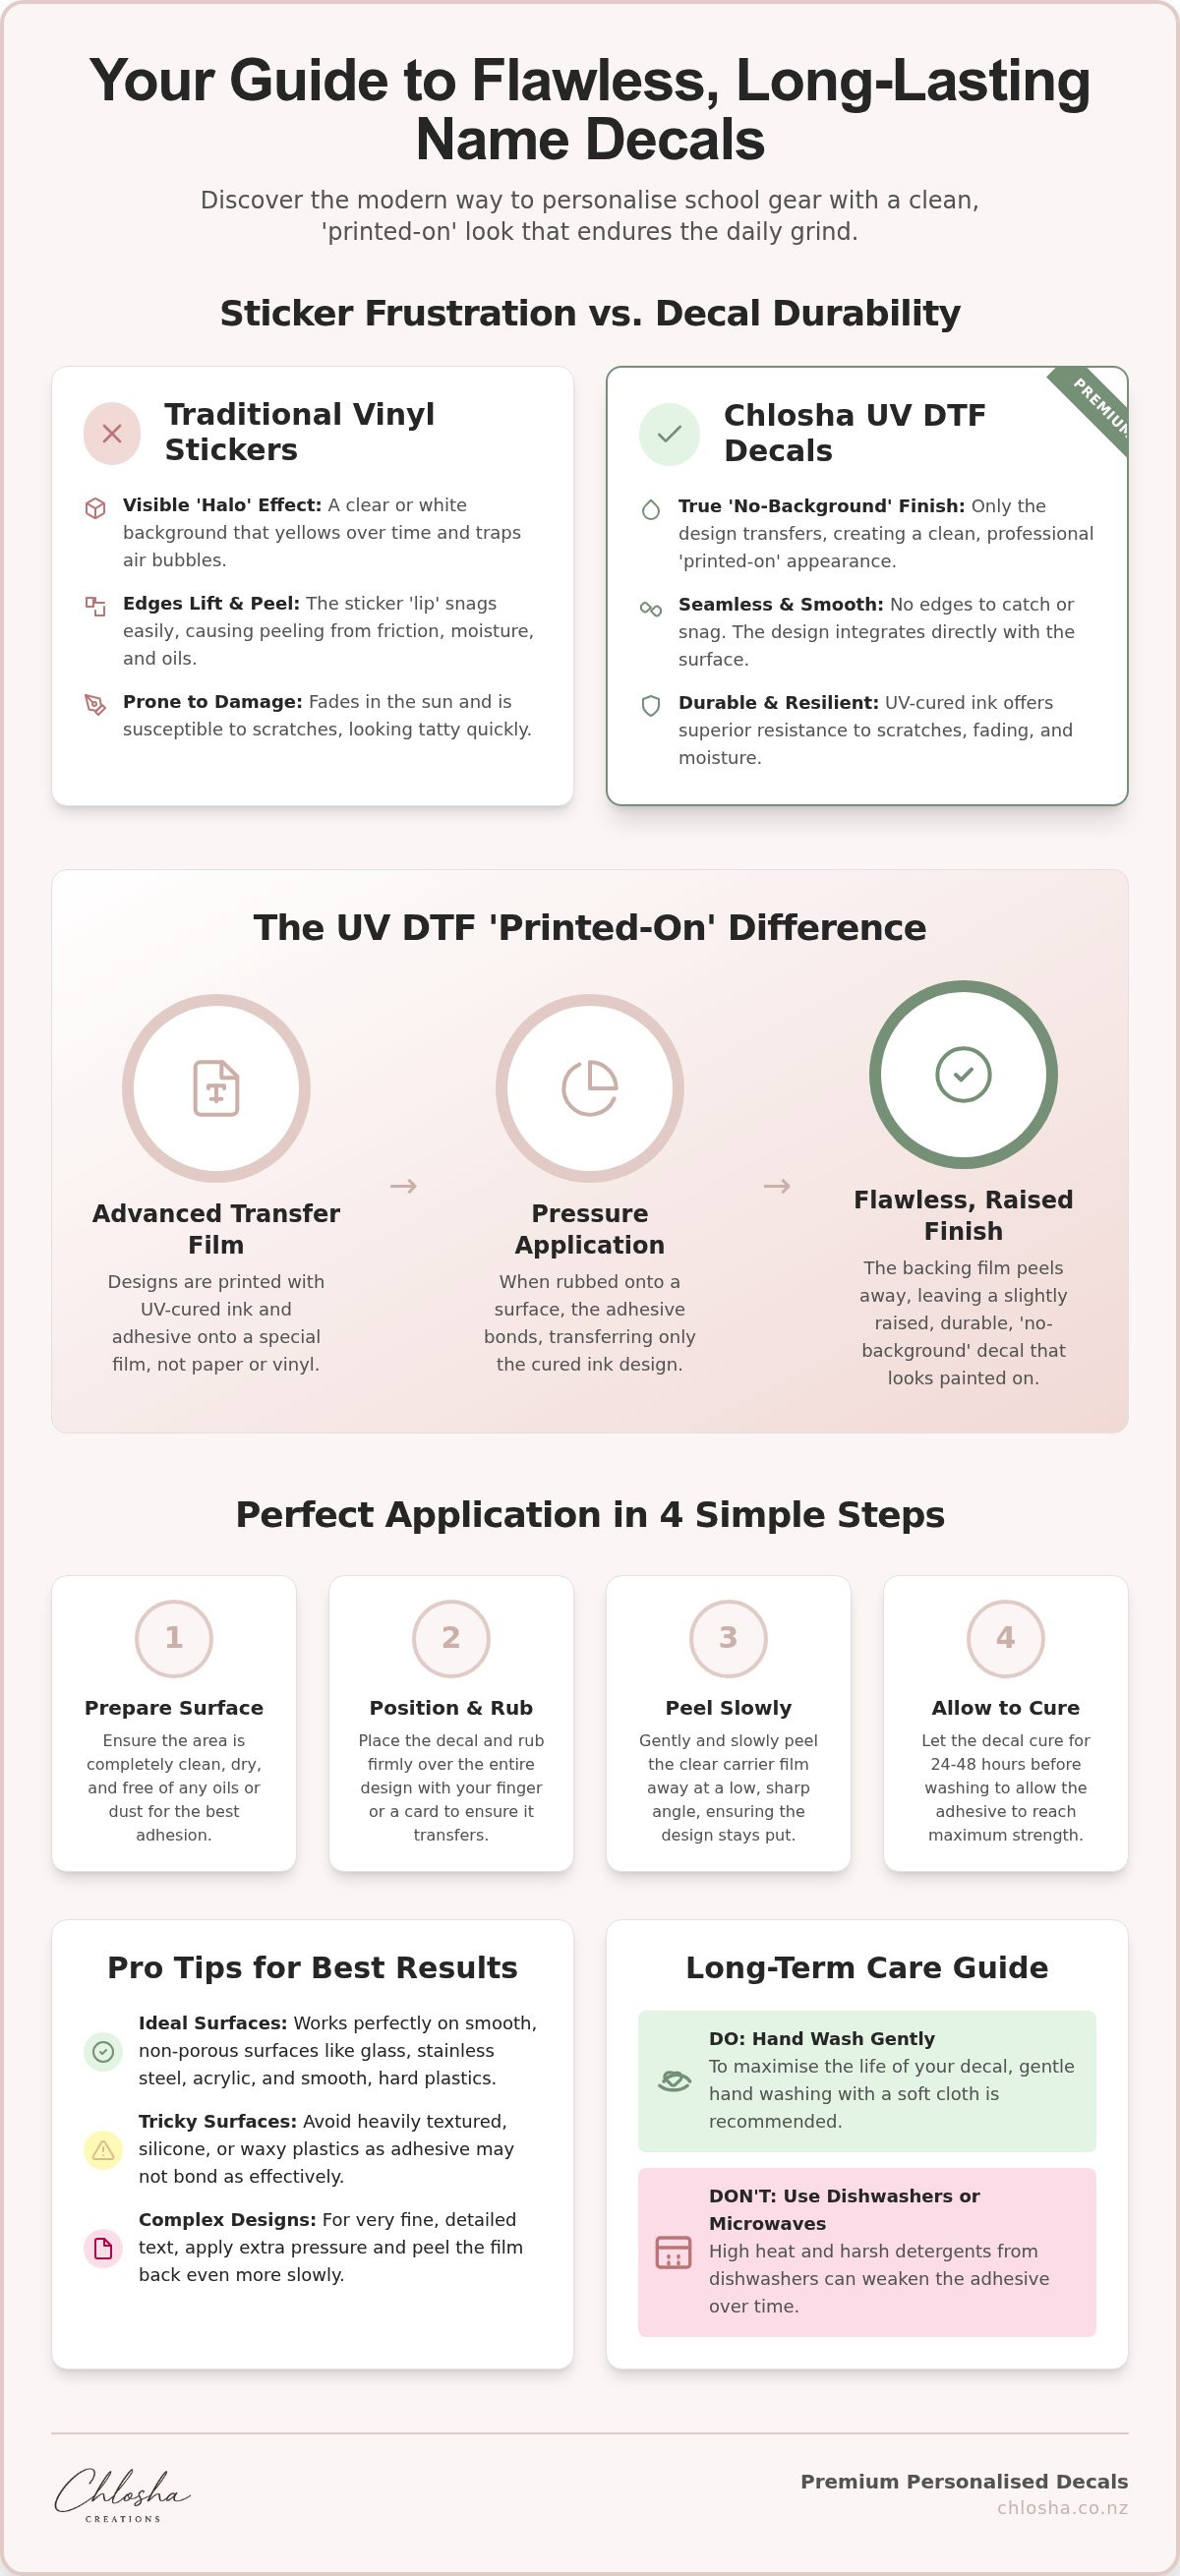
Have you ever noticed how that "durable" sticker you bought last month is already lifting? It is a common sight on school drink bottles across New Zealand. You spend ages choosing a design, only for the edges to start curling after a few trips in a backpack. While many people use the terms interchangeably, there is a technical difference when we ask What is a decal? compared to a standard paper or vinyl sticker. Most traditional stickers are essentially a layer of plastic or paper with a layer of adhesive on the back. This construction is fine for a notebook, but it often fails when faced with the rough and tumble of daily life.
The 'lip' effect: Why edges matter
Standard vinyl stickers have a physical thickness you can feel. This creates a tiny "lip" around the edge of the name. Every time your child slides their bottle into a side pocket or grabs it with sandy hands at the park, that edge gets caught. Over time, the friction weakens the bond. If you are looking for custom decals for drink bottles nz, you need something that avoids this snagging hazard. Heat and moisture also play a role. The humidity in a school bag or the warmth of a car on a hot summer afternoon can soften standard adhesives. Once that edge lifts even a millimetre, dust and lint get underneath; this makes it impossible to stick back down.
Aesthetic limits of traditional stickers
Have you noticed how some labels have a clear "halo" around the letters? That is the sticker background. While it might look okay at first, these clear areas often become cloudy or yellowed as they age. They can also trap tiny air bubbles during application, which makes the whole thing look a bit "DIY" rather than professional. This background often distracts from the actual design of the bottle itself. For a broader look at how to manage gear effectively, check out The Ultimate Guide to Personalised Name Labels in NZ.
Oils from our skin are another silent enemy. Every time a bottle is handled, natural oils transfer to the label. Standard vinyl adhesives are not always resistant to these oils. This can lead to a "sliding" effect where the label slowly shifts or loses its grip. Condensation is the final blow. As cold water hits a warm room, the bottle "sweats." This constant moisture can seep under the edges of a traditional sticker, eventually leading to that frustrating peeling. Choosing a high-quality transfer instead of a basic sticker is the first step toward labelling that actually lasts.
The UV DTF difference: What are no-background decals?
UV DTF is the modern solution for Kiwi families who are tired of looking at tatty, peeling stickers. But what exactly is it? UV DTF stands for Ultraviolet Direct-to-Film. It is a premium printing method where the design is printed onto a film and then cured instantly with ultraviolet light. This process creates a transfer that is tough, vibrant, and slightly raised to the touch. When you use these custom decals for drink bottles nz, you are choosing a finish that stays crisp and clear for much longer than traditional alternatives.
Unlike traditional stickers, these transfers don't have a clear or white border. When you apply them, only the ink remains on the bottle. This means your drink bottle colour shines through the design; it looks like the name was printed directly onto the gear at the factory. It’s a clean, bespoke finish that makes even a standard supermarket bottle look like a high-end personalised item. Because there is no bulky background, the design feels integrated with the surface rather than just sitting on top of it.
The science of a 'printed-on' look
UV DTF is a high-quality transfer cured with ultraviolet light to create a bond that is significantly more robust than standard ink. Once you peel away the transfer film, there is no carrier film left behind on your drinkware. This lack of a "sticker background" is what gives the decals their professional, integrated appearance. It is the perfect way to upgrade everyday school gear without the clunky look of traditional labels.
Why premium transfers outperform vinyl
Traditional vinyl relies on pressure-sensitive adhesives that can be prone to lifting if the edges are caught or if the surface is frequently handled. UV DTF transfers are different because the ink itself is cured into a hard, durable layer. This provides high resistance to fading from the New Zealand sun and helps protect against minor surface scratches during daily use. The bond is designed to withstand the heat and moisture that often causes standard labels to fail.
The slightly raised, 3D texture adds a premium feel that you simply cannot get with flat vinyl. It feels substantial and high-quality under your fingers. If you want to know more about the technical side of things, read our UV DTF Transfers New Zealand guide. It explains why this technology is such a step up for home organisation.
Are these the same as clothing labels? Not at all. While iron-on labels are designed for fabric and paper labels are for temporary use, these transfers are built for hard surfaces. They are specifically designed for the rigours of the lunchroom and the playground. If you are ready to see the difference for yourself, you might want to browse our latest personalised name labels to find a style that suits your child's personality. It is a simple way to make sure their favourite bottle always finds its way home.
Choosing the right custom decals for your drinkware
Picking the perfect design is the fun part, but checking compatibility is what makes it last. Not all drink bottles are created equal. While our transfers are incredibly versatile, they perform best on smooth, non-porous surfaces. Think of your classic stainless steel flasks, glass bottles, and hard plastic lunchboxes. These provide the solid foundation needed for a secure bond. If you are searching for custom decals for drink bottles nz, starting with the right surface is the secret to success.
Surface compatibility and adhesion
Most high-quality drinkware brands use materials that love UV DTF transfers. However, some "low-surface-energy" plastics like polypropylene, often marked with a '5' in a triangle, can be a bit trickier. You can perform a quick test by seeing if water beads off the surface instantly or if the plastic feels slightly "waxy" or "oily" to the touch. These surfaces are designed to repel things, which includes adhesives. Understanding The Science Behind UV DTF helps explain why smooth surfaces allow the UV-curable inks to form a tighter grip during the application process.
We recommend avoiding textured finishes, silicone sleeves, or soft, "squeezy" plastics. These materials flex and move, which puts stress on the decal. Some modern bottles also come with special powder-coated finishes. While many of these work beautifully, extremely coarse or "sand-like" textures might prevent the transfer from sitting completely flat. A smooth, clean surface is always your best bet for a professional result.
Selecting the perfect label pack
Size matters when it comes to labelling. A decal that looks great on a large 1-litre flask might be too bulky for a slim, toddler-sized bottle. We offer a variety of personalised name labels designed to fit everything from skinny straws to wide-mouth canisters. For the little ones heading off to kindy, our Icon + Name Packs are a fantastic choice. The addition of a recognisable icon, like a dinosaur or a flower, helps children identify their gear before they can even read their own name.
Don't forget to coordinate your colours. Choosing a font colour that contrasts with the bottle makes the name pop and helps teachers quickly spot whose bottle is left on the playground. It is a simple way to reflect your child's personality while keeping the household organised. Whether it is a bold neon for a sports fan or a soft pastel for a creative soul, the right combination makes their gear feel truly special.
How to apply your personalised decals for a professional finish
Applying these transfers is a simple process, but taking a few extra minutes during the application will ensure your gear looks factory-fresh. Unlike basic stickers that you just slap on, these no-background designs require a methodical approach to achieve the best results. If you are using custom decals for drink bottles nz, following these steps will help you avoid the common pitfalls of peeling or misaligned text.
Preparation: The secret to a long-lasting bond
The most important step happens before the decal even touches the bottle. Even if a surface looks clean, it often carries invisible oils from your fingers or residue from manufacturing. These oils act as a barrier that prevents the adhesive from making full contact. Use a clean, lint-free cloth and a bit of rubbing alcohol or warm soapy water to thoroughly prep the area. Ensure the bottle is completely dry before you begin. Working in a warm environment also helps; the adhesive is more pliable and "tacky" when it isn't freezing cold.
Once the surface is ready, plan your positioning carefully. You only get one shot at this, as the bond begins to form immediately. Peel the backing away slowly and press the design firmly onto the bottle. Use your thumb or a soft squeegee to rub over the entire design, ensuring every letter is pressed down. When it’s time to remove the transfer film, use a low-angle peel technique. Instead of pulling the film straight up, pull it back flat against itself. This keeps the pressure on the design and prevents the letters from lifting with the film.
For surfaces that feel a bit more stubborn or have a slight texture, a warm hair dryer on a low setting can work wonders. A quick five-second blast of warmth softens the ink just enough to help it mould into any tiny imperfections on the bottle's surface. Just be sure not to overheat it; a gentle warmth is all you need to encourage that professional, integrated finish.
The curing process: Why patience pays off
This is where most people get caught out. While the decal might feel stuck straight away, the bond continues to strengthen over the first few days. This is especially true when using custom decals for drink bottles nz on stainless steel or glass. We recommend waiting at least 24 hours before taking the bottle out for normal use. If you want the best possible durability, follow the 72-hour rule. Avoid any exposure to water or cleaning for three full days. This curing time allows the adhesive to settle and create the strongest possible grip on your gear.
It is important to remember that while these transfers are incredibly tough, no label is truly indestructible or permanent. Their longevity depends on your surface type, the correct application, and how well you care for them. By giving the adhesive time to set, you are giving your gear the best chance at surviving the school year. If you are ready to start your next project, you can find our full range of personalised name labels online to get started.
Caring for your personalised drinkware and gear
You have put in the effort to select the perfect design and apply it carefully. Now, the goal is to make sure your custom decals for drink bottles nz stay looking fresh for as long as possible. While our premium UV DTF transfers are designed for the rigours of school life, they still appreciate a bit of gentle handling. Think of these as a high-quality finish rather than a rough and ready sticker. Proper care ensures the vibrant colours and slightly raised texture remain a highlight of your child's gear.
Washing guidelines for busy NZ households
We always recommend gentle hand washing as the gold standard for your personalised items. It only takes a minute with a soft sponge and mild dish soap to keep the surface clean without putting undue stress on the decal. Avoid using abrasive scrubbers like steel wool or the scratchy side of a heavy duty sponge; these can micro-scratch the cured ink over time. If you want to keep the design looking brand new, a soft cloth is your best friend.
What about the dishwasher? While modern machines are convenient, the combination of intense heat and harsh chemicals can be tough on any adhesive. To play it safe, keep your labelled bottles out of the dishwasher entirely. If you must use it, the top rack is the only place to consider, but be aware that this may shorten the lifespan of your decal. Another tip for busy parents: don't leave drink bottles soaking in a sink of hot water for hours. Extended soaking can allow moisture to eventually creep under the edges, which is the leading cause of premature lifting.
Signs it is time to refresh your labels
Even the best transfers won't last forever. You might eventually notice the edges looking a bit grey or the fine details starting to wear down after years of daily use. If you are using custom decals for drink bottles nz, this is a natural part of the product's lifecycle. If you see early signs of lifting, you can sometimes press the edge back down with a warm thumb to reseal it, but once dirt gets underneath, the bond is gone.
When it’s time for a change, removing an old decal is easy. Simply use a hair dryer to warm the ink and peel it away slowly; any remaining residue can be cleaned off with a bit of eucalyptus oil or a dedicated adhesive remover. If you have struggled with traditional stickers in the past and are ready for a more durable solution, you can explore our latest personalised name labels to find a fresh look for the new term. Keeping your gear organised doesn't have to be a chore when you have the right tools and a few simple care habits in place.
Level up your school gear for the year ahead
Choosing the right labelling isn't just about aesthetics; it's about making daily life a little easier for busy families across the country. By moving away from standard vinyl and embracing the clean, no-background finish of UV DTF technology, you can ensure your child's gear looks professional and stays identifiable throughout the term. Remember that the secret to longevity lies in selecting compatible surfaces and allowing that crucial 72-hour curing time before the first wash. These small steps transform a simple bottle into a personalised item that reflects your child's unique personality.
As a family-run NZ business, we take pride in providing premium UV DTF quality that stands up to the rigours of the playground. Whether you need school name labels or custom decals for drink bottles nz, our transfers offer a smooth, slightly raised finish that traditional stickers simply can't match. We even offer a local pickup option for those who are in a hurry to get their gear ready for the new term.
Explore our range of durable, no-background name labels today and discover how easy it is to keep your household organised. We look forward to helping you create something special that lasts.
Frequently Asked Questions
Are these personalised water bottle decals dishwasher safe?
Our premium transfers are highly durable, but we recommend gentle hand washing to keep them looking their best for longer. If you choose to use a dishwasher, wait at least 72 hours after application to allow the bond to cure fully. Always use the top rack and avoid intensive heat cycles. Remember that no label is truly indestructible; avoiding harsh dishwasher chemicals will help prevent the edges from lifting prematurely over time.
Will the decals stay on stainless steel bottles like MontiiCo or Yeti?
Yes, our transfers bond exceptionally well to smooth stainless steel surfaces like those found on MontiiCo or Yeti flasks. These hard, non-porous materials provide the perfect foundation for our UV DTF technology. When you choose custom decals for drink bottles nz, ensure the surface is clean and free of oils before applying. A well-applied decal on a quality stainless steel bottle creates a professional, printed-on look that resists the rigours of daily school use.
Can I put these labels on my child’s kindy sippy cup?
You can certainly use these on hard plastic sippy cups, provided the surface is smooth and non-textured. Many kindy items are made from polypropylene or silicone, which can be tricky for any adhesive to grip. We recommend checking that the cup isn't flexible or squeezy, as constant movement can cause the decal to crack. For best results, stick to rigid, high-quality plastics and follow our standard preparation steps to ensure a secure bond.
How do I remove the decal if I want to change the name or design?
Removing a decal is straightforward if you decide to update a name or design. Gently warm the transfer with a hair dryer on a low setting to soften the bond, then slowly peel it away from the surface. If any sticky residue remains, a small amount of eucalyptus oil or a dedicated adhesive remover will clean the bottle without damage. This allows you to refresh your gear whenever your child outgrows a specific style or icon.
What happens if my drink bottle has a textured or powder-coated finish?
Adhesion depends on how coarse the finish is. While many modern powder-coated bottles work beautifully, extremely textured or sand-like finishes can prevent the decal from sitting completely flat. This creates tiny air gaps where moisture can enter, eventually leading to lifting. If your bottle has a heavy texture, your custom decals for drink bottles nz might not achieve their maximum lifespan. We suggest sticking to the smoothest part of the bottle for the best results.
Do you offer a local pickup option for these name labels?
Yes, we provide a local pickup option for customers who prefer to collect their orders in person. This is a fantastic way to save on shipping costs and receive your personalised items as quickly as possible. Simply select the pickup method during the checkout process. We will send you a detailed notification with all the necessary collection information once our team has finished preparing your order at our office location.
Can I get a custom logo for my business drinkware?
Yes, we offer a dedicated service for custom business logo transfers. Our UV DTF technology is perfect for branding company drinkware, event bottles, or promotional gifts because it provides a high-end, no-background finish. This makes your logo look like it was factory-printed directly onto the item. Whether you need a small batch for a team event or a larger run for client gifts, our custom printing service can accommodate your specific branding and design needs.
How many labels come in a standard personalised pack?
Our popular Classic Name Pack includes 12 labels on a single 140 by 200 mm sheet. This pack gives you a versatile mix of sizes: two large labels for drink bottles, four medium labels for lunchboxes, and six small labels for stationery or smaller gear. If you need something larger, our Mega Name Pack features two extra-large transfers. Each pack is designed to provide a cohesive look across all your child's essential school supplies and daily equipment.
