

Clear Background Custom Decals: The Guide to No-Background Transfers in NZ
Why does a "clear" label always end up with a dusty, grey border of lint after just one week in a school bag? It's a common frustration for parents and small business owners across New Zealand. You want your branding or your child's name to look like it was printed directly onto the surface; instead, you're often left with peeling edges and a visible sticker outline that looks anything but professional.
We know you need labels for drink bottles and lunchboxes that can handle the daily grind of kindy or the school playground. If you're looking for a way to elevate your gear, clear background custom decals using premium UV DTF technology are the answer. These transfers provide a stunning, raised finish that feels integrated into the item rather than just stuck on top. It's the perfect way to get a high-end look without the need for industrial machinery.
In this guide, we'll show you how to achieve that professional, no-background finish for your own projects. We'll explain why this technology is such a practical fit for busy families and how to ensure your custom decals stay looking sharp through plenty of use.
Key Takeaways
- Learn why UV DTF technology is the best choice for clear background custom decals, providing a 3D raised effect without any messy plastic borders.
- Discover how to keep school gear organised with durable transfers that stand up to the daily school run and kindy life.
- Professionalise your small business branding by applying logo transfers directly to glass jars, candle tins, or boutique drink bottles.
- Master the application process with the 'low-angle peel' technique and learn why a 72-hour curing time is essential for the best results.
- Find the right fit for every item by choosing between Mini labels for pens and Mega labels for lunchboxes.
What Are Clear Background Custom Decals?
When you want your design to look like it was printed directly onto a surface, you're looking for a specific type of finish. A clear background decal isn't just a sticker with a transparent border. It's a transfer that leaves only the ink behind. To get a better grasp of the terminology, you might ask What are decals? and how they differ from the paper stickers we used as kids. Unlike those old-school stickers, these modern transfers use a specialised process to ensure that once applied, there's no visible plastic film surrounding your design.
Choosing clear background custom decals means you're opting for a professional, "painted-on" look. This is achieved through UV DTF technology, which is the secret behind the clean and crisp finish you see on high-end boutique products. These transfers work beautifully on a variety of hard surfaces, including glass jars, metal drink bottles, acrylic signage, and hard plastic lunchboxes. It's a versatile solution for both home organisation and small business branding.
UV DTF vs. Traditional Clear Vinyl
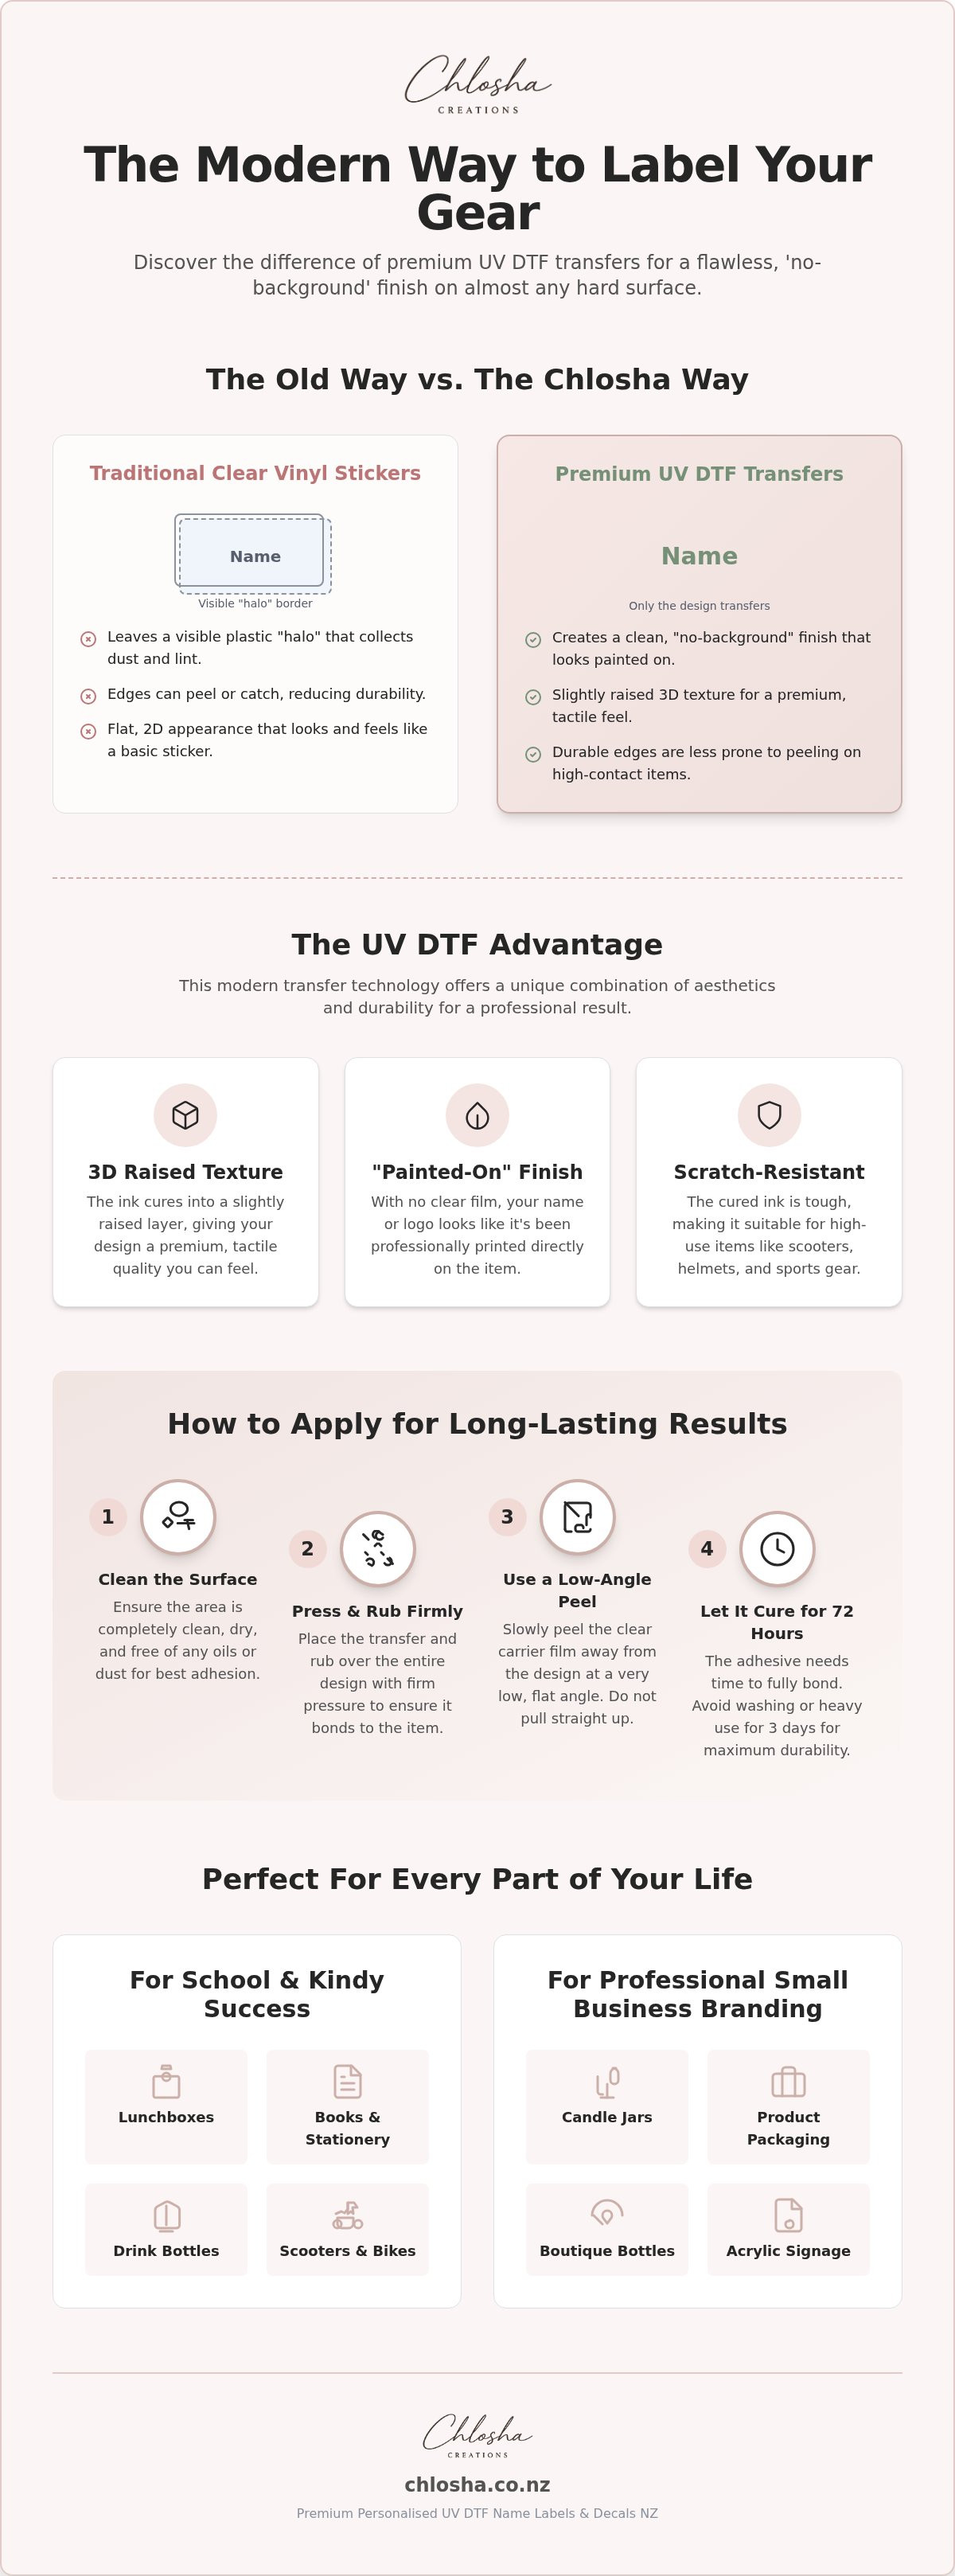
Most traditional clear stickers are made from vinyl. While they're common, they often come with a "halo" border. This is a thin, clear edge of plastic that stays on the surface after you stick it down. Over time, this edge can attract dust and lint, making your label look a bit grubby. UV DTF is different. UV DTF is a transfer process that cures ink directly onto a film for seamless application. When you peel back the carrier sheet, only the design stays.
This technology also creates a unique, 3D raised texture. It's tactile and premium, which is a massive step up from a flat sticker. Because there's no background film to worry about, it's also the best choice for intricate designs. If you have a delicate script font or a logo with fine lines, these transfers keep every detail sharp without any messy plastic filling the gaps.
Why 'No-Background' Matters for Your Gear
The biggest benefit of a no-background finish is the aesthetic. Your branding or your child's name looks like it's part of the product. It doesn't scream "I put a sticker on this." This integrated look is exactly what busy parents and clever business owners are after.
There's a functional side to this too. Since there are no clear edges sitting on the surface, there's nothing for little fingers to pick at or for a bag's lining to catch on. This helps the design stay put during the rough and tumble of daily life. Whether it's a drink bottle being shoved into a backpack or a candle tin being handled by customers, the lack of a background edge means a much cleaner, more durable result. You can explore our personalised name labels to see how this clean finish works for everyday school items.
The Benefits of Premium UV DTF Transfers for Kiwi Families
The daily school run in New Zealand is a real test for any piece of equipment. Between being shoved into backpacks, dropped on the playground, and rattling around in sports bags, lunchboxes and drink bottles take a beating. Using clear background custom decals provides a level of durability that standard paper or vinyl stickers simply can't match. These transfers are designed to handle the friction and constant handling that come with a busy family schedule without losing their crisp, professional look.
Personalisation isn't just about looking good; it's a practical tool for everyday organisation. When your child can spot their specific icon or name from across a crowded bag area, it saves time and prevents lost property. These decals are also scratch-resistant. This makes them ideal for high-use items like helmets and scooters that often end up scraped along the pavement or leaning against rough garage walls. The smooth, clean finish means there are no edges to catch, ensuring the design stays looking fresh for longer.
Labelling for School and Kindy Success
Setting your child up for a successful year starts with clear organisation. Using personalised name labels on stationery and books ensures everything finds its way home at the end of the day. The "no-background" nature of these transfers is particularly helpful for curved surfaces like drink bottles. Unlike traditional stickers that can crease or lift on a curve, these transfers sit flush against the surface for a seamless look. For the little ones who aren't reading yet, our Icon + Name Packs are a brilliant way to help them recognise their belongings through familiar pictures.
Tough Labels for Sports and Outdoor Gear
Kiwi kids spend a lot of time outdoors, and their gear needs to stand up to the elements. Whether it's hockey sticks, cricket bats, or bike helmets, the equipment is often exposed to moisture and the harsh NZ sun. While no label is truly indestructible, the bond these decals form with hard surfaces is incredibly strong once cured. Just as a clear visual identity for your business creates a professional impression, high-quality labelling on sports gear ensures your investment stays identified. For those planning more rugged adventures, you can find more tips in our guide on waterproof labels for camping gear.
Ready to get organised for the term ahead? You can explore our full range of personalised name labels to find the perfect fit for your family's gear.
Professional Branding: Logo Transfers for Small Businesses
The history of transfers is surprisingly deep. The term 'decal' is a shortened version of 'decalcomania,' a decorative transfer technique invented in the 18th century. While the methods have changed, the goal remains the same; adding a bespoke, high-end finish to everyday objects. For a small business in NZ, this technology means you can elevate your product packaging without the massive upfront cost of custom-printed containers. It's a game-changer for makers who want that professional edge from day one.
Whether you are selling hand-poured soy candles or boutique juices, first impressions matter. Using clear background custom decals gives your products a professional edge. The design appears to be printed directly onto the glass jar or candle tin. There is no bulky sticker paper to distract the eye. This creates a clean, integrated look that customers associate with premium brands. It feels intentional and high-end.
One of the biggest wins for local makers is flexibility. You can order DIY decal sheets to test new designs or run limited edition scents. This small batch approach reduces waste and keeps your branding agile. It's a practical way to maintain a consistent visual identity as your business grows without being locked into thousands of pre-printed jars.
Custom Business Logo Transfers
Consistency is key for market stall displays and event signage. Your logo needs to look just as sharp on a display board as it does on your product. When choosing logo transfers, think about the surface area. A "Mini" label might be perfect for a small lip balm tube; however, you'll need something larger for a main display. You can learn more in our guide on branding decals for small business.
Measure your containers carefully before ordering. A logo that is too small can get lost. One that is too large might wrap awkwardly around a curved surface. Aim for a size that leaves a comfortable margin around the design. This ensures the "no-background" effect really shines. It's about finding that perfect balance for your visual identity.
Durability for Commercial Use
Commercial products face a lot of handling. Customers pick them up, put them back, and often transport them in bags. UV DTF technology is a robust Name It labels alternative for premium branding because it bonds so tightly to hard surfaces. It resists the oils from skin and the friction of constant touch. Your branding stays intact long after the product leaves your hands.
Cleaning is another factor for boutique drinkware or display jars. While durable, care should be taken with harsh chemicals to preserve the finish. Avoiding abrasive cleaners ensures the 3D raised effect remains crisp and the colours stay vibrant. This level of durability makes clear background custom decals a reliable partner for your business's daily operations.
How to Apply and Care for Your Custom Decals
Applying your decals correctly is the difference between a finish that looks like part of the product and one that lifts at the edges. While the process is straightforward, taking a few extra minutes to prepare your surface ensures your clear background custom decals stay put through the rough and tumble of daily life. It's about creating a bond that lasts.
Step-by-Step Application Guide
Start by cleaning the surface thoroughly. Use isopropyl alcohol to wipe away any fingerprints, oils, or dust residues. This is the most important step for a long-lasting bond. Even a tiny bit of invisible oil from your hands can stop the transfer from sticking properly. Once the surface is dry, position your decal carefully. Apply firm pressure across the entire design using a squeegee or even the edge of a credit card. This removes air bubbles and ensures the adhesive makes full contact.
When you're ready to reveal the design, use the 'low-angle peel' technique. Slowly pull the carrier sheet back against itself at a sharp angle, keeping it as flat as possible. If any part of the design lifts with the sheet, lay it back down, rub it firmly again, and try once more. Patience here is key for intricate scripts or fine lines in your logo.
Long-Term Care and Maintenance
Timing is everything when it comes to durability. Let your decal sit for at least 24 hours before normal use. If you plan to put the item in the dishwasher, you must wait a full 72 hours. This curing time allows the adhesive to reach its maximum strength. Without this wait, you risk the design lifting during the first wash.
While these transfers are hardy, they aren't suitable for every surface. Avoid applying them to silicone, heavily textured plastics, or fabrics. The adhesive needs a smooth, non-porous surface like glass or hard plastic to grip properly. For the best longevity, we recommend hand washing where possible. If you do use a dishwasher, place the item on the top rack and avoid high-heat settings or harsh chemicals. These can degrade the finish over time.
Tricky surfaces like frosted glass can sometimes be stubborn. If you're having trouble getting the design to transfer, try warming the surface slightly with a hairdryer before application. This can help the adhesive grab more effectively. Ready to start your next project? Check out our personalised name labels to find the perfect design for your gear.
Choosing Your Perfect Personalised Decals
Selecting your designs is often the most enjoyable part of getting organised. Whether you're prepping for the school year or launching a new product line, clear background custom decals allow you to create a look that is entirely your own. The "no-background" finish means the focus remains on your chosen design, giving it a clean, integrated feel on any hard surface.
Visibility is the top priority. For school gear, high-contrast colours are your best friend. A white font on a dark navy drink bottle or a black font on a bright yellow lunchbox ensures the name stands out at a glance. We offer a range of sizes to ensure a perfect fit for every piece of equipment:
- Mini labels: Perfect for small items like pens, pencils, and the arms of sunglasses.
- Mega labels: Built for larger surfaces like lunchboxes, plastic storage crates, and helmets.
If you have little ones at kindy or daycare, our Icon + Name packs are a practical choice. Since many younger children can't yet read their names, a familiar icon like a rocket or a butterfly helps them recognise their belongings instantly. It builds their independence and keeps the lost property bin empty. For those with specific branding needs, our custom UV DTF printing service allows you to turn your own unique designs into professional transfers.
Personalisation Tips for Families
When you're labelling for multiple children, organising a Sibling Pack can save a lot of time. You can choose different colours or icons for each child to keep things distinct while keeping the overall look cohesive. If you're stuck for inspiration, you can see our best sellers for popular font and icon combos that Kiwi families love. Choosing a consistent font across all your gear creates a tidy, organised look that makes the morning rush just a little bit easier.
Next Steps: Creating Your Custom Order
Ordering clear background custom decals is a simple way to elevate your branding or home organisation. For our business customers, the process is just as simple. You can easily upload your high-resolution logo for your business transfers, and we'll handle the precision printing to give your products that high-end finish. If you're based nearby, we offer local pickup options to get your order to you even faster. We invite you to browse our full Name Labels collection to find the sizes and styles that fit your life. Whether it's for school, sports, or your growing business, we're here to help you get organised with a professional finish.
Elevate Your Everyday Gear
Finding a labelling solution that balances style with real-world durability doesn't have to be a struggle. By choosing clear background custom decals, you're opting for a premium UV DTF technology that provides a beautiful, raised 3D professional finish. Whether you're prepping lunchboxes for the new term or creating refined branding for your boutique products, these transfers offer a seamless look that traditional stickers simply can't match. Remember that the secret to longevity lies in the preparation; a clean surface and a bit of patience during the curing process will ensure your designs stay looking sharp.
As a family-run Kiwi business, we take pride in helping our community stay organised with products that actually last. We understand the chaos of the school run and the passion behind a small business launch. We're here to support your journey with quality you can trust. Ready to transform your gear? You can explore our range of premium no-background decals at Chlosha Creations and find the perfect fit for your next project. We can't wait to see what you create.
Frequently Asked Questions
Are clear background custom decals waterproof?
Yes, these decals are built to handle moisture and everyday washing once they have fully bonded to the surface. While they are highly durable, we don't describe them as "indestructible" because their longevity depends on the surface type and correct application. For the best results on items like drink bottles, ensure the surface is clean and dry before you apply the transfer. This allows the adhesive to create the strongest possible bond for long-term use.
Can I put items with UV DTF decals in the dishwasher?
You can put items with these transfers in the dishwasher after a specific waiting period. It is essential to wait at least 72 hours for the adhesive to cure completely before exposure to the heat and water of a dishwasher cycle. We recommend using the top rack and avoiding heavy-duty or high-heat settings. This careful maintenance helps preserve the professional finish and the 3D raised effect without damaging the design.
What is the difference between a clear sticker and a UV DTF transfer?
The main difference is that a traditional sticker has a clear plastic background that stays on the surface, while a UV DTF transfer leaves only the design itself. This "no-background" look is much cleaner and more professional. Additionally, clear background custom decals have a slightly raised, tactile texture that feels premium; standard vinyl stickers are usually flat and can develop a visible border that picks up lint and dust over time.
Do these decals work on drink bottles and lunchboxes?
These decals are specifically designed for smooth, hard surfaces like drink bottles and lunchboxes. They bond exceptionally well to materials like glass, metal, and high-quality hard plastics. They are a practical choice for keeping school gear organised because they don't have edges that easily lift or peel. Just be sure to avoid soft, flexible plastics or silicone surfaces, as the adhesive won't be able to grip effectively to those specific materials.
How long do I need to wait before using my labelled items?
We recommend waiting at least 24 hours before you start using your newly labelled items for normal daily activities. If you plan to wash the item in a dishwasher, the curing time is longer. You should wait a full 72 hours before dishwasher exposure. This patience ensures the bond is as strong as possible, giving your personalised decals the best chance of staying put through plenty of use in a busy household.
Can I apply these decals to fabric or clothing?
No, these transfers are not suitable for fabric, clothing, or soft surfaces. They are designed exclusively for smooth, hard surfaces where the adhesive can create a permanent bond. If you try to apply them to fabric, they will not stick properly and will likely peel off immediately. For school uniforms or bags made of fabric, you would need a different type of labelling solution, such as one of our personalised bag tags.
What surfaces are best for no-background decals?
The best surfaces for clear background custom decals are non-porous and completely smooth. This includes materials like glass, acrylic, metal, and most hard plastics used for lunchboxes. You should avoid textured or grooved surfaces, as well as low-surface-energy plastics like polypropylene. Silicone and flexible plastics are also unsuitable because they tend to repel adhesives, which prevents the transfer from bonding correctly and leads to peeling or lifting after a short time.
How do I remove the decals if I want to change them?
To remove these decals, you can usually catch an edge with your fingernail and peel them away. If the bond is particularly strong, using a hairdryer on a low heat setting can help soften the adhesive and make it easier to lift. If any sticky residue remains on the surface, a gentle adhesive remover or a bit of rubbing alcohol on a soft cloth will clean it up without damaging the item or the surface.
