

Waterproof Labels for Camping Gear: The Ultimate NZ Guide
Have you ever spent a fortune on high-quality tramping gear only to have the name label peel off the moment it hits a bit of Fiordland rain or a camp dishwasher? It is incredibly frustrating when expensive drink bottles and mess kits come home from school camp missing their IDs; or worse, with messy adhesive residue where a cheap sticker used to be. You want your equipment to stay organised without it looking like a primary school craft project. Finding the right waterproof labels for camping gear is about more than just finding sticky paper. It is about choosing a finish that looks like it was printed directly onto the surface.
We understand that Kiwi families need gear that can handle the mud, grit, and moisture of the Great Outdoors. In this guide, you will discover how to choose and apply premium, no-background labels that survive the rugged NZ outdoors without peeling or fading. We will walk you through the best ways to identify your equipment, from headlamps to chilly bins, using UV DTF technology that provides a professional, raised finish. You will learn exactly how to apply these transfers for the best results and how to care for them so they stay looking sharp through every season.
Key Takeaways
- Understand why professional identification is vital for protecting your investment in expensive outdoor equipment and preventing mix-ups at group campsites.
- Learn about the "no-background" advantage of UV DTF technology and why it is the premium choice for waterproof labels for camping gear.
- Find out how to select the right label sizes and surfaces to ensure your transfers look seamless and stay secure on everything from drink bottles to headlamps.
- Follow a simple, step-by-step application process to achieve a clean finish that handles the grit and moisture of the New Zealand bush.
- Discover how choosing locally made, personalised decals helps you stay organised while supporting a small Auckland-based family workshop.
Why Labelling Your Camping Gear is Non-Negotiable
Investing in quality outdoor equipment is a major commitment for any Kiwi family. With New Zealand's sport and camping market valued at over $2.3 billion in 2026, it is clear we take our time in the bush seriously. Replacing a high-end insulated drink bottle, a reliable LED torch, or a stainless steel mess kit isn't just a nuisance; it's a significant hit to the household budget. When gear goes missing at a busy DOC campsite or during a school trip, it rarely finds its way back without clear identification. Using waterproof labels for camping gear is the simplest way to protect that investment and ensure your equipment doesn't end up in a permanent lost-property pile.
Beyond the cost, there is a real environmental impact to consider. Lost and found bins at holiday parks often overflow with unclaimed items that eventually head to landfill. Labelling your gear is a practical sustainability habit that keeps products in use for longer. While many people reach for a permanent marker, these often fail on the dark, textured, or silicone-coated plastics found on modern outdoor gear. The ink either smudges off in the rain or is simply impossible to read against a black surface. Modern pressure-sensitive adhesive technology has allowed for much more durable solutions, but for the most rugged environments, you need a label that feels like part of the product itself.
The School Camp and Scouting NZ Challenge
For children heading off to their first Scouting NZ jamboree or school camp, the "lost property" pile is a genuine source of stress. Common items like headlamps, cutlery sets, and rain jackets are easily mixed up in crowded dorms or shared tents. While basic stickers might have worked for kindy lunchboxes, rugged outdoor use requires a serious upgrade. Using personalised name labels NZ parents trust ensures that even in the chaos of a rainy pack-down, your child's gear is easily identified. It helps reduce "gear anxiety," giving kids the confidence to manage their own belongings while they are away from home for the first time.
Beyond Names: Using Icons for Quick Identification
Sometimes a name isn't quite enough, especially for younger adventurers who are still building their reading confidence. Adding a small, recognisable symbol makes identification instant. You can match icons to the camping theme, choosing images like mountains, tents, or even our beautiful native birds. These Icon + Name Packs create a visual cue that stands out in a sea of identical green or navy equipment. It is a thoughtful touch that makes the gear feel special, ensuring it actually makes the trip back home in the boot of the car rather than being left behind on a picnic table.
Understanding UV DTF: The Premium Choice for Gear Labels
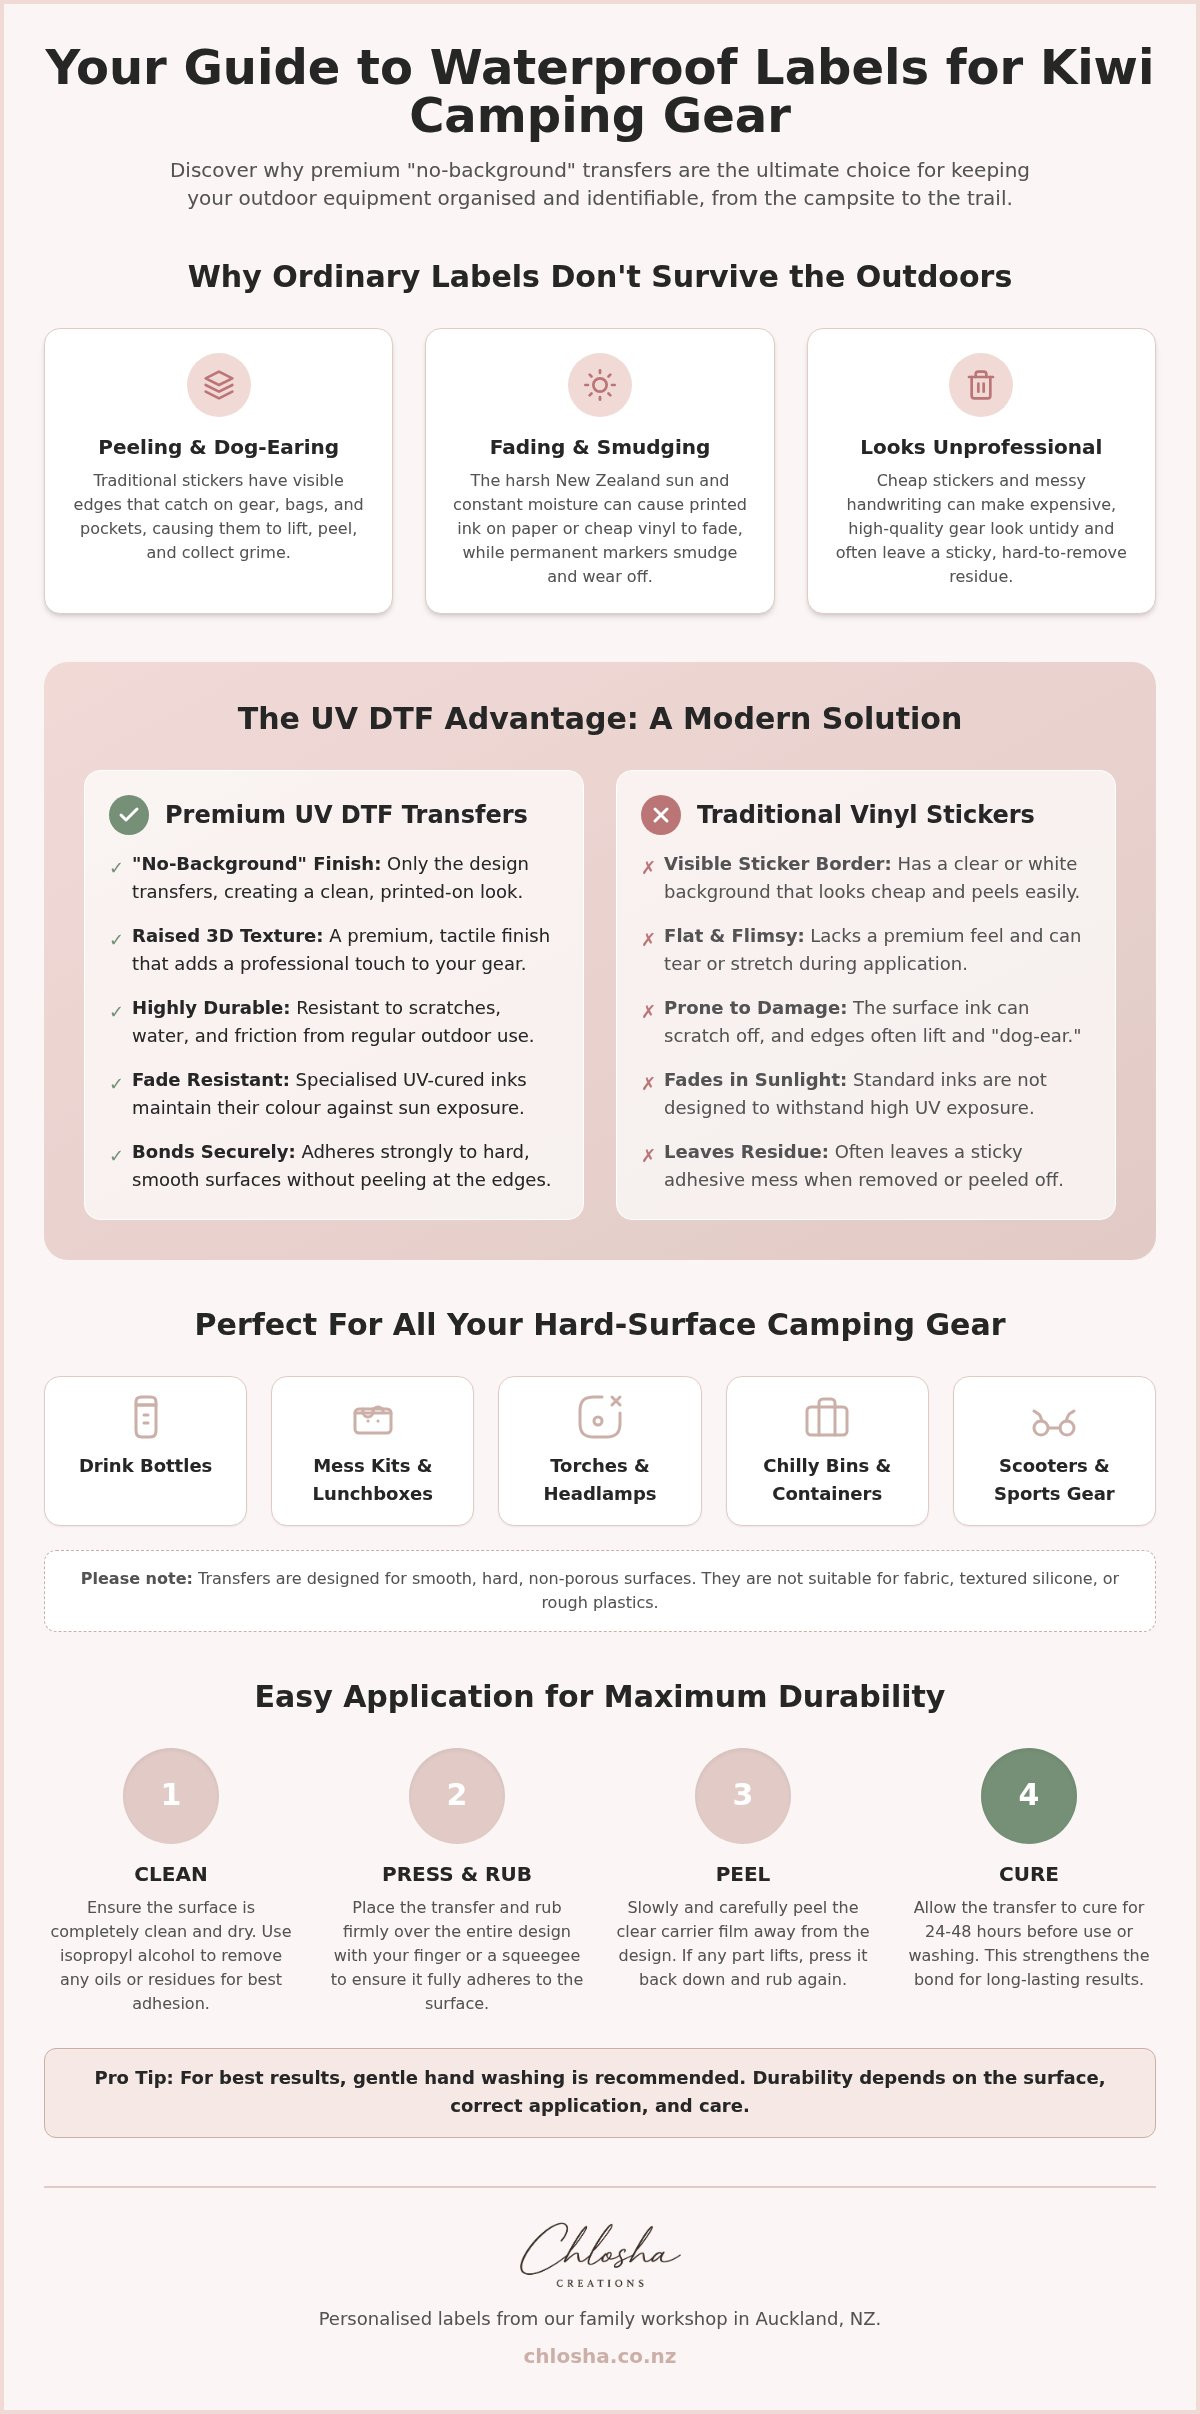
If you have ever bought a sheet of stickers from a big-box retailer, you will know exactly how they look after a week in the wild. They often have a thick white or clear border that starts to lift at the edges, eventually becoming a magnet for dirt. UV DTF (Ultra-Violet Direct to Film) is a completely different technology. Instead of a traditional sticker, this process uses specialised inks that are cured instantly with UV light to create a raised, 3D effect. It is a premium transfer that leaves only the design behind, giving your equipment a smooth, professional finish that feels like it was printed directly onto the surface.
The New Zealand sun is famously harsh, and standard paper labels stand no chance against high UV levels. Chlosha’s transfers are designed to resist fading and scratches, maintaining their vibrant colour even after a summer spent at the beach or in the mountains. This durability makes them the ideal choice for waterproof labels for camping gear that actually lasts. Because the ink is bonded so securely, you don't have to worry about the name rubbing off after a few days of heavy handling in the bush.
UV DTF vs. Traditional Vinyl Stickers
Many online marketplaces default to vinyl stickers because they are cheap to produce, but they often lack the longevity needed for rugged use. Vinyl has a visible border that can "dog-ear" or peel when you are sliding a drink bottle into the side pocket of a tramping pack. In contrast, UV DTF transfers bond tightly to hard surfaces, making them much more resistant to the friction of outdoor life. For a deeper look at how this technology works, check out our UV DTF Transfers New Zealand guide. The slightly raised texture doesn't just look better; it adds a tactile, high-quality feel to your gear that standard flat stickers simply cannot match.
Why "No-Background" Matters for Outdoor Equipment
When you invest in premium brands like Yeti or Kathmandu, you don't want to hide the sleek design under a messy, oversized sticker. The "no-background" advantage means there is no clear film surrounding your name or icon. This allows the label to integrate seamlessly with the colour of your helmet or torch. Standard stickers often develop a "dirty edge" over time as dust and grit collect around the adhesive border, which can look quite untidy on expensive equipment.
Because Chlosha’s transfers eliminate this border, your gear maintains its clean, professional look through rain and mud. If you are looking for waterproof labels for camping gear that won't compromise the aesthetic of your kit, this no-background finish is the clear winner. The result is a permanent-looking identification that survives the elements without the fading or peeling common with paper-based alternatives.
Choosing the Right Labels for Different Outdoor Equipment
Success with waterproof labels for camping gear starts with understanding the material of your equipment. While UV DTF transfers are incredibly versatile, they are specifically designed for hard, non-porous surfaces. Most high-quality camping kit is made from stainless steel or hard-shell plastics, which provide the perfect foundation for a long-lasting bond. The rugged nature of outdoor gear means you will encounter a wide variety of textures and finishes that require a bit of thought before you apply your decals.
A smart "Gear Pack" strategy involves having a range of sizes ready to go. You don't want to try and squeeze a large name label onto a narrow torch handle; nor do you want a tiny mini label lost on the side of a massive chilly bin. By mixing slim, mini, and large labels, you can ensure every piece of your kit is identifiable without the label looking out of place. This also prevents peeling that can happen when a label is forced to wrap too tightly around a small diameter.
Hard Surface Compatibility Guide
For the best results, stick to surfaces that are smooth and firm. Stainless steel drink bottles, acrylic plates, glass jars, and hard polished plastics are ideal. These materials allow the transfer to sit flat and bond securely. You should avoid applying these transfers to silicone, fabric, or soft-touch "rubbery" plastics, as these materials flex and will eventually cause the transfer to lift. Textured "hammered" finishes, often found on heavy-duty flasks, can also be tricky because the transfer cannot make full contact with the recessed parts of the surface.
Polypropylene (PP) plastics, common in many camp storage bins and lunchboxes, require a little extra care. These are low-surface-energy plastics, which means they naturally repel some adhesives. When labelling PP items, ensure the surface is meticulously clean and dry. Giving the transfer a firm rub with your thumb after application helps create a better bond, though you should still allow plenty of time for it to cure before the gear gets wet or muddy.
Size Recommendations for Common Kit
Large labels are your best bet for high-visibility items. These work perfectly on drink bottles, lunchboxes, and plastic storage bins where you need to see the name from across a campsite. For smaller essentials, our Name Labels Collection offers slim and mini options that are a much better fit. Use these for cutlery handles, headlamps, and even toothbrushes. Choosing the right size ensures the transfer isn't overhanging any edges, which is the most common reason labels start to lift during a busy tramping trip.
How to Organise and Apply Labels for Maximum Durability
Applying waterproof labels for camping gear is a bit more involved than just slapping on a sticker if you want them to survive the Southern Alps. Preparation is the most critical step. If there is even a hint of finger oil or dust on your drink bottle, the adhesive won't bond properly. Take your time to get it right before you head out into the bush.
One thing many people miss is the "curing rule." While the label might feel stuck immediately, the bond actually strengthens over time. You should wait at least 24 to 72 hours before taking your gear on a trip or getting it wet. This patience ensures the transfer is as secure as possible before it faces rain, mud, or the heat of a camp stove.
Step-by-Step Application for Camp Gear
Clean the surface with a lint-free cloth and isopropyl alcohol if available.
Carefully position the label on your gear, making sure you don't touch the adhesive underside with your fingers. Even a small amount of skin oil can weaken the bond.
Once it is in place, use a squeegee or firm thumb pressure to push out any air bubbles, working from the centre outwards.
Peel the clear carrier sheet away slowly at a 180-degree angle, keeping it low and flat against the surface rather than pulling it upwards. If any part of the design lifts, lay the sheet back down and rub it firmly again.
If you are applying a label to a slightly curved surface, like a torch handle, a little bit of heat can help. Use a hair dryer on a low setting for a few seconds to soften the transfer, then press it firmly into the grooves. This "heat set" trick is excellent for ensuring a snug fit on tricky equipment.
Long-Term Care and Maintenance
While our transfers are incredibly tough, gentle care will always extend their life. We recommend hand washing your labelled gear whenever possible. If you do use a dishwasher, place items on the top rack and avoid the highest temperature settings.
Avoid using harsh abrasives, steel wool, or heavy-duty scrubbers directly over the raised print. Treat the label like a part of the gear's finish rather than a surface to be scoured.
If a corner ever starts to lift due to a particularly rough scrape, don't pick at it. Use the hair dryer trick again to warm the adhesive and press it back down firmly.
Ready to get your kit sorted? Browse the personalised name labels NZ families use to keep their outdoor gear organised and easy to identify.
Personalised Camping Solutions from Chlosha Creations
Choosing Chlosha Creations means supporting an Auckland-based family business that truly understands the New Zealand lifestyle. Kiwis value quality and durability; especially for the equipment we take into the bush. Unlike generic international sticker brands, we focus on premium UV DTF technology to provide a clean, "no-background" finish that looks like it belongs on your gear. These transfers are a sophisticated way to manage your waterproof labels for camping gear. Your kit stays organised while maintaining its professional look. We believe that every piece of equipment, from the smallest torch to the largest chilly bin, deserves a finish that reflects the quality of the gear itself.
We take immense pride in our craftsmanship and the personal touch we bring to every order. Our small team handles each design with care, ensuring that the final transfer meets our high standards before it reaches your door. Whether you are prepping for a solo tramping trip or organising gear for a large family reunion, we have options that fit your specific needs. We even cater to small groups and scout troops, providing a consistent look for shared equipment. Getting your labels is easy. We offer fast NZ-wide shipping and local Auckland pickup for those who need their transfers in a hurry before the next weekend adventure.
Pack Options for Every Camper
Finding the right combination of sizes is simple with our curated packs. The Classic Name Pack is our most versatile all-rounder. It is the perfect choice for a standard school camp kit, providing enough labels for drink bottles, lunchboxes, and stationery. If you have a larger collection of equipment, such as oversized storage tubs and multiple chilly bins, our Mega Name Packs provide the extra coverage you need. These larger transfers are designed for high-visibility identification. You can explore these and other popular choices in our Best Sellers collection to see what other Kiwi families are using for their outdoor adventures.
Ordering Your Custom Gear Labels
We want the ordering process to be as fun as the trip itself. You can choose from a variety of fonts and colours to match your personal style or your existing equipment. Our online shop is designed to be straightforward for busy parents and organisers. Simply select your pack, enter your details, and we will handle the meticulous production in our Auckland workshop. It is a simple, modern solution for keeping your gear safe and identifiable. We are always here to help if you have a specific design request or need advice on which pack fits your tramping kit best.
Browse our range of personalised gear labels NZ today and get your kit ready for the rugged outdoors.
Ready for Your Next New Zealand Adventure?
Keeping your outdoor gear organised doesn't have to mean dealing with peeling stickers or messy permanent markers. By choosing premium UV DTF transfers, you get a clean, no-background finish that looks like a professional print directly on your equipment. These transfers are built for the rugged conditions of the New Zealand bush; provided you follow the simple steps of cleaning the surface and allowing proper curing time. It is about protecting your investment in quality gear while making sure everything finds its way home after a busy weekend at the campsite.
Our locally made transfers in Auckland are designed to handle the grit of the tramping trail while keeping your expensive equipment easily identifiable. If you are looking for the best waterproof labels for camping gear, our raised, 3D finish provides the durability you need without compromising on style. We are here to help you stay organised with a personal touch that generic brands simply cannot match.
Explore our range of durable, no-background gear labels at Chlosha Creations and get your kit sorted for your next trip. We can't wait to see where your adventures take you!
Frequently Asked Questions
Are these labels permanently waterproof for camping gear?
We don't describe our labels as permanently waterproof because their long-term durability depends on the surface type and how they are applied. While our waterproof labels for camping gear are designed to handle the rain and mud of the New Zealand outdoors, they require a smooth, hard surface to bond correctly. When you follow the application and curing guidelines, these UV DTF transfers provide a very secure and resilient finish for your equipment.
Can I use these labels on my camping clothes or sleeping bag?
No, these transfers are not suitable for camping clothes, sleeping bags, or any other fabric items. They are specifically designed for hard, non-porous surfaces like stainless steel drink bottles, plastic lunchboxes, and helmets. Because the UV DTF technology creates a raised, firm finish, it cannot flex or stretch with the movement of soft fabrics. For your outdoor apparel, you will need to look for dedicated fabric marking solutions instead.
Will the labels stay on my drink bottle in the dishwasher?
While our transfers are very hardy, we don't provide an absolute guarantee that they are dishwasher-proof. If you do choose to use a dishwasher, it is essential to wait at least 72 hours after application to allow the adhesive to reach its full strength. We recommend using the top rack and avoiding high-temperature cycles. For the best results and to maintain the premium 3D look, gentle hand washing is always preferred.
What happens if I apply the label to a silicone or textured surface?
Applying a transfer to a silicone or textured surface typically results in the edges lifting or peeling quite quickly. The adhesive requires a completely smooth, hard surface to create a proper bond. Grooved finishes, "hammered" metals, and soft-touch plastics don't provide enough contact area for the decal to stay secure. For the best longevity at a campsite, stick to surfaces like polished plastic, glass, acrylic, or smooth stainless steel.
How long do I need to wait after applying before I can use my gear?
You should wait at least 24 hours before taking your gear out for normal use in the outdoors. This curing period allows the pressure-sensitive adhesive to settle and create a stronger bond with the surface. If you plan on washing the item, you must wait a full 72 hours. Following this timeline ensures your waterproof labels for camping gear stay exactly where you put them during your next tramping trip.
Do you offer labels for scouting groups or large school camp orders?
Yes, we offer custom options for scouting groups, school camps, and other large organisations across New Zealand. Whether you need a consistent look for a whole troop's mess kits or a large batch of personalised name labels for a school trip, we can help. Our custom UV DTF printing service allows for bulk orders that maintain the same premium, no-background finish as our standard retail packs, making group gear identification simple.
Can I pick up my order in Auckland to save on shipping?
Yes, Auckland-based customers can choose our local pickup option during the checkout process to save on shipping costs. This is a convenient way to get your personalised decals faster before a big trip or school camp. While we serve families and businesses nationally, our Auckland workshop is happy to provide this community-focused service. Simply select "Pickup" when you finish your order, and we will let you know when it is ready.
What is the difference between UV DTF and a standard sticker?
The main difference is that UV DTF transfers have no background, leaving only the design on your gear for a clean, "printed-on" look. Standard stickers are usually printed on vinyl or paper and have a visible clear or white border that can lift over time. UV DTF technology also creates a slightly raised, 3D effect that is much more durable and resistant to the "dog-earing" common with traditional adhesive name stickers.
