

Daycare Name Labels NZ for Lunch Boxes, Bottles and Bags
Good daycare labels need to do more than look cute: they need to be easy to read and suited to the items they’re going on. For daycare name labels in NZ, personalised stick-on labels are a practical way to identify lunchboxes, drink bottles and bags, as long as you choose the right style for each surface and apply it carefully.
It’s easy to focus on the design and overlook everyday details. A small name may be hard to spot in a busy kindy room, while a label placed over a curve or textured area may not adhere smoothly. Match the label to the item, then clean and dry the surface before applying it.
This guide explains what to label, how to choose a clear name and design, and how to apply a label neatly. You’ll also find practical care tips, including why hand washing is recommended for labelled drink bottles and lunchboxes. A little preparation can make the morning pack-up simpler for you and easier for educators to manage.
Key Takeaways
- Choose a clear name design that’s easy to recognise on busy daycare days.
- Match each label to the item and surface, from drink bottles to bags and books.
- Prepare the surface and apply the label carefully to help it sit smoothly.
- Use practical placement and care choices to support labels through everyday use.
- Explore personalised name and icon options to make children’s belongings easier to identify.
Personalised name label designs and customisation
A useful daycare label makes a child’s belongings easy to recognise at a glance. Start with the name educators and your child use every day. For example, choose “Mia” if that’s the name she responds to, or “Mia Thompson” when belongings could be mixed up with another child’s. Keep the lettering clear, especially on a small lunchbox or bottle.
Personalisation can include more than a name. A simple icon gives young children another visual clue. A star, flower or animal beside “Leo” can help him spot his own bag without reading every label. Choose an image that remains distinct at a small size, rather than one with fine details that may be hard to see.
Think about where each label will go before choosing its shape and layout. A short name can fit neatly on a narrow bottle, while a longer name may need more space on a lunchbox. Check the usable area, including curves and ridges, and choose a flat spot that leaves the name visible when the item is packed.
- Use the same spelling across a lunchbox, drink bottle and bag.
- Choose a readable colour contrast, such as dark text on a light background.
- Add an icon when a child is still learning to recognise their name.
- Keep extra wording off small labels so the name remains easy to read.
“Personalised name stickers” is a phrase families often use for stick-on labels. The application method can differ between products, so follow the instructions for the label type you choose. For a UV DTF transfer, the design has a smooth, no-background finish rather than a printed background around the name. Explore the personalised name labels range for a starting point when choosing a design for daycare items.
How much do custom daycare name labels cost in New Zealand? Prices vary by format, design and quantity, so compare the options and total shown at checkout. Avoid choosing by price alone: consider whether the design suits the item and whether the set covers the belongings you want to label.
Do NZ name label companies offer shipping, delivery times, or free delivery? Shipping and delivery arrangements vary between sellers, and free delivery may depend on the seller’s terms or order. Check the delivery information at checkout for the applicable cost and estimated timing before placing an order.
Before ordering, list the items your child takes to daycare, such as a raincoat, book bag and drink bottle. Match the name length and label layout to each suitable surface. This small planning step helps you choose designs that remain legible and useful throughout the daily routine.
Stick-on labels for lunch boxes, bottles, books and backpacks
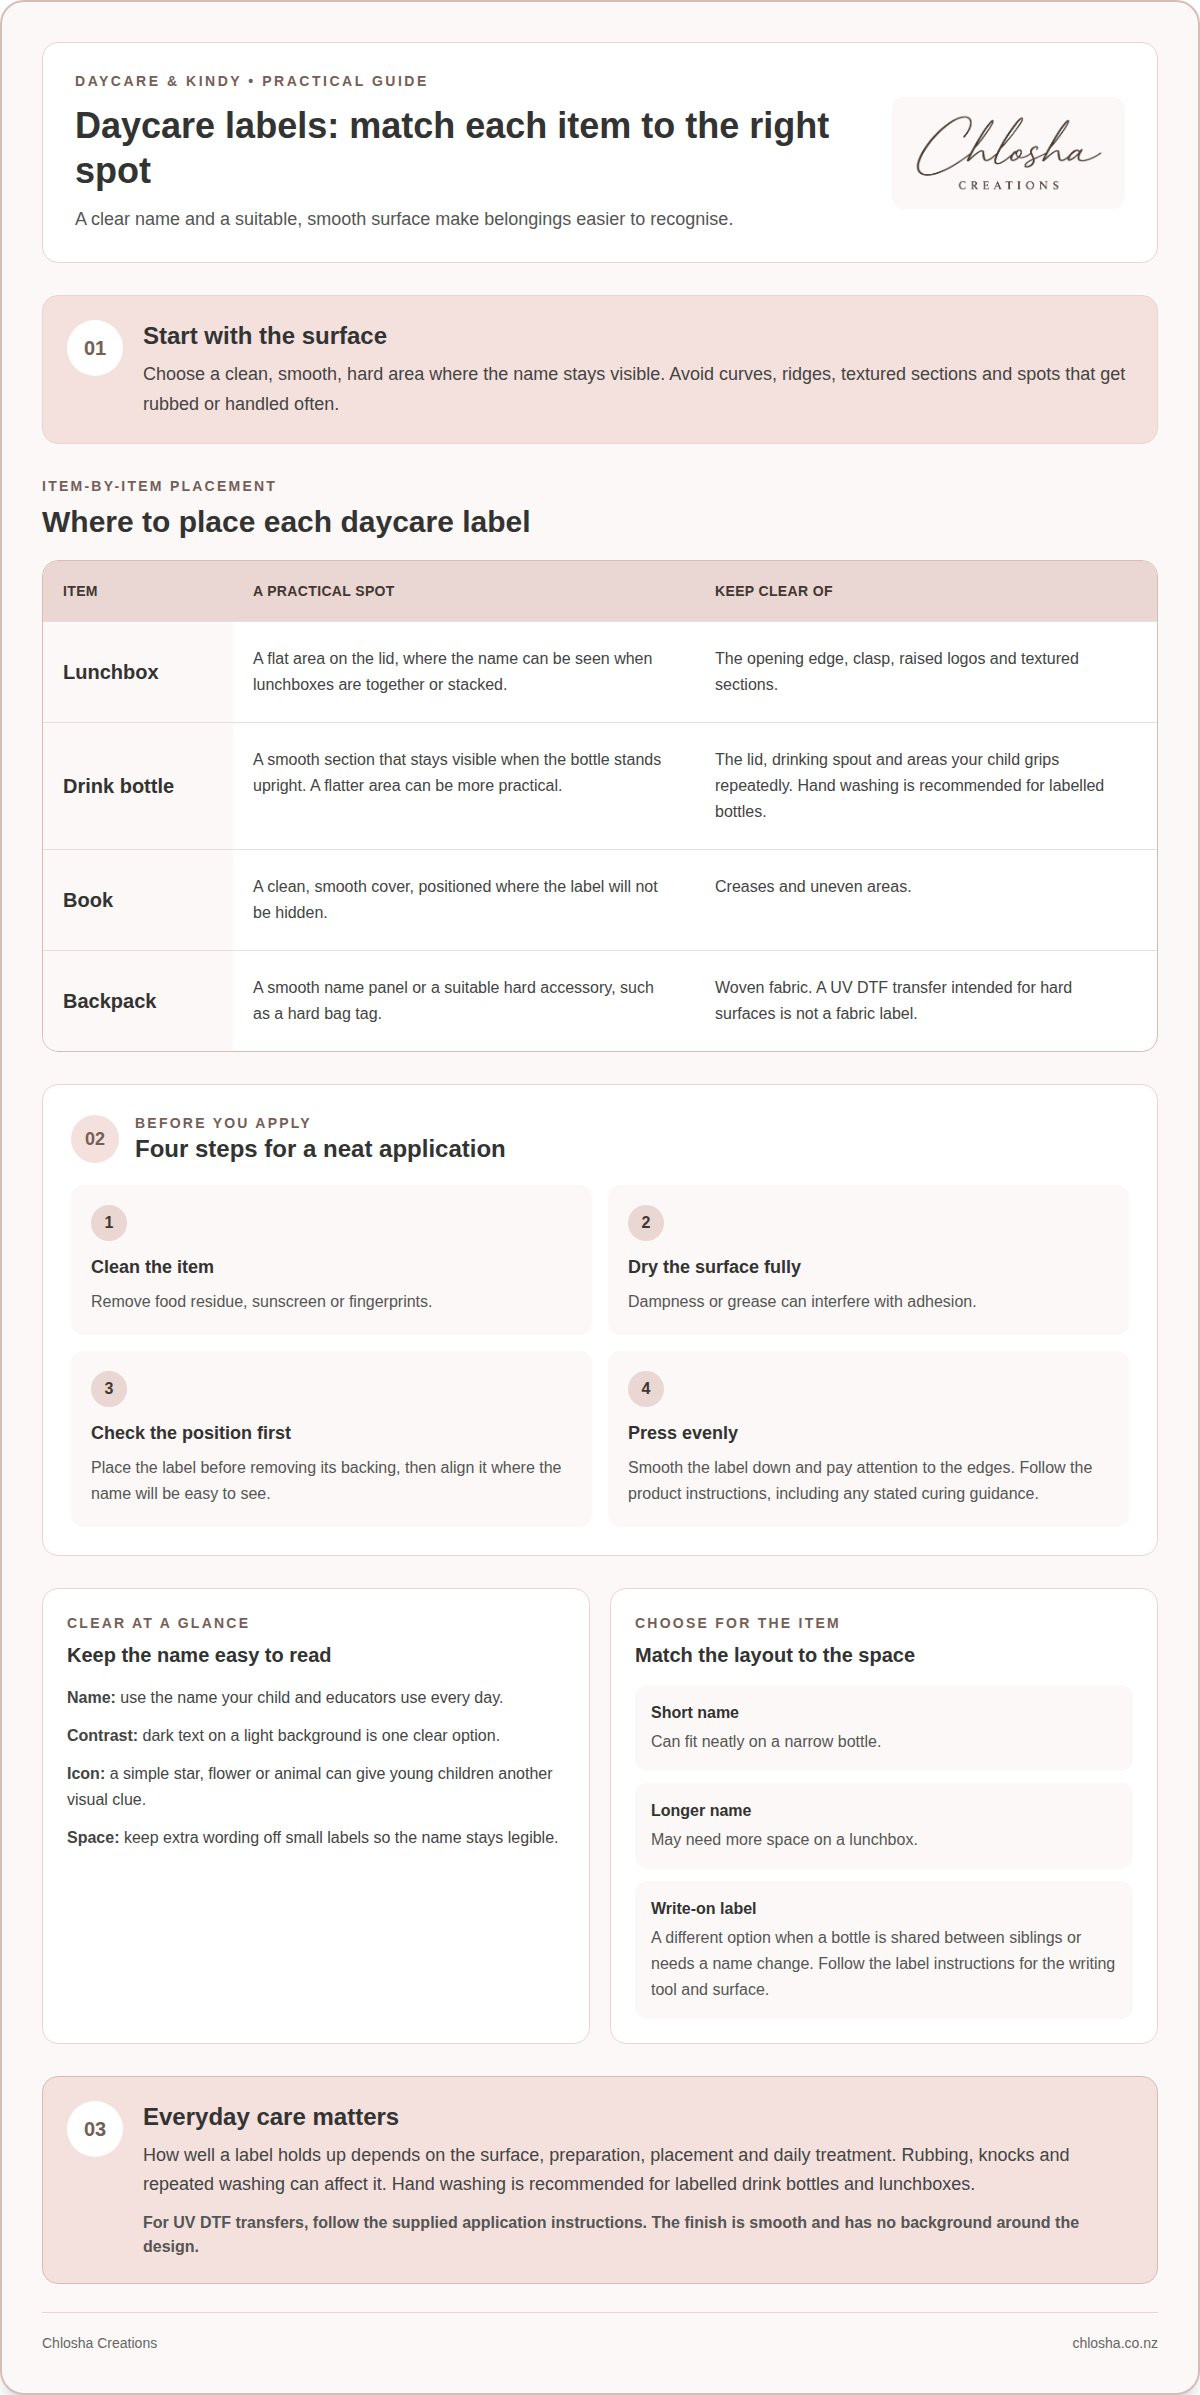
Different daycare items call for different label placements. On a lunchbox, choose a smooth, hard area on the lid, away from the opening edge and clasp. A label centred on the lid is easier to spot when several lunchboxes sit together. Keep it clear of raised logos or textured sections, which can interrupt adhesion.
For a drink bottle, look for a smooth section that stays visible when the bottle stands upright. Avoid the lid, drinking spout and areas your child grips repeatedly. A bottle’s curve can affect how a label sits, so a flatter section is often more practical. Hand washing is recommended for labelled bottles.
Books and backpacks need a little more thought. A label designed for a smooth, hard surface can suit a compatible book cover, pencil case or hard bag tag. Fabric is different: a UV DTF transfer intended for a hard surface isn’t a fabric label. On a backpack, consider a smooth name panel or hard accessory instead of applying it directly to woven fabric.
- Lunchbox: use a flat lid area that remains visible when stacked.
- Drink bottle: choose a smooth section away from the lid and grip area.
- Book: place the label on a clean, smooth cover, not across a crease.
- Backpack: use a smooth panel or suitable hard tag rather than fabric.
Daycare bottle write-on labels offer a different approach: you write a name on the label rather than having it printed as part of the design. This can be handy when a bottle is shared between siblings or needs a name change. Follow the label’s instructions for the writing tool and surface. Let the writing dry before handling, and check that the name remains readable with normal use.
Before applying any stick-on label, empty and clean the item, then dry its surface fully. Position the label before removing its backing, so you can check its placement. Press it down evenly, paying attention to the edges. For a transfer design, follow the supplied application instructions and any stated curing guidance before the item is washed.
A clean, smooth, no-background finish can keep the focus on the name rather than a printed rectangle. If you’re choosing labels for several smooth daycare items, explore personalised name labels and consider each item’s surface before selecting a design.
Label durability and application
A label’s staying power depends on its surface, preparation, placement and daily treatment. A clean, smooth lunchbox panel gives a label better contact than a dusty, ridged or curved area. Rubbing, knocks and repeated washing can also affect how it holds up. Choose a spot away from clasps, seams and places children grip often.
Prepare each item before applying a label. Wash away food residue, sunscreen or fingerprints, then dry the surface completely. A damp bottle or greasy lunchbox lid can interfere with adhesion. Avoid applying a label over scratches, raised lettering or an existing sticker, as uneven areas can leave edges lifted.
For a transfer label, follow the product’s application instructions from start to finish. Align it before pressing, then smooth it down evenly so the design contacts the surface. Pay particular attention to corners and edges. If the instructions give a curing period, allow that time before washing or putting the item into everyday use.
- Choose a clean, flat area on the item.
- Dry the surface fully before positioning the label.
- Apply the label as directed, smoothing it firmly and evenly.
- Allow any stated curing time before washing the item.
Care matters after application, too. Hand wash labelled drink bottles and lunchboxes, using gentle handling around the label. Washing conditions can affect how well a label holds up, so follow its care instructions. Results depend on the item’s surface, correct application, curing time, washing conditions and ongoing use. Don’t use a labelled item in a microwave unless its manufacturer says it’s suitable.
What safety considerations apply to labels on children’s belongings? Place labels on the outside of items, away from food-contact areas, bottle spouts and surfaces children may put in their mouths. If a label becomes loose or damaged, remove it rather than leaving a peeling piece within reach.
Check labelled items during regular pack-ups. If an edge starts lifting on Ruby’s drink bottle, stop picking at it and clean the bottle by hand. Replace or remove a label that no longer sits flat. Keep spare labels stored safely, away from young children, until you need them.
A clean, smooth, no-background transfer can suit a compatible bottle or lunchbox, but it isn’t a fabric label. For example, apply it to a hard bag tag rather than directly to a woven backpack. Matching the label type to the material and following its application and care instructions helps keep daycare items identifiable through everyday use.
Labels for daycare, childcare and kindergarten
Daycare and kindy routines involve shared spaces, quick pack-ups and belongings moving between rooms. A named drink bottle, lunchbox or spare-clothes bag gives educators a clear clue about its owner. Labels can also help children recognise their own things, especially when a familiar icon appears beside the name.
Are personalised name labels required by New Zealand daycare centres? Requirements can differ between centres, so follow the instructions given by your child’s daycare or kindergarten. If the centre asks families to identify belongings, a readable name on everyday items makes the task straightforward.
Start with the items your child uses during a typical day. For example, list a lunchbox, bottle, backpack, sunhat and change of clothes. Then consider how each item is stored: a bottle may sit among others on a shelf, while a bag may hang in a shared cubby. Put the name where staff can see it without unpacking everything.
- Meals: label the lunchbox and drink bottle where the name stays visible when packed.
- Spare clothing: identify a named storage pouch or suitable smooth container.
- Rest time: mark a sleep item’s smooth tag or storage bag, following centre guidance.
- Outdoor play: identify a hard accessory or smooth gear panel, not woven fabric.
For toddlers, a simple icon can help connect a label with a familiar object. A small kiwi bird beside “Aria”, for instance, gives a visual cue alongside the written name. Keep the text large enough to read on a small item. Use the same spelling across a bottle, bag and lunchbox so staff see one consistent name.
Shared care arrangements need a little extra organisation. If Nana drops off a named backpack on Mondays, keep the same label placement and spelling used on other belongings. For siblings attending the same centre, include each child’s name rather than relying on a shared family surname. Clear identification helps distinguish similar bottles or matching raincoats.
Centre routines matter, too. Some items may be stored in individual baskets, while others go on communal shelves. Follow instructions about what to bring and how to identify it. If a centre requests a particular name format, use it consistently on the relevant items. A consistent layout helps staff scan bags quickly at pick-up.
Review labels when belongings change, such as when your child moves from a toddler room to kindergarten or gets a new lunchbox. Remove or update old names before passing an item to a sibling. For a new enrolment, list daily essentials, label suitable smooth, hard surfaces and keep names visible without covering clasps, lids or working parts.
What types of name labels are best for daycare in New Zealand?
The right label depends on the item’s surface and how it’s used. For a compatible smooth, hard lunchbox or drink bottle, choose a label designed for that surface. A UV DTF transfer isn’t suitable for a woven backpack or cotton sunhat. Match the label type to the material rather than trying to use one style on every belonging.
Personalised name labels suit families wanting a clear name across everyday items. Choose a readable layout for a lunchbox lid, bottle or hard pencil case. A short first name can work well when it’s distinctive. If the daycare has children with the same first name, adding a surname or initial can help distinguish similar belongings.
An icon-and-name design can add a visual cue for children who don’t yet read confidently. For example, a recognisable cat beside “Mila” may help her identify her bottle. Keep the icon simple and the lettering clear at the label’s actual size. A detailed picture or crowded design can make the name harder to spot from a busy cubby.
Write-on labels are useful when a name may need changing, such as on a bottle shared between siblings. Check that the label is intended for the chosen pen or marker, and let the writing dry before use. A printed name gives you consistency across items, while a write-on option allows flexibility when belongings change hands.
- Smooth plastic lunchbox: choose a stick-on label intended for a smooth surface.
- Curved drink bottle: find a flatter area where the label can sit evenly.
- Woven backpack: use a suitable hard tag rather than applying a surface transfer to fabric.
- Shared item: consider a write-on option if the name needs updating.
UV DTF transfers have a clean, smooth finish without a background around the design. They’re intended for suitable hard surfaces, not fabric, and application instructions matter. A traditional printed sticker is another stick-on format; the right choice depends on the item, desired look and care routine. For drink bottles and lunchboxes, hand washing is recommended. Dishwasher conditions and ongoing use can affect label durability.
Before choosing daycare labels, sort the items into surface groups: smooth, hard goods, fabric and belongings with existing tags. Then select a suitable label style for each group. This avoids expecting one product to work on a bottle, cotton hat and backpack alike. Keep names visible and away from openings, clasps and areas children grip.
For names and designs suited to smooth daycare items, explore personalised name label options and match the label to the surface you plan to mark.
Chlosha Creations: Daycare & Kindy Name Labels
Chlosha Creations makes personalised labels to help identify children’s daycare and kindy belongings. Its UV DTF transfers have a clean, smooth, no-background finish for suitable hard surfaces, such as a drink bottle or lunchbox.
Choose Personalised Name Labels for a clear name, or Personalised Icon + Name Labels when a visual cue could help your child find their things. Kids Name Labels offer another option for everyday belongings. Match the label to the item’s surface, follow the application instructions, and hand wash labelled drink bottles and lunchboxes.
If you’re organising labels for a new daycare routine or replacing a child’s current set, explore the options that suit the items you need to mark. For help choosing, contact Chlosha Creations.
Make the next daycare change easier
Choosing daycare name labels in NZ can be part of a simple routine, not a one-off task. Keep a note of the belongings your child uses regularly, then add new items as their daycare or kindy routine changes. That way, a replacement drink bottle or extra bag won’t leave you starting from scratch.
A consistent name style can also make future updates easier. Keep the same spelling and visual approach across new belongings, especially when your child moves rooms or starts kindergarten. The result is a practical system that grows with your family’s needs.
Ready to choose a design for your child’s belongings? Explore personalised name label options and find a style that suits your daycare routine. One thoughtful choice can make the next pack-up feel a little more organised.
Frequently Asked Questions
Where can I buy daycare name labels in NZ?
You can order personalised labels from Chlosha Creations through its online shop. Before choosing, note which belongings need identifying and whether siblings share similar items. This can help you decide between a name alone or a name paired with an icon. If your daycare uses a particular name format, such as first name and surname, use it consistently when preparing your order. Please double-check the spelling before ordering, as your label will be printed exactly as entered.
Which NZ brands offer waterproof and dishwasher-safe name labels?
Chlosha Creations’ labels are water-resistant for everyday use, but shouldn’t be described as waterproof or dishwasher-safe. Dishwasher exposure can affect how a label holds up, so a machine-wash claim shouldn’t be assumed from water resistance alone. Labels are not recommended for commercial dishwasher use. For a drink bottle used daily, choose care that suits both the label and the bottle, rather than relying on a dishwasher-safe claim.
Are iron-on or stick-on labels better for daycare clothes?
For clothing, use a method designed for fabric and garment care. Iron-on labels attach with heat, while stick-on products vary and may be intended for hard surfaces rather than clothes. Chlosha Creations’ UV DTF transfers aren’t clothing labels. A jacket’s care instructions and fabric type matter when choosing a clothing label; a hard name tag on the bag can identify the child’s belongings separately.
How do I label bottles, lunchboxes, shoes, and clothing for daycare?
Make a short inventory before labelling: list the bottle, lunchbox, shoes and clothing that go to daycare, then group them by material. Use a suitable label on compatible smooth, hard areas of a bottle or lunchbox, and a fabric-specific method for clothing. For shoes, assess the material and finish first. A consistent name format across the list helps distinguish siblings’ belongings during shared drop-offs.
How long do daycare name labels last, and how do I apply them?
There isn’t one lifespan that fits every daycare item; wear depends on the item’s material, how often it’s handled and its cleaning routine. Follow the instructions supplied with the label, and keep the packaging or care guidance somewhere handy for later reference. For a label on a frequently used bottle, inspect its condition as part of your regular daycare-bag reset and replace it if identification becomes difficult.
