

DIY Decal Sheets: Professional UV DTF Branding Guide
What if you could achieve a sleek, "printed-on" finish for your branding without investing thousands in industrial machinery? It is a common challenge for local creators who want their items to stand out. You have likely dealt with the frustration of traditional stickers peeling off drink bottles or those annoying clear borders that ruin a clean aesthetic. We agree that your hard work deserves a professional touch, but high minimum order quantities from commercial printers often make small-batch customisation feel out of reach.
This guide will teach you how to use DIY decal sheets for products to bridge that gap using premium UV DTF technology. You will learn how to achieve a durable, raised finish that looks like it was printed directly onto glass or plastic. We will walk through the simple application process, explain why a no-background look is the secret to high-end branding, and provide practical tips to ensure your designs handle daily use. By the end, you will be ready to transform your products with affordable, professional-grade decals that look and feel like they belong on a retail shelf.
Key Takeaways
- Discover how to achieve a seamless, no-background finish on glass and plastic that looks like it was printed directly onto the item.
- Understand the UV-cured technology that creates a slightly raised, 3D effect for high-end branding without needing expensive machinery.
- Learn how to maximise your DIY decal sheets for products by organising multiple logos and icons on a single sheet for efficient small-batch customisation.
- Master the simple application process involving thorough surface cleaning and firm pressure to ensure a professional, smooth bond.
- Gain essential care tips, including the 72-hour curing time before dishwasher use, to help your branding withstand the rigours of school and sports gear.
Why Standard Stickers Fail Your Products (And the Professional DIY Alternative)
You have spent months perfecting your product, but the final touch often feels like an afterthought. Many local creators rely on standard stickers, only to find the result looks a bit "stuck on." A traditional decal or transfer might serve a basic purpose, but there is a massive difference between simply labelling an item and truly branding it. Labelling tells someone who it belongs to; branding tells them what your business stands for. It is the difference between a temporary tag and a permanent identity.
Standard paper-based labels often struggle with the humidity in NZ or the daily friction of being handled. They fade, the edges curl, and they eventually peel away, leaving a messy residue. When you are trying to build a premium image for your small business, these small failures can undermine the perceived quality of your work. This is why DIY decal sheets for products offer a professional alternative for those who aren't ready to invest in industrial machinery but still want their items to look retail-ready.
The Limitations of Traditional Vinyl
Standard vinyl stickers are a common choice, but they come with a specific set of visual hurdles. Because vinyl is a solid film, it always has a visible edge. On high-end glass jars or matte plastics, this border catches the light and screams "sticker." It creates a physical lip that is prone to lifting, especially on tight curves like drink bottles or small cosmetic containers. These edges also attract dust and lint over time. This quickly makes a professional product look homemade and worn out, which isn't the impression you want to leave with your customers.
The Professional DIY Shift
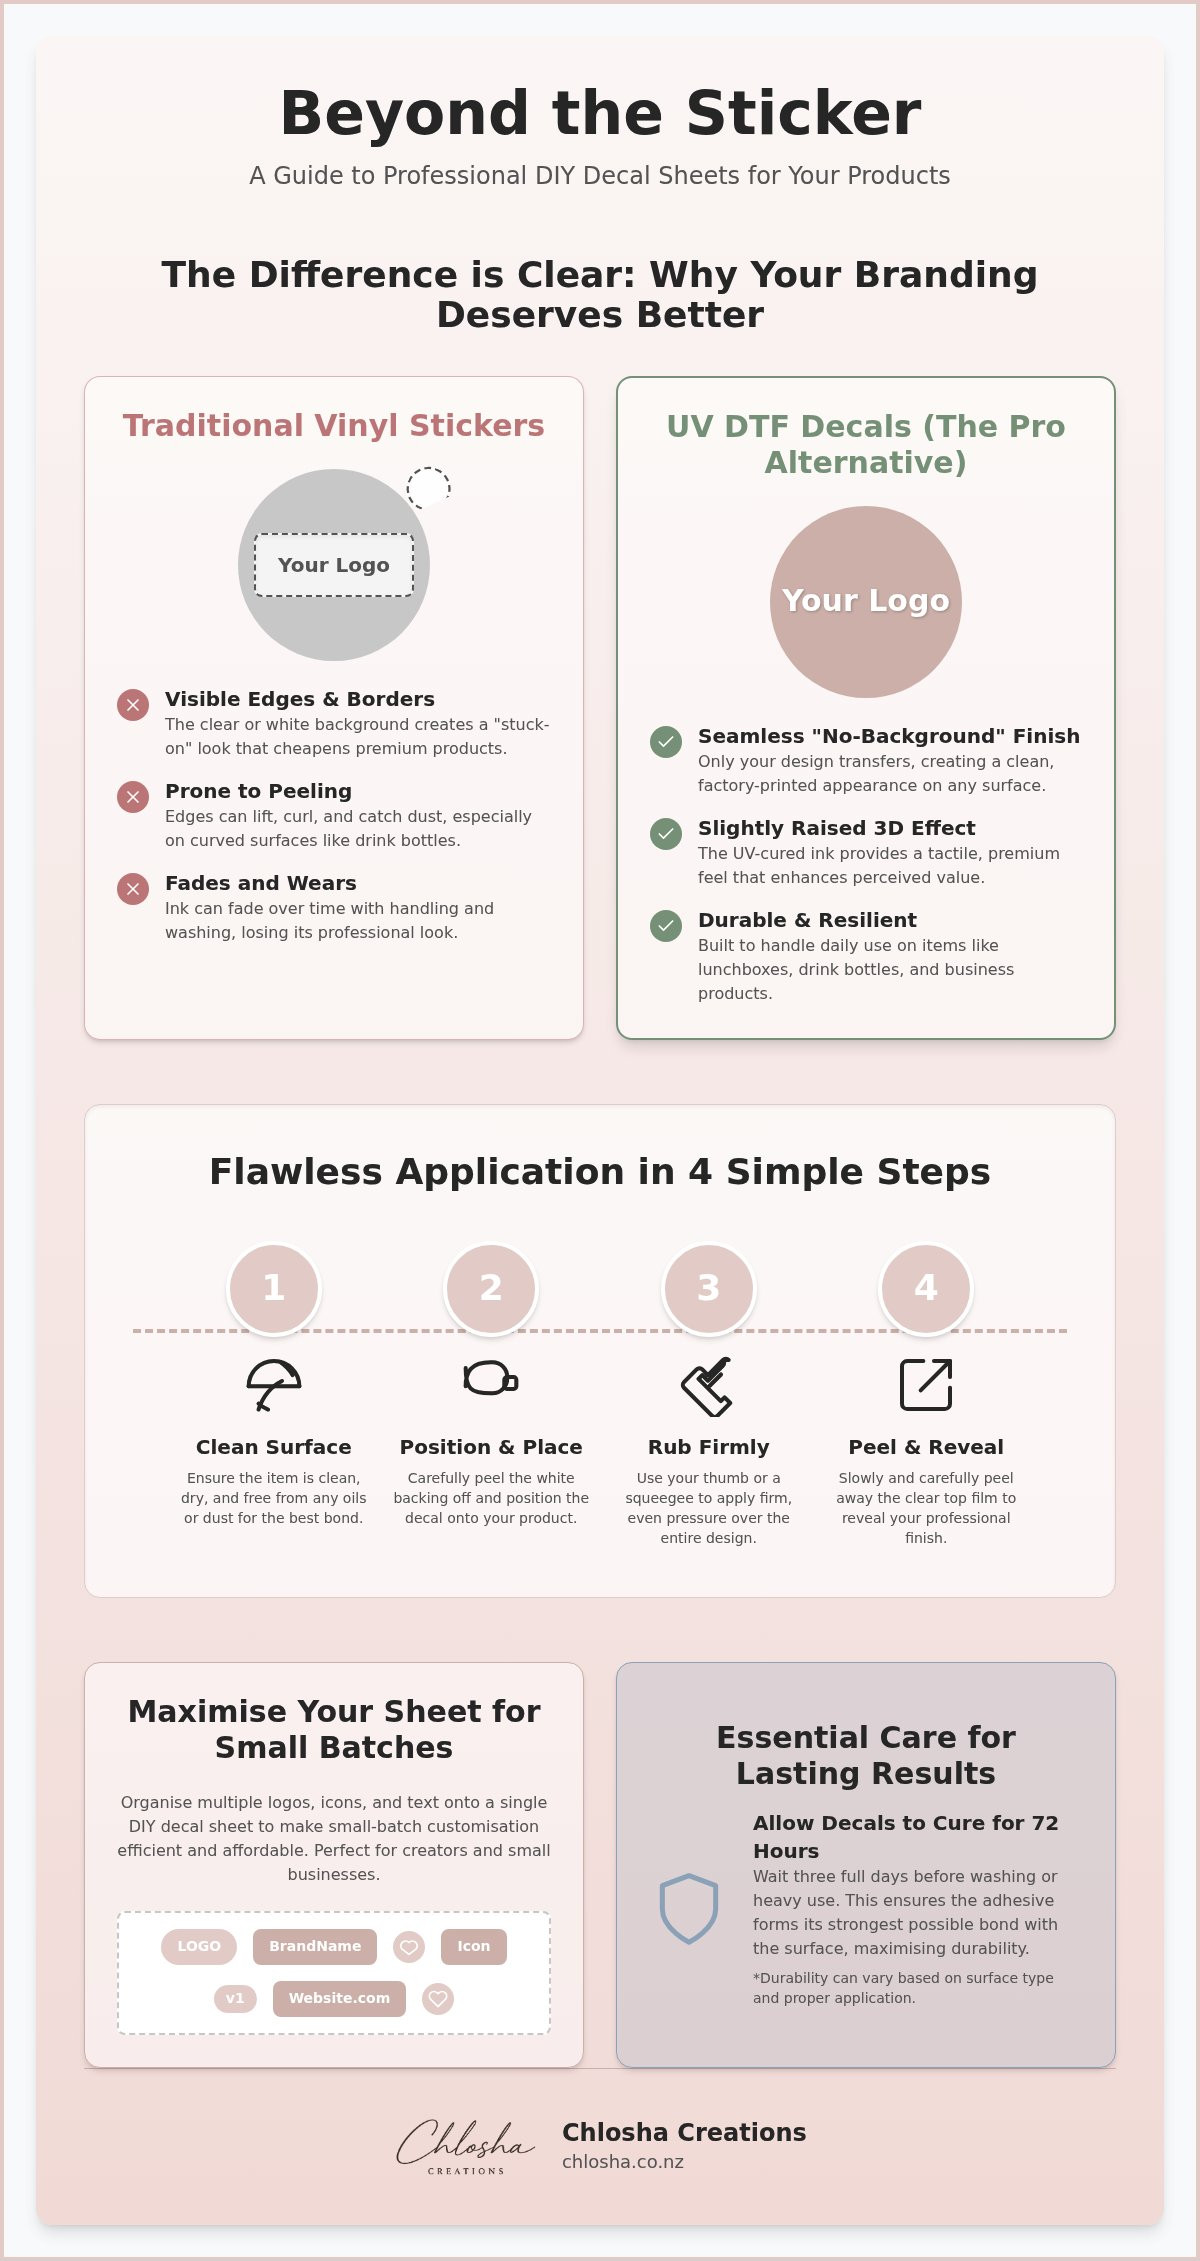
Modern creators are moving towards a "no-background" finish that integrates the design directly onto the surface. Using DIY decal sheets for products allows you to achieve a smooth, raised, 3D effect that looks like it was printed in a factory. You don't need to buy a specialised UV printer or learn complex software. By ordering custom sheets from a local specialist like Chlosha Creations, you get the benefits of premium UV DTF technology without the overhead costs. It is the perfect middle ground for small-batch branding that needs to look expensive while remaining affordable and easy to apply at your own kitchen table or workbench.
Understanding UV DTF: The Technology Behind No-Background Decal Sheets
If you have ever handled a high-end retail product and wondered how the logo looks so crisp and tactile, you are likely looking at UV technology. UV Direct-to-Film (DTF) is a specialised printing process that uses ultraviolet light to cure ink instantly as it is applied to a carrier film. This creates a design that is not just a flat image, but a slightly raised, 3D transfer. When you use DIY decal sheets for products, you are essentially applying a "liquid" design that has been hardened into a durable, flexible skin. It is a sophisticated way to get professional results at home.
The "no-background" aspect is the real win for local small businesses and organisers. Standard labels often leave a clear or white rectangle around your logo. This is especially noticeable on glass jars or dark-coloured drink bottles. UV DTF technology eliminates this entirely. Only the ink transfers to your product. The result is a clean, professional finish that looks like it was printed directly onto the surface in a factory. Using DIY decal sheets for products instantly elevates the perceived value of your items without the need for expensive industrial equipment.
What Makes UV DTF Different?
UV DTF transfers consist of three main layers: a specialised adhesive base, high-density UV-cured ink, and a clear carrier sheet. Unlike other transfers, there is no heat required for application. You simply rub the design onto your surface. The ink remains slightly flexible after curing, which helps it bond to various hard materials without cracking. It is a tough, resilient finish that handles the daily bumps and scratches of life. This makes it ideal for everything from personalised name labels to custom business branding.
UV DTF vs Vinyl Decals: A Quick Comparison
While vinyl has its place, particularly for large signage or flat surfaces, it often falls short for detailed product branding. Vinyl is a solid film that sits on top of a surface, making it thicker and more prone to catching on edges. In contrast, UV DTF is much thinner and integrates more smoothly with the item. The UV-cured inks are also naturally more resistant to fading and scratches compared to standard eco-solvent inks used in many vinyl stickers. For a deeper dive into the technical differences, you can read our guide on UV DTF vs vinyl decals. Choosing the right method ensures your branding stays looking fresh for longer, provided you follow the correct application steps and allow the necessary curing time before use.
Designing Your DIY Decal Sheet: Layouts, Sizes, and Material Fit
Designing your own sheet is where the creative magic happens. Unlike many large-scale printers that require you to stick to one design per order, DIY decal sheets for products give you total freedom. You can "gang" your designs, which simply means filling every available centimetre of the sheet with different logos, icons, or text. This approach is perfect for local small businesses in NZ that need a variety of branding sizes without the cost of multiple separate orders. It is about being clever with your space to get the most value out of every sheet.
Because these decals have a "no-background" finish, negative space is your best friend. The surface of your item actually becomes part of the design. If you are branding clear glass jars, high-contrast colours like crisp white or bold black work best. Avoid very thin, spindly lines; bolder graphics provide a larger surface area for the adhesive to bond, ensuring your design stays put. Think about how the light will hit the slightly raised, 3D ink once it is applied to your product.
Choosing the Right Sheet Size
Planning is essential before you start your layout. Measure your drink bottles, lunchboxes, or jars to see what size your branding needs to be. For a sense of scale, our Classic Name Pack uses a 140x200mm sheet, which provides plenty of room for multiple labels. On a standard 140x140mm pre-cut sheet, you could comfortably fit 12 to 15 small 30mm logos. This flexibility makes DIY decal sheets for products a practical choice for small-batch runs or seasonal gift packs where you only need a handful of custom transfers at a time.
Surface Compatibility Checklist
UV DTF technology is incredibly versatile, but it follows a "Smooth and Hard" rule. For the best results, you want to stick to surfaces that allow the adhesive to create a solid bond. Here is a quick guide on what works and what to avoid:
- The "Yes" List: Glass, acrylic, stainless steel, ceramic, and hard, smooth plastics. These materials are perfect for a "printed-on" look.
- The "Maybe" List: Some powder-coated metals. If the texture is very fine, it can work, but heavily textured coatings are difficult for the decal to grip.
- The "No" List: Polypropylene (PP) and silicone. Polypropylene is a low-surface-energy plastic that naturally repels adhesives. Silicone is too flexible and oily, which prevents the transfer from sticking.
- Textured Surfaces: Avoid anything with a "bumpy" or porous finish. If the decal cannot make 100% contact with the surface, it is more likely to lift over time.
Always ensure your surface is properly cleaned before you begin. Even a tiny bit of dust or oil from your fingers can interfere with the bond. By choosing the right material and a high-contrast design, you ensure your branding looks professional and handles the rigours of daily use.
How to Apply Your Decal Sheets for a Flawless, Printed-On Finish
Applying your DIY decal sheets for products is a straightforward process, but success is all in the preparation. You aren't just sticking a label; you are creating a bond between the UV-cured ink and your item. If the surface isn't ready, the bond won't hold. Follow these steps to ensure your branding looks like it was done by a professional.
Step 1: Prepare the surface. Start with a thorough clean. Use isopropyl alcohol or warm soapy water to remove any fingerprints, dust, or oily residues. Even a tiny amount of oil can prevent the adhesive from "grabbing" the surface. Dry the area completely with a lint-free cloth. Avoid using glass cleaners that contain wax or "easy-clean" additives; these leave a film that interferes with the bond.
Step 2: Position and press. Carefully peel the decal from the backing paper, ensuring all elements stay on the clear carrier sheet. Place it onto your item. Once it touches the surface, use a squeegee or the edge of a credit card to apply firm, even pressure from the centre outwards. This pushes out any air and forces the adhesive into the microscopic pores of the material.
Step 3: The "Low and Slow" peel. This is the most satisfying part. Start at one corner and slowly peel the carrier sheet back. Keep it low, almost folding it back on itself. If any part of the design starts to lift with the sheet, stop immediately. Lay it back down and rub firmly again before continuing.
Step 4: Curing. Your decal will feel stuck immediately, but the adhesive needs time to reach full strength. Avoid handling the area for the first 24 hours. Most importantly, you must wait 72 hours before exposing the item to water or placing it in a dishwasher. This window is critical for long-term durability.
The Secret to a Bubble-Free Application
The hinge method involves taping one side of the decal to your product to act as a pivot point, allowing you to remove the backing and sweep the design down in one smooth motion. If you are working with tricky curves on drink bottles, a quick blast from a hair dryer on a low setting can make the transfer more pliable. For intricate business logos with tiny dots or thin lines, give those specific areas an extra firm rub with your thumb before you attempt the peel. You can find more tips in our range of personalised name labels designed for easy home application.
Long-Term Care for Your Decals
While these transfers are tough, they aren't indestructible. We always recommend hand-washing to extend the life of your branding. High-temperature dishwasher cycles can eventually degrade the bond, especially if the 72-hour curing rule wasn't strictly followed. If you notice a tiny corner starting to lift, it is usually due to a speck of dust during application. You can often press it back down firmly, but preventing it starts with that initial deep clean. Treat your branded items with a bit of care, and they will stay looking sharp through daily use at school or the office.
Custom Branding Made Easy: Ordering Your DIY Decal Sheets from Chlosha Creations
Ordering your branding shouldn't feel like a gamble. When you source DIY decal sheets for products from a local Auckland business, you aren't just getting a sheet of stickers. You are getting the reliability of a family-run team that understands the high standards Kiwis expect. Local production means we can maintain strict quality control over every UV DTF transfer that leaves our workshop. It also means you won't be waiting weeks for international shipping. If you are based in Auckland, you can even choose local pickup to get your branding packs in your hands even faster.
Our "Decal Studio" is designed to be flexible. Whether you need a small batch of custom business logo transfers for a new product launch or a larger run for a seasonal event, we have you covered. We pride ourselves on being a helpful partner in your creative journey. This isn't about faceless corporate transactions. It's about providing the tools you need to make your products look their absolute best. By choosing a local partner, you ensure that the finish on your jars, bottles, or gift boxes is exactly what you envisioned.
From School Gear to Small Business
The transition from organising your home to branding your business is more natural than you might think. Many of our customers first discover our personalised name labels when they are sorting out drink bottles and lunchboxes for the kids. They quickly realise that the same durable, no-background technology is the perfect fit for their professional branding needs. These sheets are incredibly versatile. You can use them for event favours, goodie bags, or even custom teacher gifts. If you are looking for more strategy on how to use these for your company, our Small Business Branding Guide is a great place to start.
Getting Started with Your First Sheet
Ready to see the difference for yourself? Ordering your first custom UV DTF print is simple. You just need to upload your high-resolution design and we will handle the technical side of the production. When your branding pack arrives, you will immediately notice the premium feel. The ink is slightly raised, giving your products a tactile, high-end quality that standard stickers simply cannot match. If you aren't quite sure what design to go for, feel free to browse our Best Sellers for some inspiration. Using DIY decal sheets for products is the most accessible way to achieve a factory-finish look without the industrial price tag. We are here to help you every step of the way.
Ready to Elevate Your Brand?
Achieving a retail-ready look doesn't require a massive budget or complex machinery. By choosing DIY decal sheets for products, you can transform ordinary jars, bottles, and packaging into high-end branded items with a clean, no-background finish. Success lies in the small details: picking the right smooth surface, applying firm pressure, and allowing that vital 72-hour curing window before the first wash.
Whether you're a busy parent organising school gear or a local creator building a boutique business, these premium UV DTF transfers offer the durability and professional 3D effect your hard work deserves. As a family-run NZ business, we take pride in helping our community bring their creative visions to life with high-quality finishes and fast national shipping. You can even choose Auckland pickup if you're nearby.
Explore our Custom DIY Decal Sheets and elevate your branding today. We can't wait to see what you create.
Frequently Asked Questions
Can I use DIY decal sheets on my kids’ school lunchboxes?
Yes, you can use them on most school lunchboxes and drink bottles provided the surface is smooth and hard. They are a popular choice for school gear because they don't have a clear border that peels up over time. Just ensure you clean the surface thoroughly before applying. This helps the adhesive bond properly so the label can handle the daily bumps of a school bag or kindy cubby.
Are these decal sheets the same as vinyl stickers?
No, these are quite different from traditional vinyl stickers. Vinyl is a solid film that sits on top of a surface; whereas our UV DTF technology uses UV-cured ink to create a "no-background" finish. This gives your design a slightly raised, 3D effect that looks like it was printed directly onto the item. It is a much more professional look for anyone using DIY decal sheets for products to brand their gear.
How long do the decals last on a glass surface?
On a glass surface, these decals can last for a very long time if they are applied correctly. While we don't claim they are indestructible, the UV-cured ink is highly resistant to scratches and daily handling. Their lifespan depends on factors like the initial surface cleanliness and how the item is washed. Most users find they stay looking crisp and vibrant through months of regular use on pantry jars or glassware.
Can I put my branded bottles in the dishwasher?
You can put your branded bottles in the dishwasher, but you must wait at least 72 hours after application for the adhesive to fully cure. We always recommend hand-washing where possible to keep the design looking its best for as long as possible. High-heat cycles and harsh detergents can eventually affect the bond. If you do use a dishwasher, try to stick to the top rack and avoid extreme temperatures.
What surfaces should I avoid when using UV DTF decals?
You should avoid applying these decals to silicone, fabric, or low-surface-energy plastics like polypropylene (PP). These materials naturally repel adhesives, meaning the decal won't stay put for long. Highly textured or porous surfaces are also problematic because the decal needs a smooth, flat area to create a solid bond. If your surface feels oily or "rubbery," it is likely not a good fit for UV DTF technology.
Do I need a special machine to apply these decals?
No, you don't need any expensive machinery or special equipment to apply these transfers. All you need is a clean surface and a bit of firm pressure. You can use a squeegee or even the edge of a credit card to rub the design onto your item. The "rub-on" process is simple enough to do at home, making DIY decal sheets for products a great entry point for small businesses.
Can I get a custom decal sheet with my business logo?
Yes, creating custom decal sheets with your business logo is exactly what our Decal Studio is for. You can upload your high-resolution design and we will print it using our premium UV DTF process. This allows you to achieve professional branding for your products without having to order thousands of units from a commercial printer. It is the perfect solution for small-batch customisation and professional-looking gift packs.
What happens if I make a mistake during application?
If you make a mistake during the initial placement, it can be difficult to fix because the adhesive is quite strong. It is best to take your time and use the "hinge method" to ensure everything is straight. If the decal has already been pressed down firmly, it cannot be repositioned and would need to be removed and replaced with a new one. This is why we always suggest a "low and slow" peel to catch any issues early.
