

Durable Stickers for Bikes: How to Choose and Apply Name Labels
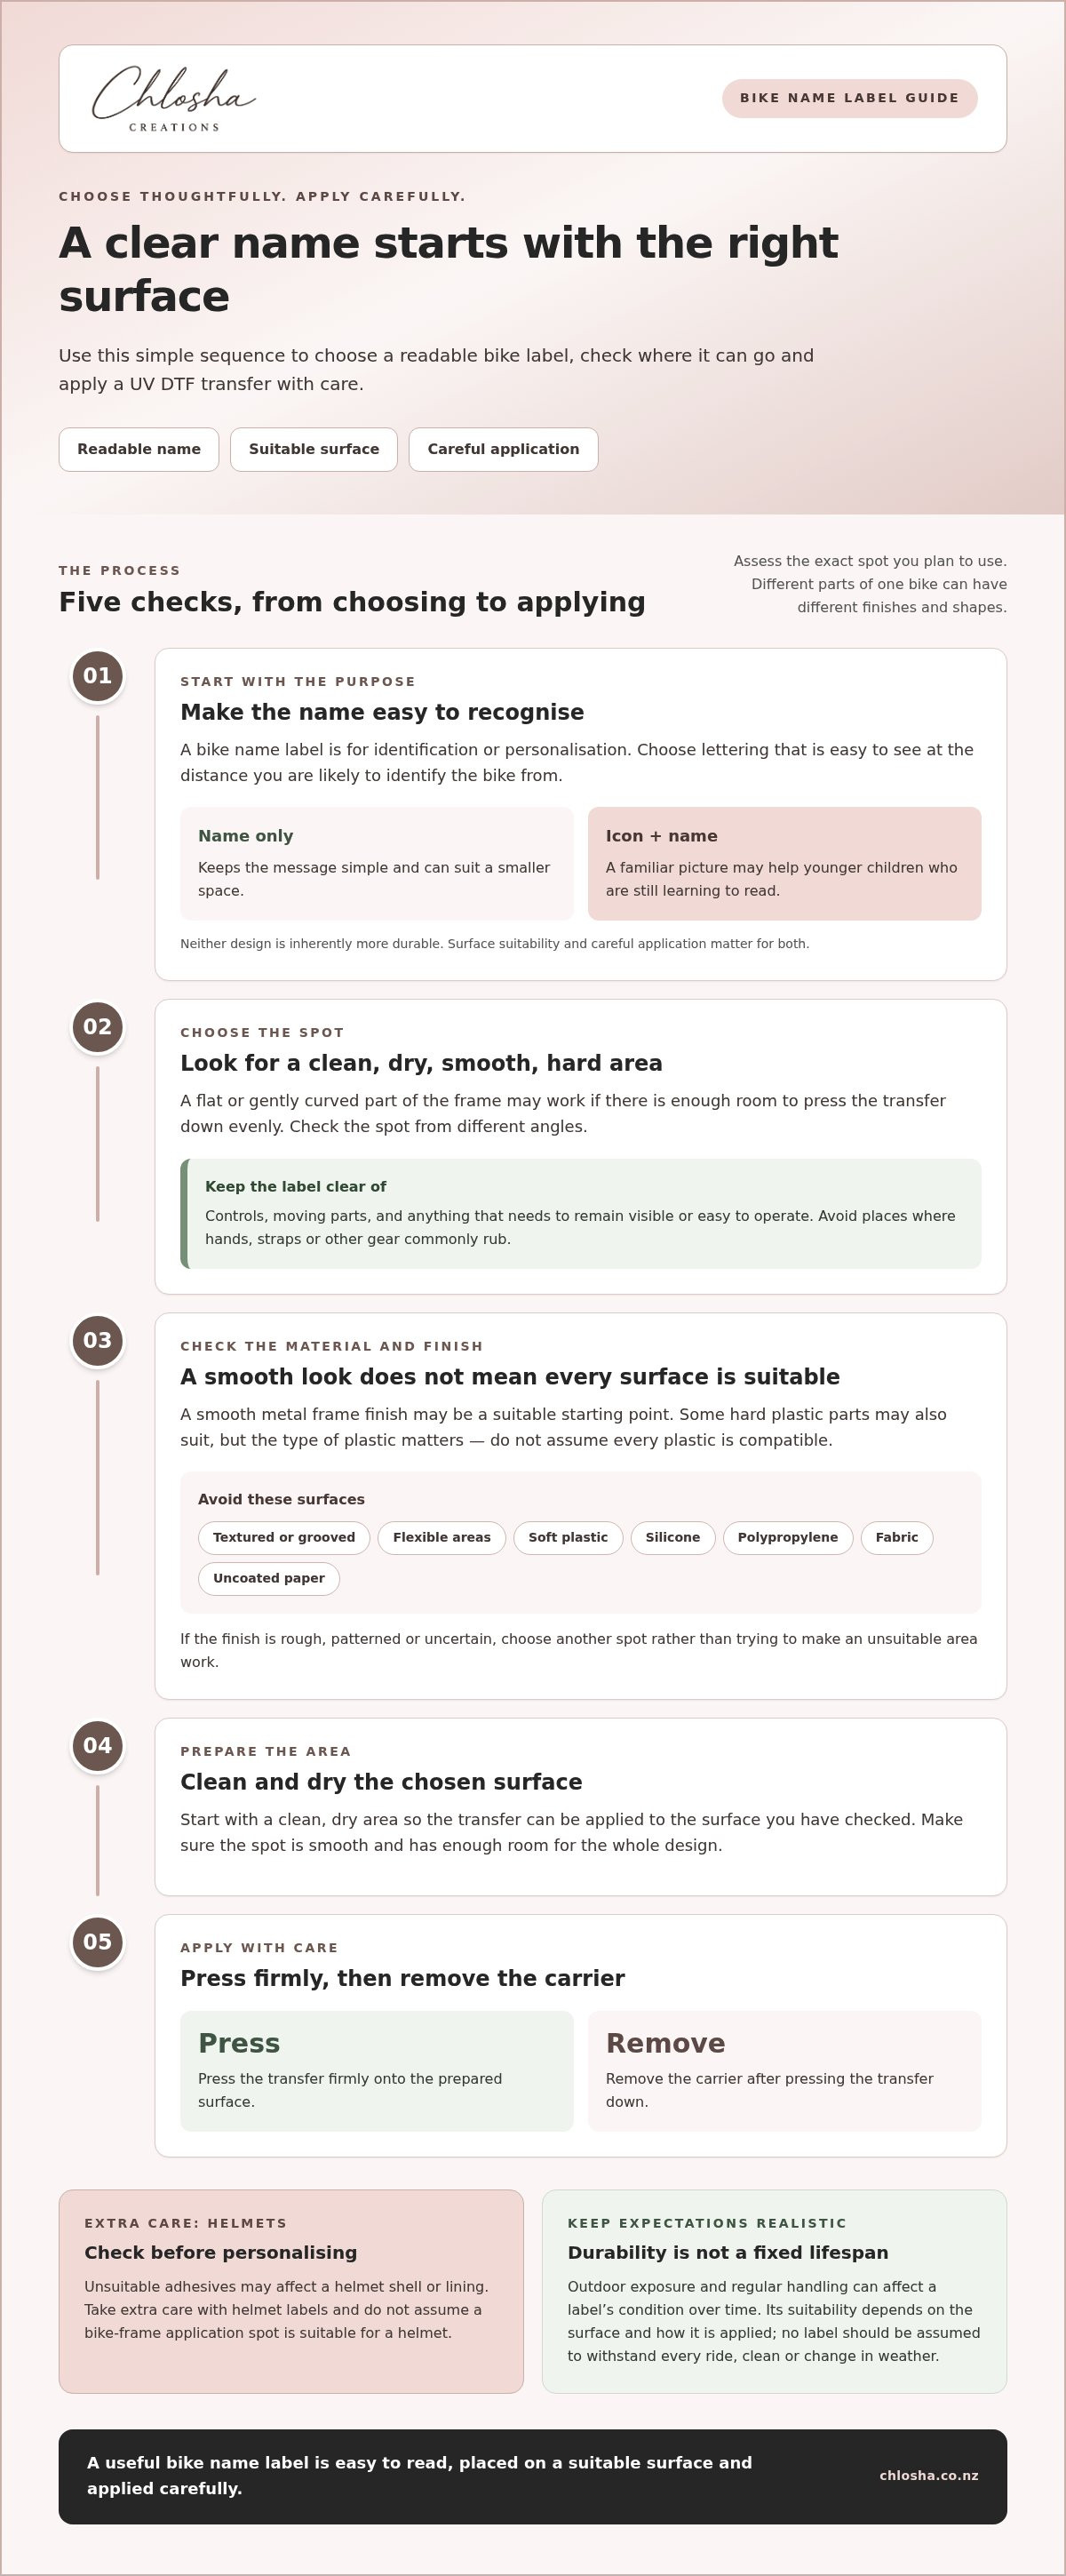
When choosing durable stickers for bikes, where and how a label is applied matters as much as how it looks. You’ll want a name that’s easy to spot during everyday use, and a surface that suits the label. Start by checking the bike’s finish and choosing a clean, dry, smooth, hard area.
Chlosha Creations’ UV DTF name labels have a clean, smooth, no-background finish, but they’re designed for suitable surfaces only. Textured, grooved, flexible or soft surfaces may not be suitable. Outdoor exposure and regular handling can also affect a label’s condition over time.
This guide covers choosing a readable name-only or icon-and-name design, checking a bike’s surface for suitability, and applying a label carefully. It also explains why helmet labels need extra care, so you can personalise everyday gear thoughtfully.
Key Takeaways
- Choose durable stickers for bikes by considering the intended use and application surface, rather than relying on a promised lifespan.
- Check the frame’s finish and shape first. Textured or grooved areas may not suit a UV DTF transfer.
- Pick a name-only or icon-and-name design that’s easy to read and fits the available space.
- Follow the application steps carefully: clean and dry the surface, press the transfer firmly, then remove its carrier.
- Take extra care with helmet labels, as unsuitable adhesives may affect the helmet shell or lining.
What makes a bike sticker durable enough for everyday identification?
A bike name label is useful when it stays readable in the spot you choose. But durability isn’t a fixed lifespan or a promise that a label will withstand every ride, clean or change in weather. Consider whether the label suits the surface and how the bike is used. Careful application also helps the label perform as intended.
A durable bike label suits its surface, is applied carefully and remains clear enough for everyday identification. That’s more useful to consider than a broad durability claim. A clean, smooth area gives the label a better starting point than a spot with dirt, texture or a curve that makes it difficult to press down evenly.
What does durability mean for a bike name label?
Start with the label’s purpose. A name on a child’s bike can help distinguish it from similar bikes at school or on family outings. For either a bike or everyday gear, legibility matters: choose lettering that’s easy to see at the distance you’re likely to identify it from.
A name label is for identification or personalisation. It isn’t a safety reflector, a light or a replacement for required bike equipment. Its condition can change with the surface, regular handling and application, so don’t assume any label will remain unchanged indefinitely.
Where might a personalised label go on a bike?
Look for an accessible, clean, dry, smooth, hard area. A suitable flat or gently curved part of the frame may work if the finish is smooth and there’s enough room to press the transfer down evenly. Check the spot from different angles, and avoid places where hands, straps or other gear commonly rub.
Keep the label clear of controls, moving parts and anything that needs to remain visible or easy to operate. Avoid textured paint, grooves, seams and flexible areas. If the frame’s finish is rough, patterned or uncertain, choose another spot rather than trying to make an unsuitable area work.
Assess the exact area before applying the label. A bike can have different finishes, shapes and surface details in different places. Choose an uninterrupted spot that leaves the name easy to find and doesn’t interfere with the bike’s function.
How UV DTF transfers and bike surfaces affect label adhesion
A UV DTF transfer has a clean, smooth finish with no background around the design. That gives a name label a neat look on a suitable surface, but appearance alone doesn’t determine whether it will adhere well. The bike’s material, coating and texture all matter. Assess the exact spot you plan to use, as different parts of the same bike may have different surface properties.
Surface-suitability rule: apply a UV DTF transfer only to a clean, dry, smooth, hard surface. Avoid textured, grooved, flexible or soft surfaces, as well as unsuitable materials such as polypropylene.
Which bike surfaces are suitable for a UV DTF label?
Look for a smooth, hard area where the transfer can make even contact. A smooth metal frame finish may be a suitable starting point. Some hard plastic parts may also suit, but the type of plastic matters, so don’t assume every plastic is compatible. Avoid spots where a ridge, seam or change in texture interrupts the application area.
Also consider the coating. A surface that looks glossy may still have a texture or protective finish that affects suitability. The transfer’s no-background design doesn’t change its surface requirements. If you can’t find a suitable smooth, hard area, choose another spot instead of applying it over a questionable finish.
Which surfaces should you avoid?
Some materials and shapes aren’t appropriate for these transfers. Avoid:
- Textured or grooved surfaces, including ridged sections of a frame.
- Flexible areas and soft plastic parts.
- Silicone surfaces.
- Polypropylene and other unsuitable plastics.
- Fabric and uncoated paper.
A smooth, no-background appearance doesn’t mean a transfer will suit every material underneath. Texture can prevent an even application, while a flexible surface can move rather than hold a firm shape. If the frame has a rough coating, moulded ridges or a material you can’t identify, don’t assume a small flat-looking patch is suitable.
Why does the surface matter as much as the transfer?
The label and surface need to be a suitable match. Even a carefully applied transfer may not be a good fit if the bike’s finish is uneven or unsuitable. A compatible hard surface gives you a more appropriate foundation. When comparing durable stickers for bikes, assess the exact surface rather than expecting one option to work on every frame, component or finish.
If you’re comparing name-only and icon-and-name options for different gear, browse the personalised name label range and consider which design will be clearest on your chosen smooth surface.
How to choose a personalised bike label that is easy to read
A good bike label should be readable at a glance and sized for the spot you want to use. Start with its purpose: are you identifying a child’s bike among similar bikes, or adding a name to everyday gear? Then measure the suitable smooth area. A design that looks clear on screen may feel crowded on a narrow part of the frame.
Name-only or icon-and-name: which design suits your bike?
A name-only label keeps the message simple. It can work well for someone who recognises their name quickly, or in a small area where extra design details could make the text harder to read. An icon alongside a name adds a visual cue that may help younger children recognise their belongings, especially if they’re still learning to read. Neither format is inherently more durable. Surface suitability and careful application matter for both.
Chlosha offers name and icon-plus-name options. If a familiar picture would help your child identify their bike or gear, browse the personalised icon-and-name packs and consider how the icon and lettering will fit together in your chosen spot.
How should you think about label size and placement?
Measure the intended smooth area before choosing a size. Leave room for the full design without crossing a groove, edge or change in surface. Consider how the name will look from the distance you’re likely to read it. Larger lettering may be easier to pick out from nearby bikes, while a compact label may suit a smaller open area.
| Design choice | Reading distance | Suitable label area |
|---|---|---|
| Name only | Useful when the name needs to stand out clearly at a glance. | A smaller smooth area may suit a short name. |
| Icon and name | A visual cue can help a child recognise their gear nearby. | Allow space for both the icon and readable lettering. |
Use the table as a starting point, not a rigid rule. A long name may need more room than a short one, and a curved frame can reduce the uninterrupted space available. Check the label’s individual dimensions against your measurements before choosing. Chlosha’s Classic Name Pack contains 12 labels on a 140 × 200 mm sheet: two large, four medium and six small labels. These pack details don’t guarantee that a particular label will fit a particular bike, so compare the individual label dimensions with your chosen area.
For durable stickers for bikes, clarity and fit go hand in hand. Keep the wording easy to read, avoid squeezing a design into too small a space, and choose the format that best suits the rider.
How to prepare, apply and care for a bike name label
A careful application gives your bike name label the best start. Take time to clean, dry and position the surface before transferring the design. Rushing the placement can make it harder to get a neat result, particularly if the label needs to sit in a specific spot on the frame.
What preparation and application steps help?
Work on a clean, dry surface and follow the supplied UV DTF application instructions. Before starting, check that the chosen area is suitable and that the label is facing the right way. Once it’s positioned, press it down firmly and remove the carrier carefully.
- Clean the area. Remove dirt and grime from the chosen spot, then let it dry fully. Moisture or leftover dirt can interfere with a tidy application.
- Position the label. Hold it over the intended area and check its placement before pressing. Make sure it’s straight and clear of edges, grooves and parts you need to operate.
- Press firmly. Work across the transfer with firm, even pressure, using a squeegee if supplied. Press the full design down, not just the centre.
- Peel back the carrier. Lift it slowly at a low angle. If part of the design starts to lift with the carrier, lay it back down and press that area again before continuing.
If the transfer needs a little help during application, use a warm hair dryer on a low setting if needed. Keep the heat gentle and follow the supplied instructions. Peel the carrier slowly so you can see if any part needs extra pressure.
How should you care for the labelled area?
Wait about 24 hours after application before normal use. This setting time is part of the application guidance, not a promise of a particular lifespan. It gives the transfer time to set before the bike returns to its usual routine.
For labelled drink bottles or other washable gear, hand wash rather than assuming the item is dishwasher-safe. On a bike, care for the labelled area thoughtfully and don’t treat it as immune to wear. The surface, application, setting time and ongoing use can all affect its condition.
Choose a suitable surface, apply the transfer carefully and allow it to set. These practical steps support everyday identification without relying on broad durability promises. Explore Chlosha’s personalised name labels to choose a design for a bike or other gear.
Personalise a bike with Chlosha’s Scooter, Bike & Helmet Name Labels
A personalised name can make a bike or piece of everyday gear easier to identify. Match the design to its purpose, choose a suitable spot and apply it with care. Chlosha’s Scooter, Bike & Helmet Name Labels use UV DTF transfers, with a clean, smooth, no-background finish on suitable surfaces.
Which Chlosha name-label option may suit your gear?
A name-only option keeps identification straightforward. An icon alongside the name adds a visual cue that may help a child recognise their belongings. Consider who needs to read or recognise the label and how much room is available. Browse the personalised name label options to compare name and icon-plus-name styles for your gear.
For a child’s bike, consider whether the name will be easy for them to recognise and for an adult to read. For shared family gear, a clear name may be all you need. Choose a style that suits the rider and fits the intended area without crowding the design.
What to remember before applying a bike label
Before applying a label, check that the exact spot is clean, dry, smooth and hard. A bike’s finish can vary from one part to another, so assess the surface itself rather than assuming the whole frame is suitable. Avoid textured, grooved or flexible areas, and leave enough uninterrupted space for the full design.
Follow the supplied application guidance: position the transfer carefully, press it down firmly and peel away the carrier at a low angle. Allow about 24 hours before normal use. The surface, application, setting time and everyday handling can all affect the label’s condition, so don’t treat a durability claim as a promise of a fixed lifespan.
Helmet labels need an extra check. Waka Kotahi advises against stickers with unsuitable adhesives on helmets because they may weaken the shell or shock-absorbent lining. Don’t apply a label to a helmet unless its adhesive is appropriate for that helmet and won’t damage it.
Choosing durable stickers for bikes comes down to matching a readable design with a compatible surface and careful application. Explore Chlosha’s name-label options to personalise a bike or other gear.
Make the bike feel unmistakably theirs
Personalising a bike can be a small way to celebrate the rider behind it. Let your child choose a detail they like; it can make their bike feel more special before the next trip to school, kindy or the park.
Choosing durable stickers for bikes means finding a design that suits the rider and the way their gear is used. A thoughtful personal touch can make everyday belongings feel more individual.
Ready to find a style that suits your family? Explore personalised name labels and choose an option that makes their bike feel like their own.
Frequently Asked Questions
Can I use a personalised name label on a bike helmet?
Only use one if the helmet’s care information explicitly permits adhesive labels. If it doesn’t, leave the helmet undecorated and put the identifying name on the bike or a separate accessory instead. A name tag on a bag, for example, can help identify a child’s gear without adding anything to their helmet.
Are UV DTF bike labels waterproof?
Don’t assume a UV DTF bike label is waterproof. Its condition can vary with the surface, application and everyday exposure, so avoid relying on it to stay unchanged through rain or washing. After a wet ride, gently dry the bike with a soft cloth rather than scrubbing over the label. This is a sensible care step, not a guarantee against wear.
Can I apply a bike name label over an existing decal?
It’s usually better not to layer a new transfer over an existing decal. The old design may have raised edges or a different finish, making an even result harder to achieve. If you want to replace it, consider whether removing the decal could affect the bike’s paint or coating. Don’t scrape aggressively; preserving the frame finish matters more than covering an old design.
Can I use a bike label on a polypropylene part?
No, polypropylene isn’t suitable for these transfers. A part can look smooth and still be made from an unsuitable plastic, so appearance alone isn’t enough to identify it. Check the component’s packaging or product information for its material before choosing a spot. If you can’t identify the material, choose a different component whose material you can confirm.
How long should I wait before using a bike after applying its label?
Wait about 24 hours before normal use. To make that easier, apply the label the day before the bike is needed, rather than just before school or a ride. Keep the bike somewhere it won’t be handled or knocked during that setting period. This gives you time to follow the application guidance without rushing.
Should I put my child’s full name on their bike?
A first name may be enough for your child to recognise their bike, and it avoids displaying more personal information than the identification task needs. Consider where the bike is parked and who can see it. If several children in a group share the same first name, an initial may help distinguish bikes without adding details such as a school name or contact information.
