

Mega Name Packs: How to Choose the Right Large Name Labels
Will an extra-large name label fit the item you want to mark, and is its surface suitable? Mega Name Packs are designed for larger belongings. Check the label dimensions and the available flat space before choosing a design.
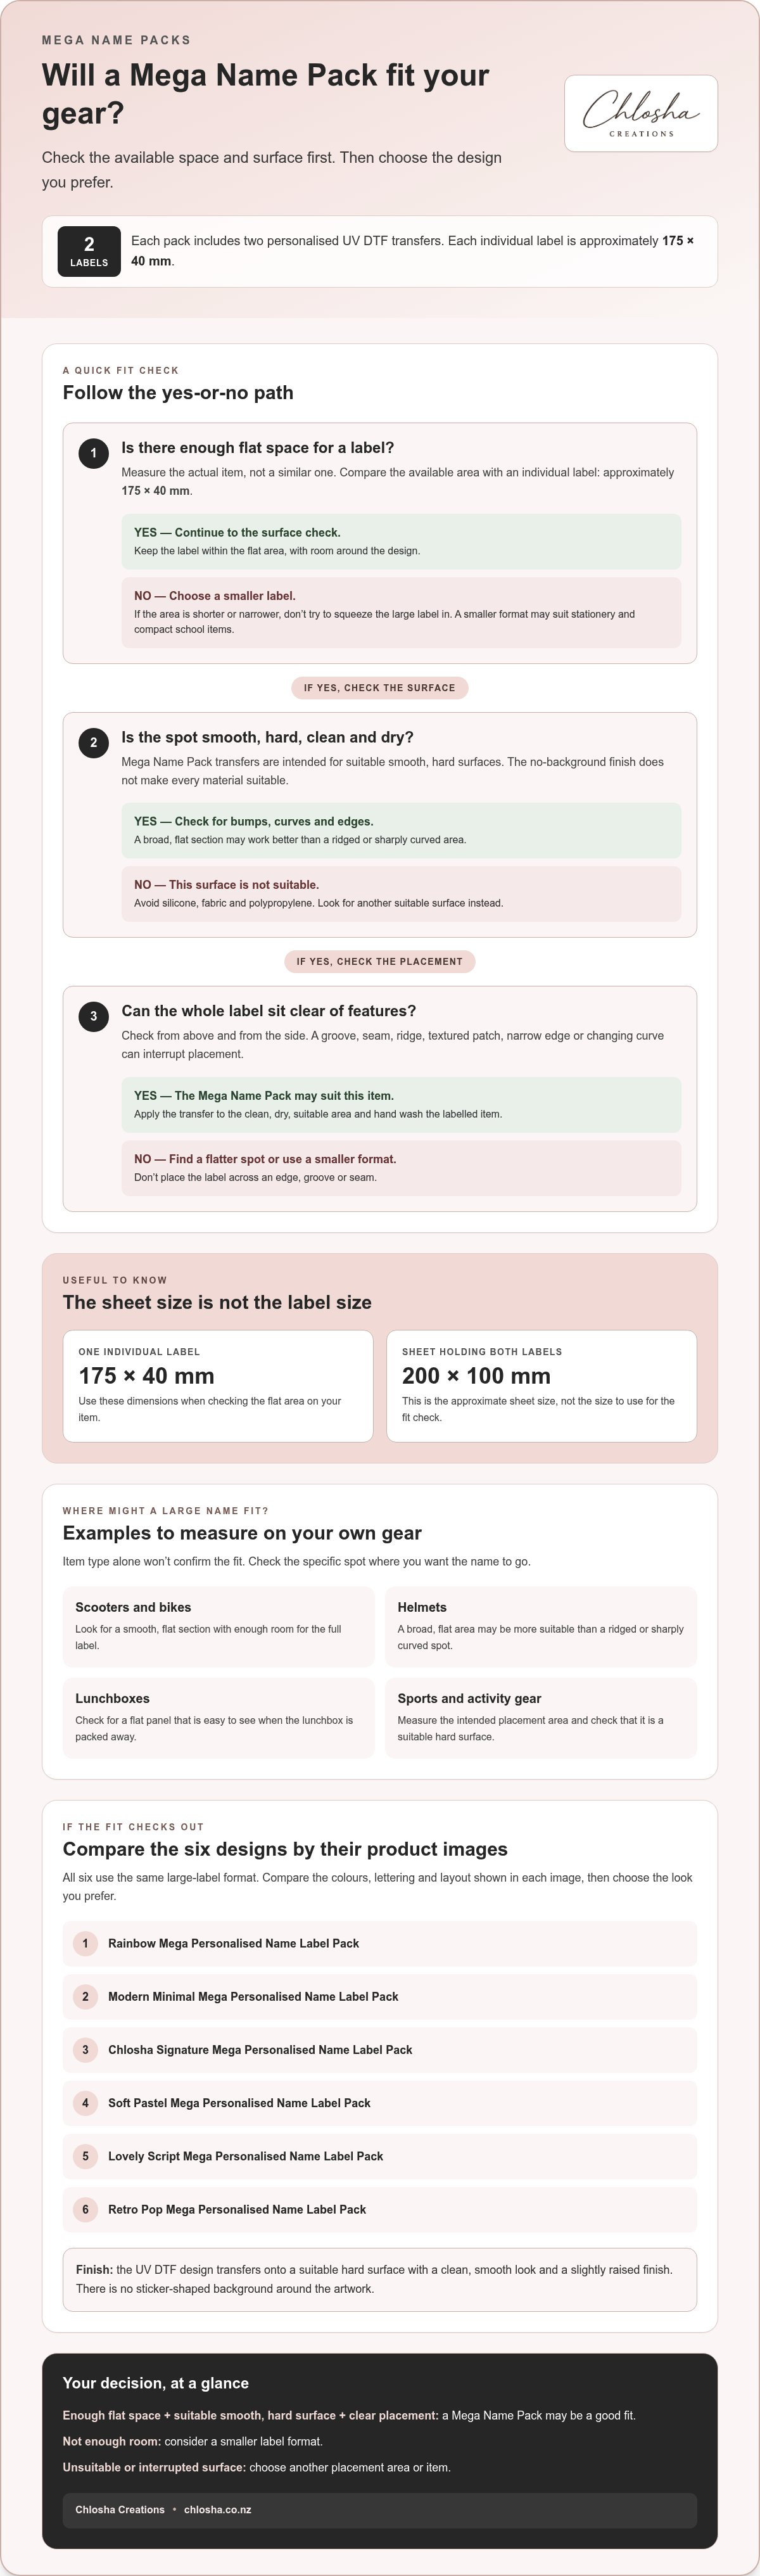
Each pack includes two personalised labels, each approximately 175 × 40 mm, on a sheet measuring approximately 200 × 100 mm. The premium UV DTF transfer has a clean, no-background finish and is intended for suitable smooth, hard surfaces.
This guide explains how to compare the six designs, measure scooters, bikes, helmets, lunchboxes and other gear, and check surface suitability. You’ll also find practical application and care steps to help you make a considered choice.
Key Takeaways
- Measure the flat area on your item and compare it with the individual label dimensions.
- Compare the product images for the six Mega Name Pack designs to find a style you like.
- Use the label only on a clean, dry, smooth, hard surface. Avoid silicone, fabric and polypropylene.
- Apply the transfer carefully and hand wash the labelled item.
- Choose based on the item’s size, surface and your preferred design.
What are Mega Name Packs, and when do large name labels make sense?
A Mega Name Pack contains two extra-large personalised name labels in a premium, no-background UV DTF format. The larger format gives a name more room on suitable belongings and activity gear. Smaller labels may be a better fit for compact stationery and little items.
Consider how the label will be used. A name on a scooter or sports helmet may be easier to spot when it has space around it; a large label on a pencil case or small stationery item could take up more room than you need. The right format depends on the item’s size and the area available for the transfer.
Which belongings suit a large personalised name label?
Scooters, bikes, helmets and lunchboxes are examples of larger everyday items you might want to label. Sports and activity gear may also suit the format. But the item’s category alone won’t tell you whether the label will fit. Look for a clean, dry, smooth, hard area with enough room for the full design, and consider whether the name will be visible during everyday use.
For example, a broad, flat section of a helmet may be more suitable than a ridged area. On a lunchbox, look for a flat panel that’s easy to see when the box is packed away. If you’re labelling smaller belongings, personalised icon and name packs offer a more compact option for pairing a name with an icon.
What does the no-background UV DTF finish look like?
The name and design transfer onto a suitable hard surface with a clean, smooth appearance and a slightly raised finish. There’s no sticker-shaped background around the artwork, so the item’s own surface remains visible around the design. The no-background finish describes the look, but it doesn’t make every material or shape suitable.
Labels come in different formats and serve different purposes. Label (Wikipedia) provides a general overview of labels and their uses. For a Mega Name Pack, focus on whether the surface is smooth and firm enough for the transfer, and whether the name will be easy to see.
Picture the item in its usual setting: will it be stored with other gear, carried to school or kindy, or taken to activities? A large name can make sense on shared family belongings, provided there’s a suitable flat area. For small stationery, a smaller format may be more practical. Match the label size to the available space rather than assuming it will fit every scooter, bike, helmet or lunchbox.
How to check Mega Name Pack dimensions against your gear
Measure the area where you plan to place the label, rather than relying on the item’s overall size. Each label is approximately 175 × 40 mm, and the sheet holding both labels is approximately 200 × 100 mm. It’s the individual label dimensions you’ll need to compare with the available space.
A quick measuring check before choosing a pack
Use the actual item you intend to label. Even items in the same category can have different shapes and flat areas, so measuring a similar item may not give you a reliable guide. A ruler or tape measure is enough for a basic check.
- Choose a clean, dry, smooth, hard area where the name will be easy to see.
- Measure the flat area’s width and height, then compare them with the label dimensions of approximately 175 × 40 mm.
- Check that the label can sit within the flat area without crossing an edge, groove or seam.
Leave some space around the design. If it would cross a raised feature, textured patch or narrow edge, look for another placement area. The sheet dimensions describe the pack; the size of each individual label is what matters when checking the fit.
Allow for curves and surface features
A large item doesn’t necessarily have a suitable area for a large label. Check that the intended spot is smooth and flat enough for the transfer to sit evenly. A sharply curved surface, groove or area that changes shape across the label’s width may not provide suitable placement. Look for a flatter section instead.
Seams, ridges and textured details can also interrupt placement. View the area from above and from the side to spot curves or features that may be less obvious when you look straight at it.
When a smaller label may be a better fit
Mega Name Packs are designed for larger belongings, so they won’t suit every small item. If the available flat area is shorter or narrower than the label, don’t try to squeeze it in. A smaller label can be a neater choice for stationery and other compact school items.
For more compact options, browse the personalised name label range. If your measurements show enough suitable space on a larger item, compare the designs in the Mega Name Packs.
Compare the six Mega Name Pack designs before you choose
All six Mega Name Packs use the same large-label format, so choose the design you prefer for the item you’re labelling. Product names can help you navigate the options, but the product images show the colours, lettering and layout. Compare those details before making your choice.
Compare the named designs by the look you prefer
Use this table as a checklist while viewing each listing. Consider the design shown, then picture it on the smooth, hard surface you’ve chosen.
| Pack design | What to compare in the product image |
|---|---|
| Rainbow Mega Personalised Name Label Pack | Which visible colours and layout appeal to you? |
| Modern Minimal Mega Personalised Name Label Pack | What details stand out in the lettering and arrangement? |
| Chlosha Signature Mega Personalised Name Label Pack | How does the pictured design look beside your item? |
| Soft Pastel Mega Personalised Name Label Pack | Which visible design details suit your preference? |
| Lovely Script Mega Personalised Name Label Pack | How does the lettering appear in the product image? |
| Retro Pop Mega Personalised Name Label Pack | What colours and layout can you see in the listing? |
View the listing images large enough to inspect the name area and overall design. Consider the item’s colour and where the transfer will sit. This helps you choose based on the details shown, rather than assuming a particular contrast or readability. If the gear goes to school, kindy or sports, think about which design you’ll recognise when looking for it.
There’s no single design that suits every item. You might prefer a simpler look on a bike or a more decorative style on a lunchbox. Either way, check the placement area as well as the design: a favourite style still needs enough suitable flat space.
When an icon and name design may suit better
Mega Name Packs are large personalised name labels. If you’d like a themed icon alongside the name, explore the separate Icon + Name Packs. Compare the pictured designs with the item and the identifying details you want.
Once you have a preferred style, compare the Mega Name Pack images and choose the design you like. Use the pictured details to guide your decision, rather than relying on the product name alone.
Check surface suitability and apply Mega Name Pack labels carefully
Surface suitability matters as much as the design. Mega Name Packs are intended for clean, dry, smooth, hard surfaces. Compatible hard plastic, glass and acrylic are examples, but materials and finishes vary. Check the actual area where you plan to apply the transfer.
Which surfaces are suitable for UV DTF name labels?
Look for a flat, even area without texture or grooves. Raised patterns, recessed channels and seams can interrupt contact with the surface. Flexible materials bend during use and aren’t suitable for this type of label. If the area isn’t smooth and firm, choose another spot or item.
Avoid textured or grooved surfaces, silicone, soft or flexible plastic, fabric, uncoated paper and polypropylene. A drink bottle or lunchbox may seem like an obvious place for a name, but check its material and finish first. Don’t assume every part of an item is suitable.
How to apply a large transfer with care
Once you’ve chosen a suitable spot, prepare the surface and take your time with placement. A clean, dry surface makes it easier to position the label and press it down evenly.
- Clean the chosen area and let it dry thoroughly. Remove dust, moisture and residue from the placement spot.
- Position the label before pressing it down. Check that it’s straight and clear of edges, grooves and raised details.
- Press or squeegee firmly across the transfer so it makes even contact with the surface.
- Peel the carrier film away slowly at a low angle. If the transfer lifts with the film, lay it back down and press firmly again before continuing.
If needed, use a warm hair dryer on a low setting to help with application. Keep the heat gentle, then continue pressing and peeling slowly. Wait approximately 24 hours before normal use.
Hand wash the labelled item and take care around the transfer. The surface, application, curing time, washing conditions and ongoing use can all affect durability. Avoid scrubbing directly over the label, and don’t assume the item is suitable for a dishwasher or microwave.
To compare designs for gear with a suitable surface, explore the Mega Name Packs.
Choose your Mega Name Pack and make the next step simple
Bring your checks together before choosing: measure the item, confirm that the surface is suitable, then compare the designs. Review the product details and personalisation carefully, including how you want the name to appear.
A simple checklist for choosing a pack
- Item size: Is there enough flat space for the label? Measure the actual item rather than relying on its category. Scooters, bikes, helmets and lunchboxes can have different shapes and available areas.
- Surface suitability: Is the placement spot clean, dry, smooth and hard? Avoid textured, grooved or flexible surfaces and unsuitable materials.
- Preferred design: Compare the product images for Rainbow, Modern Minimal, Chlosha Signature, Soft Pastel, Lovely Script and Retro Pop. Choose the pictured style you prefer for your gear.
These checks work together. A design you like won’t compensate for a label crossing a groove, and extra space won’t help if the surface is unsuitable. If you want an icon alongside a name, consider the separate Icon + Name Packs. Otherwise, choose the Mega Name Pack that suits your measured placement area.
Browse the Mega Name Packs collection
Each pack includes two extra-large personalised labels, with six design options to choose from. Review the product details and images, then enter the name as you want it displayed. Check the spelling, capitalisation and other details before completing your order.
Consider where the item will be used. A scooter taken to after-school activities may need a different placement from a lunchbox packed for kindy. Choose a visible spot on a suitable smooth, hard surface. The shape and finish of the item will determine whether there’s enough appropriate space.
If your checks line up, you’re ready to choose. If not, reconsider the placement or whether a smaller format would suit the item better. This keeps your decision focused on a practical fit, a suitable surface and a design you’ll be happy to see on everyday gear.
To compare sizes and styles, browse the personalised name label range.
Make your everyday gear feel more personal
A name label can add a personal detail to a child’s scooter, sports gear or lunchbox. Picture the item in its usual setting, whether it’s packed for school, carried to kindy or gathered up after an activity. That context can help you choose a design and placement that work for everyday use.
Mega Name Packs are a large-format option for personalising suitable belongings. Keep the item in mind as you browse, and enter the name exactly as you’d like it displayed.
Explore the Mega Name Packs to compare the designs and choose a personalised detail for your gear.
Frequently Asked Questions
What does “no-background” mean on a Mega Name Pack label?
“No-background” means there isn’t a separate block or sticker-shaped panel behind the name design. The printed elements sit on the item, leaving its surface visible around them. The transfer has a slightly raised finish, so it may feel different from the item’s original surface.
Can a Mega Name Pack label go on a curved drink bottle?
It may suit a drink bottle if you can find a smooth, hard area that’s flat enough for the whole label. Check the bottle from the side as well as straight on. A narrow, sharply curved area may cause the transfer to cross onto a different angle, so don’t place it where it wraps around the bottle’s curve. Check the bottle material too, as not all plastics are suitable.
Can I use a Mega Name Pack label on a helmet?
A helmet may be suitable if it has a clean, dry, smooth, hard area large enough for the label, without vents, ridges or textured sections. Check the exact placement before applying, as helmet shapes and finishes vary. A flatter outer area may work better than a curved edge or recessed detail.
Are Mega Name Pack labels suitable for fabric or clothing?
No. These transfers are intended for suitable smooth, hard surfaces, not fabric or clothing. Fabric moves and bends during wear, so it isn’t suitable for this label type. Mega Name Packs are better suited to compatible hard gear than to uniforms, jackets or soft pencil cases.
How should I wash an item with a Mega Name Pack label?
Hand wash the item and wait approximately 24 hours after application before normal use. Durability can depend on the surface, correct application, curing time, washing conditions and ongoing use, so gentle hand washing is recommended. Don’t assume a labelled item is suitable for a dishwasher or microwave. For a drink bottle, wash it by hand and take care around the labelled area.
Can I use a Mega Name Pack label on polypropylene?
No. Polypropylene isn’t a suitable surface for these transfers. Some lunchboxes and drink bottles are made from different plastics, and the material may not be obvious by looking. Check the item’s material information before applying a label. If it’s polypropylene, choose another item with a suitable hard surface.
Are icons included with Mega Name Packs?
Mega Name Packs are large personalised name labels, rather than an icon-and-name format. If you’d like a themed icon alongside the name, browse the separate Icon + Name Packs and compare the designs. This format can help distinguish a child’s belongings at kindy or school, while Mega Name Packs focus on a larger name for suitable hard gear.
