

Garage and Shed Organisation Labels: A Practical NZ Guide
Can everyone in your household find the camping gear, garden tools or spare parts without opening every tub? A clear storage system starts with knowing what’s where, and garage and shed organisation labels can make that much easier.
When shelves become a jumble or shared tools don’t make it back to their proper place, labels help everyone see what belongs where. The key is choosing clear wording and placing each label where it can be read easily. You’ll also need to match the label to the surface you’re applying it to.
This guide covers practical label ideas for tubs, shelves, toolboxes and other garage or shed storage. Learn how to group belongings, write labels that are easy to scan, and choose options for suitable smooth, hard surfaces. A simple shared system makes it easier to find what you need and return it to the right spot.
Key Takeaways
- Build a shared system by sorting items, grouping similar belongings and giving each storage zone a clear name.
- Use garage and shed organisation labels to make container contents easier to scan and shared gear simpler to put away.
- Choose text, pictures or both to help household members recognise storage categories at a glance.
- Match labels to the surface: Chlosha UV DTF transfers are intended for clean, dry, smooth hard surfaces.
- Before choosing personalised labels, consider what you’re storing, how the label will be seen and where it will be applied.
Why garage and shed organisation labels make storage easier to use
Garage and shed organisation labels identify what a storage area is for or what a container holds. A label such as “Garden tools” on a tub or “Bike helmets” on a shelf turns stored belongings into a system people can understand at a glance. Common storage needs vary from household to household, but tools, sports gear and seasonal belongings often benefit from having a clear home.
A shared system also makes it easier to put things back. When everyone knows where the spare light bulbs belong, they’re less likely to leave them wherever there’s room. Labels work best when the category makes sense to everyone using the space, not just the person who organised it.
Consistent labels make it easier to find shared belongings and return them to a familiar place.
Labels support an organising system; they can’t create one on their own. Sort belongings first, decide where categories belong, then add labels that match those decisions. A quick reset now and then helps keep the system useful as household needs change.
Which garage and shed areas benefit most from labels?
Start with zones that contain items people reach for often or regularly struggle to find. Depending on your household, that might mean a tool area, gardening supplies, sports gear or seasonal belongings such as camping equipment and chilly bins. Choose categories that reflect what you actually store rather than trying to label every possible area.
Begin with one small frustration. If gardening gloves and hand tools get mixed up, give them a clearly marked shelf or container. If sports equipment is scattered across several tubs, group it in one accessible area and label the storage. Starting with a well-used zone lets you see whether the system works before you organise the whole space.
How to plan storage categories before labelling
Group belongings by how you use them, not only by what they are. For example, keep the items used for washing the car together, or store a child’s sports gear in one place so it’s easier to gather before practice. A useful category helps someone decide where an item belongs without needing to ask.
Keep names short, specific and familiar. “Garden tools” says more than “Outdoor”, while “Camping” may be clear if everyone knows which gear belongs in that group. Avoid creating so many small categories that people have to think hard about where each item goes. If a label feels unclear, simplify the wording or regroup the contents before labelling.
Once your categories are settled, choose wording everyone will understand. Personalised wording can help make storage zones clear and consistent. Explore personalised name labels for suitable storage surfaces. Planning first gives each label a practical purpose, rather than simply adding names to containers.
How to build a garage and shed label system that stays clear
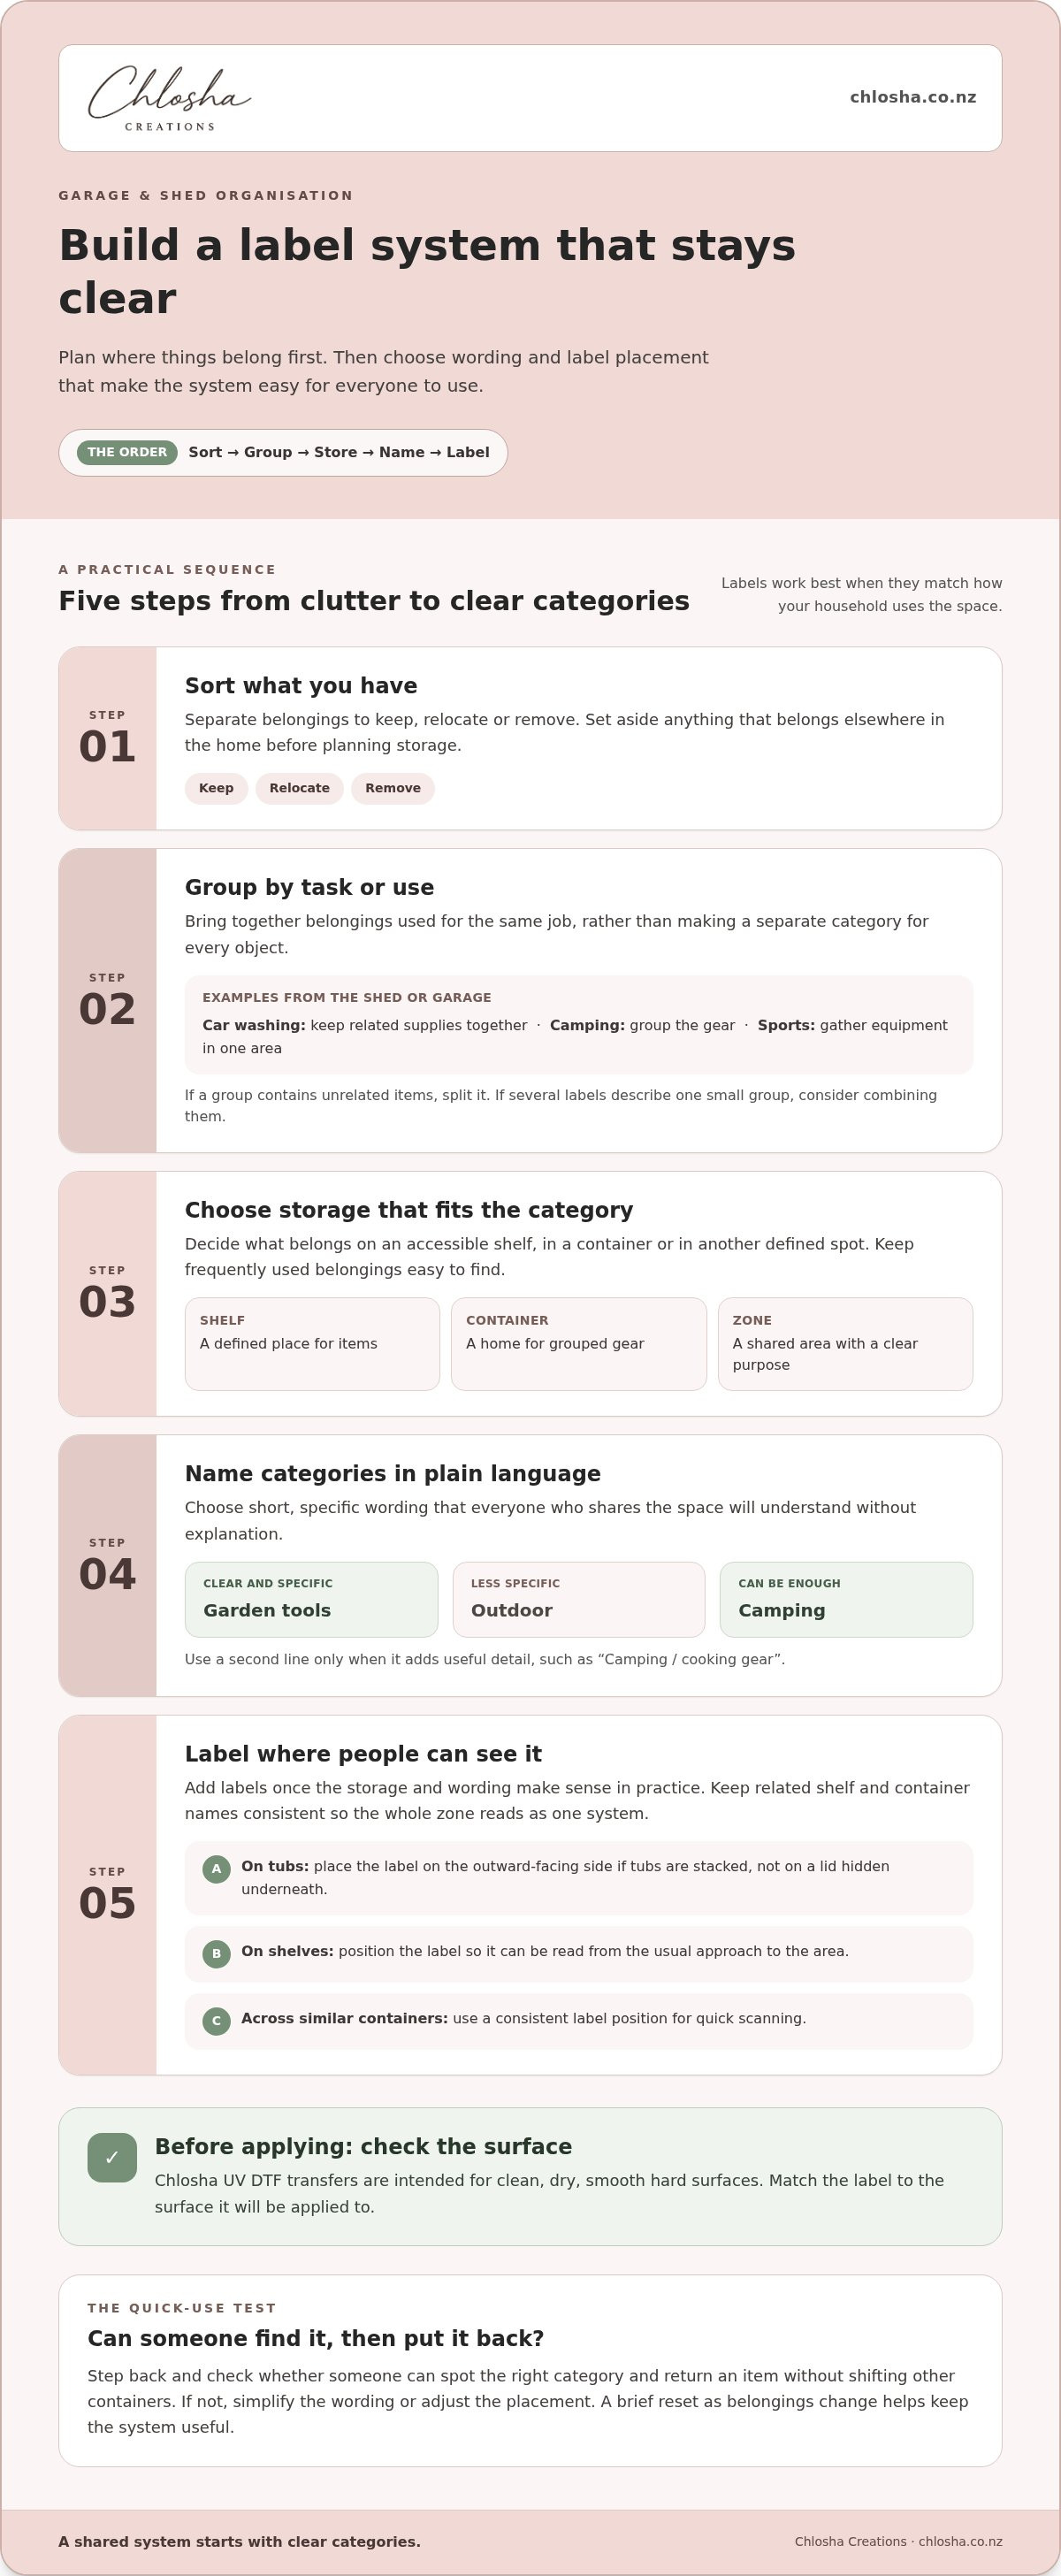
A reliable label system starts with decisions about what belongs where, not with a stack of labels. Work through the space in order: sort belongings, group related items, choose suitable storage, name each category, then label. This keeps labels connected to how your household uses the garage or shed.
Sort before labelling: decide what stays and where it belongs before choosing the words. This can save you from labelling containers only to change their contents or location later.
- Sort: Separate belongings to keep, relocate or remove. Set aside items that belong elsewhere in the home.
- Group: Bring together things used for the same task, such as car-cleaning supplies or camping gear.
- Choose storage: Decide what belongs on an accessible shelf, in a container or in another defined spot.
- Name categories: Pick plain wording that a household member can understand without explanation.
- Label: Add labels once the storage and wording make sense in practice.
Sort and group items before choosing label wording
Lay out a group together before settling on its name. A “Sports gear” container might work for balls and training accessories, while helmets may be easier to locate on a nearby shelf. Try the arrangement with the people who share the space: can they tell where an item goes and put it back without prompting? If they hesitate, adjust the grouping.
Group by task or use rather than making a separate category for every object. The aim is a system that gives enough direction but is simple to maintain. If a category contains unrelated belongings, split it. If several labels would describe one small group, consider combining them.
Choose label wording and placement for quick scanning
Keep the main label short: “Garden supplies” or “Camping” may be all a container needs. Add a second line only when it answers a useful question, such as “Camping / cooking gear”. Use the same category name on a shelf and its related container so the zone reads as one system, not a set of conflicting instructions.
Put labels on the outside of containers where they’ll remain visible when stored. If tubs are stacked, label the outward-facing side rather than a lid that disappears beneath another tub. Use a consistent position across similar containers, and make sure shelf labels can be read from the usual approach to the area. The same principle applies to personalised name labels for storage: people can use them more easily when they can see them at a glance.
Before applying your garage and shed organisation labels, step back and check the whole arrangement. Can someone spot the right category and return an item without shifting other containers? If not, adjust the wording or placement. A brief reset as belongings change helps keep the system clear and usable.
Picture labels or personalised wording: choosing garage and shed labels
Choose a label style based on who uses the space and what needs to be found. A picture can make a broad category easier to recognise, personalised wording can clarify what belongs in a container, and using both can offer helpful cues for different household members. The best fit is the one people can understand quickly and use consistently.
Consider whether the contents are obvious from a picture alone. A tool image may suggest a general tool area, but it won’t distinguish a tub of sanding supplies from one holding drill accessories. Clear wording can do that. Pictures and text work well together when people need both a quick visual cue and a specific category name.
| Reader need | Potential advantage | Consideration |
|---|---|---|
| Help children or visitors recognise a general zone | A familiar picture can be understood quickly, even if someone reads the category differently. | A picture may not show exactly which items belong in that group. |
| Tell similar containers apart | Specific wording, such as “Bike repair” or “Garden gloves”, describes the contents more precisely. | Keep the wording short enough to scan easily. |
| Make a shared area clear to different users | A picture paired with a category name gives both a visual cue and added detail. | Use the same style of cue across related shelves and containers. |
When picture labels help people find the right things
Pictures can help with broad, familiar groups such as hand tools, garden items or sports equipment. They may help children, visitors or anyone unfamiliar with the storage system recognise a category without asking. Think about how your household interprets the image. If a short word could mean different things to different people, a clear picture alongside it may reduce guesswork.
When personalised wording gives storage more clarity
Specific words are useful when containers look alike or hold related but different items. “Camping lights” gives more direction than “Camping”, while a household name can identify whose belongings a tub contains. Personalised labels can be used on suitable smooth, hard surfaces. Chlosha’s UV DTF transfers are intended for clean, dry surfaces such as compatible hard plastic, glass and acrylic.
Consider storage beyond the garage, too. The same approach can make categories clearer in cupboards or utility areas. A clean, no-background finish with a slightly raised effect can suit compatible hard storage surfaces. Explore personalised name labels for storage when you want wording tailored to a container or area.
Before choosing, picture the person who’ll look for the item. If they need to identify a general zone quickly, a familiar picture may be enough. If they need to distinguish similar tubs, choose precise wording. Use both cues when they add clarity, not just decoration.
Prepare the surface and apply garage and shed organisation labels carefully
A label’s suitability depends on the surface it’s applied to, not just the material named on the container. Chlosha UV DTF transfers are intended for clean, dry, smooth hard surfaces. For a suitable application, choose a clean, dry, smooth and hard surface.
Compatible hard plastic, glass and acrylic may be suitable, but check the actual finish. A smooth plastic tub is a better candidate than one with a textured panel, deep grooves or a flexible, soft surface. Polypropylene is a low-surface-energy plastic and may not be suitable. Avoid textured or grooved surfaces, silicone, flexible or soft plastic, fabric and uncoated paper.
Check the storage surface before applying a label
Look closely at the spot you plan to label. Even a hard container can have moulded ridges or a pebbled texture that interrupt the smooth area. Check that the intended position is flat and free from grooves, and consider how the container is handled and stored. If the surface is flexible, rough or soft, identify it another way rather than applying a transfer there.
Material and finish both matter. Two plastic containers can have different surface textures, and a label may suit one but not the other. Choose a smooth, flat area that’s large enough for the wording and, where possible, away from seams or edges.
Apply and care for UV DTF labels
Take your time with application. Clean the surface thoroughly and let it dry fully. Position the label, then press or squeegee firmly across the design so it makes even contact. Peel the carrier back slowly at a low angle. If needed, use a warm hair dryer on a low setting to help with application.
Wait about 24 hours before normal use. For items that may go in a dishwasher, wait about 72 hours before exposure where appropriate, but this is not a claim of dishwasher safety. Durability can depend on the surface, correct application, curing time, washing conditions and ongoing use. Hand washing is recommended. A label’s suitability for a smooth surface does not mean the labelled item is suitable for every cleaning method.
These checks apply to garage and shed organisation labels for storage tubs, cabinets and other suitable hard surfaces. If you’re choosing wording for a container, explore personalised labels for smooth storage surfaces and match the option to the surface you intend to label.
Choose personalised garage and shed labels for your storage setup
The right label fits the job, makes sense to the people using the space and can be applied to a suitable surface. Before choosing, check four things: what the storage is for, which wording will identify it clearly, whether the surface is suitable and whether the label will be easy to see once everything is in place.
For shared tools, name the storage location or category so it’s clear where equipment belongs after use. For family gear, familiar wording such as “Sports gear” or “Camping” can help household members find and return items. If you’re labelling a container, check that the intended spot is clean, dry, smooth and hard.
Match the label choice to the way the space is used
Think about when someone will need the label. Are they looking for a particular item, putting something away or sorting a group of belongings? A broad label may suit a clearly defined zone, while more specific wording can distinguish containers with similar contents. Position the label where it can be seen without lifting or shifting other stored items.
Personalised name labels can be a practical option for compatible hard surfaces. Chlosha’s UV DTF transfers have a clean, smooth, no-background finish with a slightly raised effect. They’re intended for suitable smooth, hard surfaces, so the material alone isn’t enough to decide. Check the surface finish and follow the application guidance before labelling a storage item. Browse the personalised name-label collection for options that fit your storage plan.
Make a simple plan for maintaining the system
Storage needs change. Leave room to update category wording when the contents shift, rather than creating a new label for every small change. A seasonal tidy-up is a useful time to check that labels still match what’s on the shelf and frequently used items remain easy to reach.
Make the system familiar to everyone who shares the garage or shed. Use the same category names in conversation and on labels, and agree where belongings go after use. If a label repeatedly doesn’t match how people sort or find things, revisit the category or wording. A straightforward system everyone can follow is more useful than a detailed one that only makes sense to its organiser.
Use the guidance earlier in this article alongside your storage plan: settle the wording, confirm visibility and check surface suitability before applying a label. Then browse Chlosha’s personalised name labels if they suit the smooth, hard surfaces in your garage or shed.
Start with one storage zone and build from there
You don’t need to organise every shelf and container at once. Choose one area that regularly slows you down, then make its labels part of how your household uses that space. As people put things away, notice which wording feels natural and which categories need a clearer name. That feedback can guide your next steps.
A small, well-used zone is a good place to begin with garage and shed organisation labels. Once the routine feels familiar, apply the same approach to another part of the garage, shed or home storage. Chlosha Creations is a family-run New Zealand business serving customers nationwide, with personalised labels designed for suitable storage surfaces.
If personalised wording would make your storage plan easier to follow, explore personalised name labels and choose an option that fits your next organising step. Start small, keep the system easy for everyone to use, and let each clear space make the next one simpler.
Frequently Asked Questions
Can UV DTF labels be used on garage storage tubs?
UV DTF labels may suit some garage storage tubs if the plastic is compatible, hard and smooth. Not every tub will be suitable, so check the exact spot: a textured finish, grooves or flexing can interfere with application. Avoid soft or flexible plastic and polypropylene. Clean the surface thoroughly and let it dry fully before applying the label. Press or squeegee firmly, then peel the carrier back at a low angle.
Are garage organisation labels suitable for outdoor sheds?
Suitability depends on the surface and the conditions the label will face. Chlosha UV DTF transfers are intended for clean, dry, smooth hard surfaces, but this does not mean they are suitable for every outdoor condition. Check the surface where you plan to apply one and follow the application steps. Avoid relying on a label in exposed conditions where its performance may be affected.
How should I label storage boxes so items are easy to find?
Give each box a short category name that reflects how you’ll use its contents, such as “Spare bulbs” rather than the broader “Household”. Put the wording on the side that faces out when the boxes are stored, and use the same position for similar containers. If a box has smaller groups inside, label the main category outside and keep the contents grouped consistently so household members can find and return things.
Should I use picture labels or words in a shed?
Use the format that makes a category clearest to the people who share the shed. A familiar picture can help someone recognise a general group, such as garden equipment, without needing to read. Words are more useful when categories look alike, such as “Bike pump” and “Bike repair kit”. For shared storage, a picture with a short label can help different users understand the category quickly.
Can I apply a label to a textured or grooved container?
No. Chlosha UV DTF transfers are intended for clean, dry, smooth hard surfaces, so choose a different spot if the container is textured or grooved. Flexible or soft plastic and polypropylene are also unsuitable examples. A smooth panel may be a better option if it meets the application guidance. Match the label to a compatible area rather than relying on it to adhere to an unsuitable surface.
How long should I wait before using a newly labelled container?
Wait about 24 hours before normal use. For items that may go in a dishwasher, wait about 72 hours before exposure where appropriate, but hand washing is recommended and dishwasher safety is not guaranteed. For a garage or shed tub, plan its final position while the transfer sets. Place the label on the outward-facing side, clear of a rim or handle, so it stays visible on a shelf or in a stack.
