

UV DTF Decal Sheets: How to Choose and Use Them in New Zealand
Choosing uv dtf decal sheets is about more than finding a design you like. The surface, finish and way you’ll use the item all matter. A good match starts with the item you want to personalise and the spot where the design will sit.
UV DTF designs have a clean, no-background finish with a slightly raised feel. Pre-cut sheets, commonly 140 × 140 mm, group designs together for personal projects, gifts or small-batch personalisation. They’re transfers for suitable hard surfaces, not blank sticker paper or a home-printable template.
This guide explains what to look for when choosing a sheet, which surfaces are suitable and how to apply a decal with care. You’ll also learn why fabric, silicone and textured surfaces aren’t a good match, plus what to know about curing and cleaning. Allow around 24 hours before normal use, and hand wash decorated items. A little preparation makes it easier to choose a design that suits your item and apply it carefully.
Key Takeaways
- Choose uv dtf decal sheets by matching the design and sheet dimensions to the item you want to personalise.
- Check the surface first: these transfers are for clean, dry, smooth hard surfaces, not fabric, silicone or textured items.
- Pre-cut designs can add a personal touch to gifts and everyday items, or help with small-batch branding on suitable products.
- Follow the application and care guidance, including allowing time for the decal to settle and hand washing the finished item.
What are UV DTF decal sheets, and what makes their finish different?
UV DTF decal sheets are sheets of printed transfers designed to apply individual designs to suitable smooth, hard surfaces. A sheet groups one or more designs together; it isn’t a home-printable template or blank sticker paper. Each design is prepared as a transfer, ready to apply to a compatible item.
UV DTF uses ultraviolet light to cure the printed ink. A carrier film helps position the design before it is pressed onto the surface. For a general overview of the printing technology, see UV printing. Once applied, the design has a clean, no-background appearance and a slightly raised finish you can see and feel.
Unlike a design printed on a solid-colour background, the area around the artwork doesn’t transfer as a block. Only the design is intended to show on the item. The result depends on the artwork and the item, so consider the surface colour and shape when picturing how the finished decal will look.
How does a no-background decal sheet look on an item?
Imagine a small design on a clear glass jar or a smooth acrylic container. Instead of a visible rectangle around the artwork, the design sits directly against the item’s surface. The same clean effect can suit smooth, firm hard plastic, provided the surface has no texture.
Colour matters. A light design may be less visible on a pale item, while a darker design may stand out more clearly. Shape matters too: a flat area makes positioning easier, while a curved surface can change how the design appears from different angles. Check the item before deciding where the decal will sit.
What is the difference between a sheet and an individual decal?
A sheet is a format that groups designs or transfers together. With pre-cut decal sheets, designs are prepared as separate pieces on a shared sheet, so you can select an individual design for your project. The number and layout depend on the sheet, so check the product details rather than assuming every sheet contains the same selection.
An individual decal is one design, while a sheet can include several. Name-label packs serve a different purpose: they identify belongings, such as items used at school, daycare or kindy. A decorative or branding design on a UV DTF sheet personalises a suitable hard surface; it doesn’t replace a name label when clear identification is needed.
In short, uv dtf decal sheets offer a grouped format for choosing transfers, while the no-background finish helps the design sit neatly on a compatible item. Consider the artwork, sheet layout and surface together to understand what you’ll receive and how it may look once applied.
Which projects suit UV DTF decal sheets?
Choose a project by starting with the item, not just the artwork. A design may look perfect on screen, but the item still needs a suitable smooth, hard surface. UV DTF decal sheets can suit personal projects, gifts and small-batch branding when the object is a good match.
Are decal sheets useful for everyday personalisation?
They can add a distinctive detail to a drink bottle, lunchbox or storage container, provided the area you plan to decorate is clean, dry, smooth and hard. Look for a flat or gently curved spot with enough room for the design. Check the item’s surface and shape before choosing a decal, rather than assuming every bottle or lunchbox will suit.
For a family project, you might add a decorative motif to a suitable bottle or personalise a smooth storage jar for craft supplies. If the main goal is identifying belongings for school, daycare or kindy, choose a name label designed for that purpose. A decorative decal and a name label can complement each other, but they aren’t interchangeable.
Can they add a personal touch to gifts?
A small design can make a hard-surface gift feel more considered. For example, you could add a motif to a suitable glass container, acrylic item or firm storage accessory. Think about the item’s colour, curve and available space first, as each can affect how the design looks once applied.
Keep the intended use in mind too. A frequently handled item needs more consideration than a display piece. Avoid choosing a project based on appearance alone: the surface and how the item will be used matter just as much.
When might a business use UV DTF decal sheets?
For a small business, a sheet can be a practical way to apply a coordinated design across several compatible products, such as smooth cups, bottles or other hard-surface items. This can suit a small batch of branded goods, details on a hard container or a limited run for an event. Both the design and each item’s surface need to suit the transfer.
Before applying a design across a batch, consider the range of item shapes and colours. The same artwork may appear differently on a curved bottle than on a flatter surface, so plan the placement and check each item individually. For more on logo use and consistent business branding, the guide Branding Decals for Small Business: A Guide to Professional UV DTF Transfers explores those considerations in more depth.
For name-based identification rather than decorative personalisation, explore personalised name labels. For any decal project, match the design to a suitable surface and the way the finished item will be used. Care and ongoing use can affect how a decal holds up, so don’t assume a particular lifespan or dishwasher performance.
How to choose a UV DTF decal sheet for your project
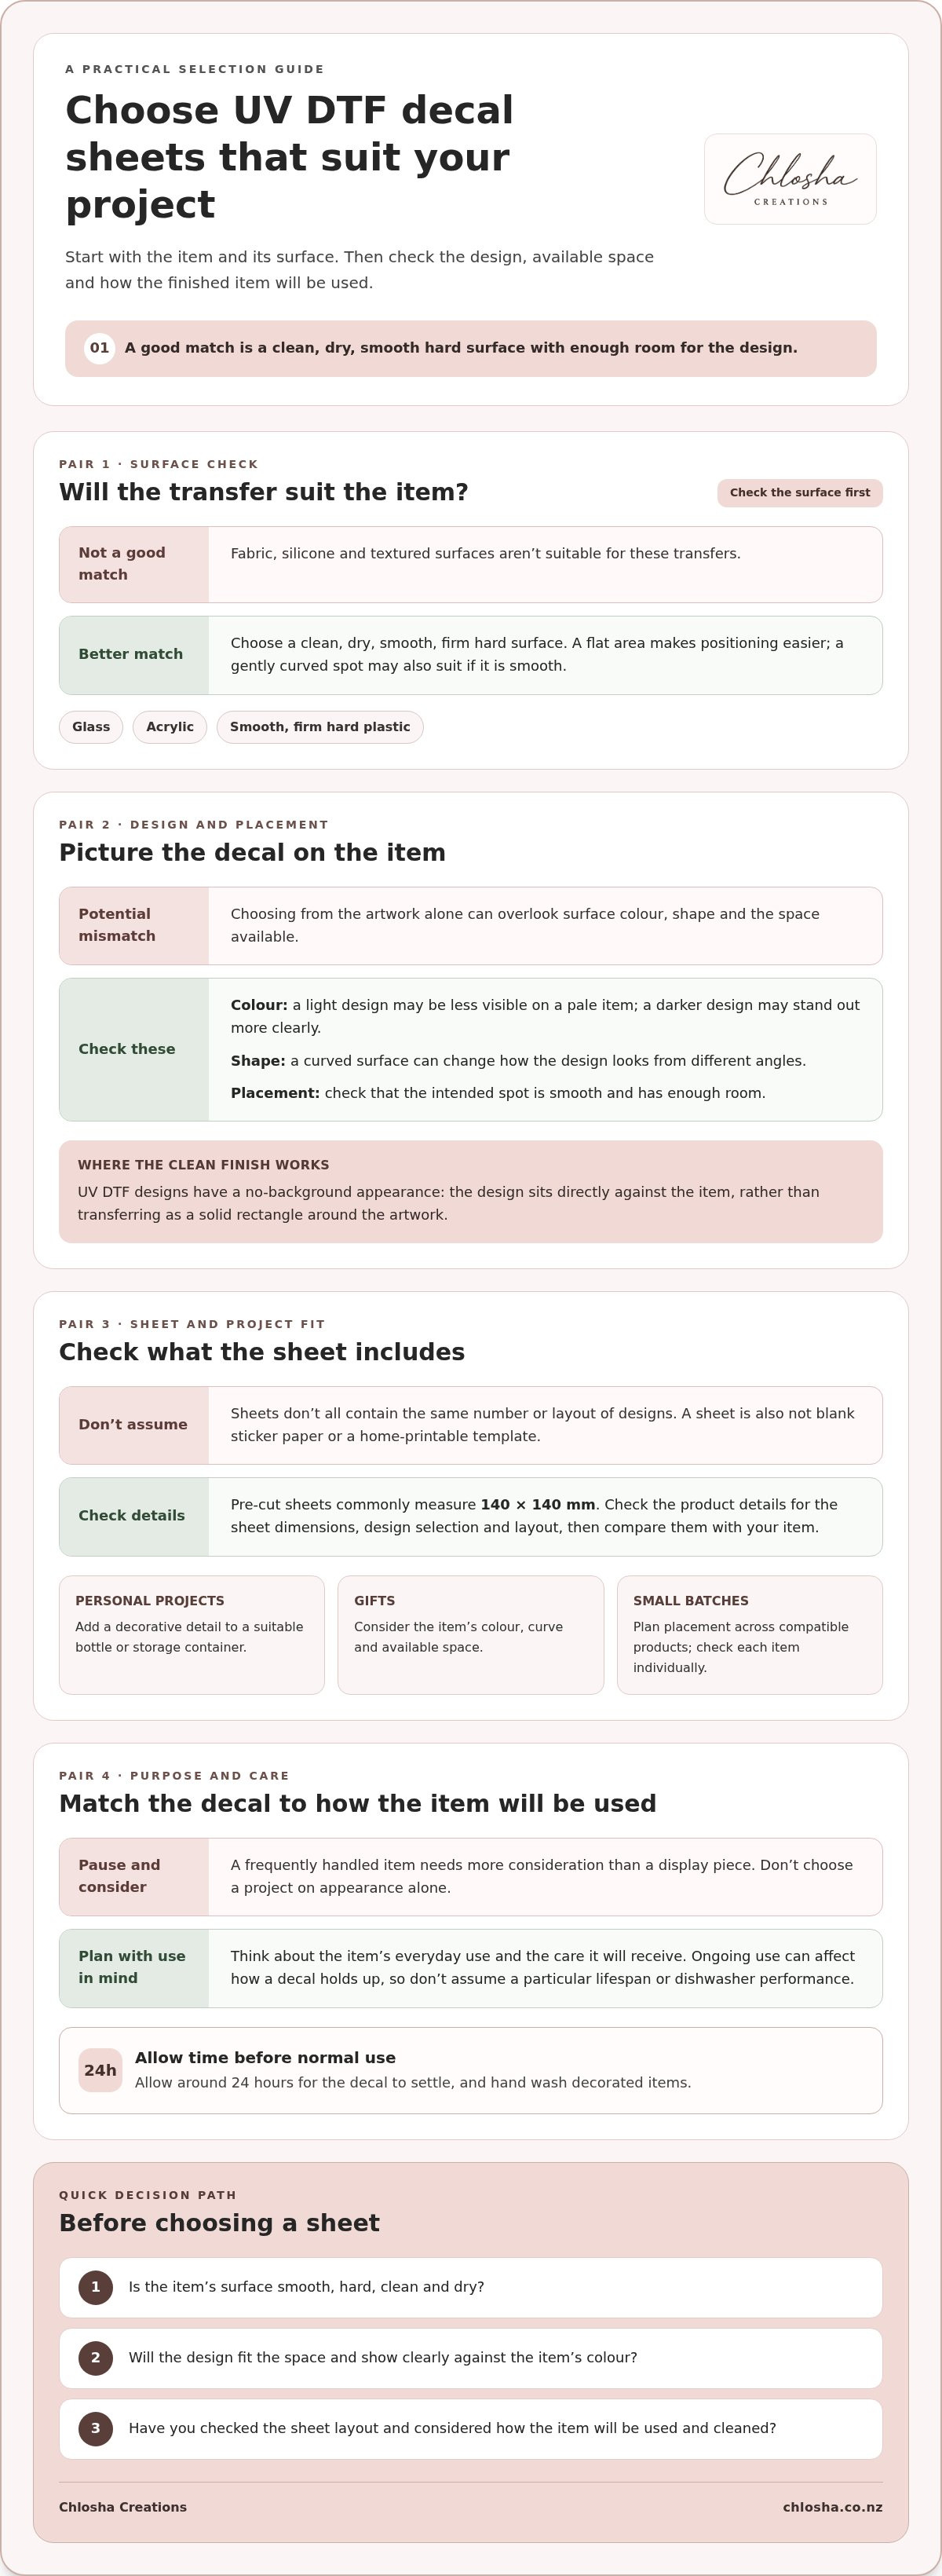
A good choice starts with the item you want to decorate. Before settling on a design, check that the surface is suitable and that the decal will fit the space you have in mind. Use this four-step check to narrow down the right uv dtf decal sheets for your project.
- Define the item. Decide what you’re personalising and how it will be used. A storage container, gift detail and small-business product may call for different design sizes and placements.
- Check the surface. Confirm that the area is smooth, hard, clean and dry. If it’s flexible, textured or made from an unsuitable material, choose another way to personalise it.
- Choose the design. Think about the look you want and how much clear space is available around the placement. A detailed design needs enough room to remain easy to see.
- Check the sheet dimensions. Compare the sheet format with your project and read the details for the specific design. Sheets are commonly 140 × 140 mm, but this is a typical format, not a promise that every sheet has those dimensions.
Choose a decal sheet by matching its design and format to your project, then make sure the item has a suitable surface.
Does the intended surface suit a UV DTF transfer?
Start with the exact area where you plan to place the design. Suitable surfaces are smooth, hard, clean and dry, such as compatible glass or acrylic. Avoid textured or grooved areas, silicone, flexible items and soft plastic. These materials and finishes may not provide the firm, even surface the transfer needs.
Also avoid fabric, uncoated paper and polypropylene. Don’t rely on the item’s general material name alone: different finishes can behave differently. Look closely at the application area, including seams, raised details or coatings that could interrupt smooth contact.
How should sheet size and design placement guide your choice?
Measure the usable area first, especially if the item curves or has a narrow flat panel. Leave enough room for the design to sit without crossing an edge, seam or groove. You can mark the intended position with a removable guide, then check that it looks balanced from the angles the item is usually viewed.
Next, compare that space with the design scale and the sheet’s stated dimensions. The commonly used 140 × 140 mm format describes the sheet, not necessarily the size of each design. Layouts and design counts vary, so use the details for the particular sheet rather than assuming how many transfers it contains. Measuring helps you choose a format that suits both the item and the planned placement.
How to apply and care for UV DTF decals
Careful preparation makes application easier and helps the transfer sit smoothly. Follow the instructions provided with your decal, and work on a clean, dry, smooth hard surface. Dust, moisture or an uneven finish can get in the way of firm contact.
What are the basic application steps?
Set aside a little time so you can position the design carefully before pressing it down. This simple sequence helps keep the transfer aligned and reduces the chance of lifting an edge during application.
- Clean and dry the surface. Remove dust and residue, then make sure the area is completely dry before you begin.
- Position the decal. Line it up on the item and check that it sits where you want it before pressing.
- Press firmly. Use your fingers or a squeegee to press across the design, paying attention to the edges so the transfer makes even contact.
- Peel back the carrier slowly. Pull it away at a low angle rather than lifting it straight up. If part of the design starts to lift with the carrier, lay it back down and press that area again before continuing.
If the carrier is difficult to remove, a warm hair dryer on a low setting may help. Keep the heat gentle and apply it briefly; the aim is to assist the peel, not overheat the item. Take your time, especially around small details.
How long should you wait before using a newly decorated item?
Leave the applied decal to settle for approximately 24 hours before normal use. Avoid handling, washing or putting the item into regular use during this period. This gives the transfer time after application before it faces everyday contact.
Hand washing is recommended. Where dishwasher exposure is being considered, allow approximately 72 hours first, but this timing doesn’t make an item dishwasher-safe or guarantee how the decal will hold up. The surface, application, curing time, washing conditions and ongoing use can all affect durability. Avoid soaking the item or scrubbing directly over the design.
After washing, dry the item gently rather than rubbing the decal area. Check the design as part of normal care, particularly on items that are handled often. Frequent use can cause wear, so choose a placement that’s less exposed to knocks and friction where possible.
Using UV DTF decal sheets for decoration is different from labelling belongings for identification. If your main need is adding a child’s name to school or daycare items, explore personalised name labels for identifying everyday belongings.
Choosing Chlosha UV DTF decal sheets for your next project
Chlosha Creations' UV DTF Pre-Cut Decal Sheets and DIY Decals offer a practical way to add a design to a suitable hard-surface item. The finish is clean and no-background, with a slightly raised effect, so the design sits neatly against the item rather than appearing inside a surrounding block. Sheets are commonly 140 × 140 mm, but this is a typical format, not a guarantee. Designs and layouts vary by sheet, so check the details of the option you’re considering.
Before choosing, think about what you want the finished item to do. A decorative design might suit a gift or personal project, while a logo could personalise a small batch of suitable products. In either case, the surface and available placement area need to suit the transfer. For more context on UV DTF transfers and their no-background finish, look for the article UV DTF Transfers New Zealand: The Complete Guide to Premium No-Background Decals.
When is a decal sheet a better fit than a name label?
A decal sheet is a good fit when the main aim is design-led personalisation: adding a motif, decorative detail or branding to a compatible hard surface. A name label has a different job. It helps identify belongings such as items used at school, daycare or kindy, where it matters whose item it is. Choose based on the purpose, rather than treating the two formats as substitutes.
If names are the priority, explore personalised name labels for everyday belongings. If you’re choosing a decorative transfer instead, consider how the design will look on the item and where it can sit comfortably. That distinction makes it easier to select something useful, not just attractive.
What should you have ready before choosing a sheet?
A quick project check can help you compare options with confidence. Have the item nearby and note where you’d like the design to go. Then look closely at that specific area, rather than judging suitability from the item’s overall appearance. A smooth finish and enough usable space are key details to consider before settling on a design.
- The item: Decide what you’re personalising and how it will be used.
- The surface: Choose a clean, dry, smooth, hard area. Avoid textured, grooved, silicone, flexible or soft plastic surfaces, as well as fabric, uncoated paper and polypropylene.
- The placement: Check the usable area and imagine the design in position, allowing room around edges and curves.
- The sheet: Compare the stated dimensions and design layout with your project. The commonly stated 140 × 140 mm format is a guide, not a promise that every sheet has the same size or design count.
With those details in mind, you can browse uv dtf decal sheets from Chlosha Creations with a clearer sense of what will suit your project. Match the artwork, surface and format, then follow the application and care guidance when you’re ready to decorate your chosen item.
Make your next personalisation project your own
Before choosing a design, picture the finished item in its everyday setting. Will it be picked up often, given as a gift or displayed at home? That can help you choose a placement that suits how the item will be used. Sketch the design’s position on paper first, then compare its scale with the item before applying anything.
With uv dtf decal sheets, a thoughtful result starts with a clear idea and a suitable project. Take your time choosing what belongs on the item, and keep its main purpose in view. If the job is to make belongings easy to identify, a name label may be more practical.
Explore Chlosha’s UV DTF Pre-Cut Decal Sheets and DIY Decals to find a design for your next suitable hard-surface project. If names are what you need for school, daycare or everyday family items, explore personalised name labels.
Frequently Asked Questions
Can UV DTF decal sheets be used on any surface?
No. They’re intended for clean, dry, smooth hard surfaces, such as compatible glass, acrylic and hard plastic. Avoid textured or grooved items, silicone, flexible or soft plastics, fabric, uncoated paper and polypropylene. For example, a smooth section of a hard bottle may be suitable, while a ribbed or flexible section may not be. Check the exact application spot first, as an unsuitable material can affect adhesion.
Can I print my own designs onto a UV DTF decal sheet at home?
No. UV DTF decal sheets are printed transfers, not blank sticker paper or printable label templates. A sheet holds designs ready for transfer; printing equipment and printable materials are different products. Chlosha also offers custom UV DTF printing for suitable applications, which can suit a project using your own design or logo. The finished transfer still needs to be applied to a compatible hard surface.
How big is a UV DTF decal sheet?
Chlosha’s pre-cut decal sheets are commonly 140 × 140 mm, though that’s a typical format, not a guarantee that every sheet has the same size or layout. Individual designs can vary in size and arrangement. Before choosing, measure the area where you plan to apply the design. A paper mock-up can help you picture its scale on a curved bottle or compact storage container.
Can I reuse a UV DTF decal after peeling it off?
Plan to apply a decal once rather than relying on being able to reposition and reuse it. Before peeling, set the item on a stable surface and check the intended position from the angles you’ll see it. If the decal has already been lifted or applied, don’t assume it can be transferred again without affecting its finish or adhesion. Preparing the placement first helps avoid a rushed application.
Are UV DTF decal sheets suitable for fabric or clothing?
No. Chlosha’s UV DTF decals are intended for suitable smooth, hard surfaces, not fabric or clothing, and they aren’t iron-on or sew-on labels. A hard-surface transfer isn’t a substitute for a product designed for textiles. For a school uniform, bag or other fabric item, choose an option made specifically for that material rather than applying a decal intended for a bottle or hard case.
Can items with UV DTF decals go in the dishwasher?
Dishwasher exposure isn’t guaranteed to be suitable, so hand washing is recommended. Check the care instructions for the item too, and don’t assume that a decorated item is suitable for a dishwasher or microwave. If you’re choosing an item for a project, consider how you’ll clean it before applying a decal. That can help you decide whether the finished item will suit its intended use.
What should I do if a decal lifts during application?
Pause and avoid pulling quickly or forcing the lifted area down. Check that the surface is clean, dry and smooth, then press or squeegee firmly over the design and peel the carrier back at a low angle. If needed, a warm hair dryer on a low setting may help. If the surface is textured, grooved, flexible or made from an unsuitable material, stop rather than trying to make the transfer adhere.
