

Easy Apply Name Labels: Ultimate Guide for Busy Parents
Have you ever pulled your child's favourite drink bottle out of their bag only to find the name label peeling at the edges or covered in unsightly air bubbles? It is a common frustration for busy parents who want school gear to stay organised without looking like a messy DIY project. You likely want a finish that looks like it was printed directly onto the surface, rather than a sticker with a thick background that ruins the look of the item. Using easy apply name decals is the best way to achieve that sleek, professional result you are after.
We know how important it is for labels to be both beautiful and practical. This guide will teach you how to master the art of applying durable, no-background decals to everything from lunchboxes to sports gear. We will walk you through the simple prep steps and the correct technique to ensure a bubble-free finish every time. By the end of this article, you will be able to give your children's belongings a premium look that is built to last through the busy school year and beyond. Let's get started on making your organisation tasks a little easier and much more stylish.
Key Takeaways
- Understand why UV DTF technology provides a superior "printed-on" look without the messy clear backgrounds found on traditional stickers.
- Master the step-by-step process for using easy apply name decals to ensure a professional, bubble-free finish on all your school gear.
- Learn the "Clean, Dry, Smooth" rule for surface preparation to help your labels bond effectively to drink bottles and lunchboxes.
- Discover the importance of the curing process and why giving your decals time to set is the secret to long-term durability.
- Identify which smooth, hard surfaces are best suited for these transfers and how to choose the right personalised pack for your family.
What are easy apply name decals and why choose UV DTF?
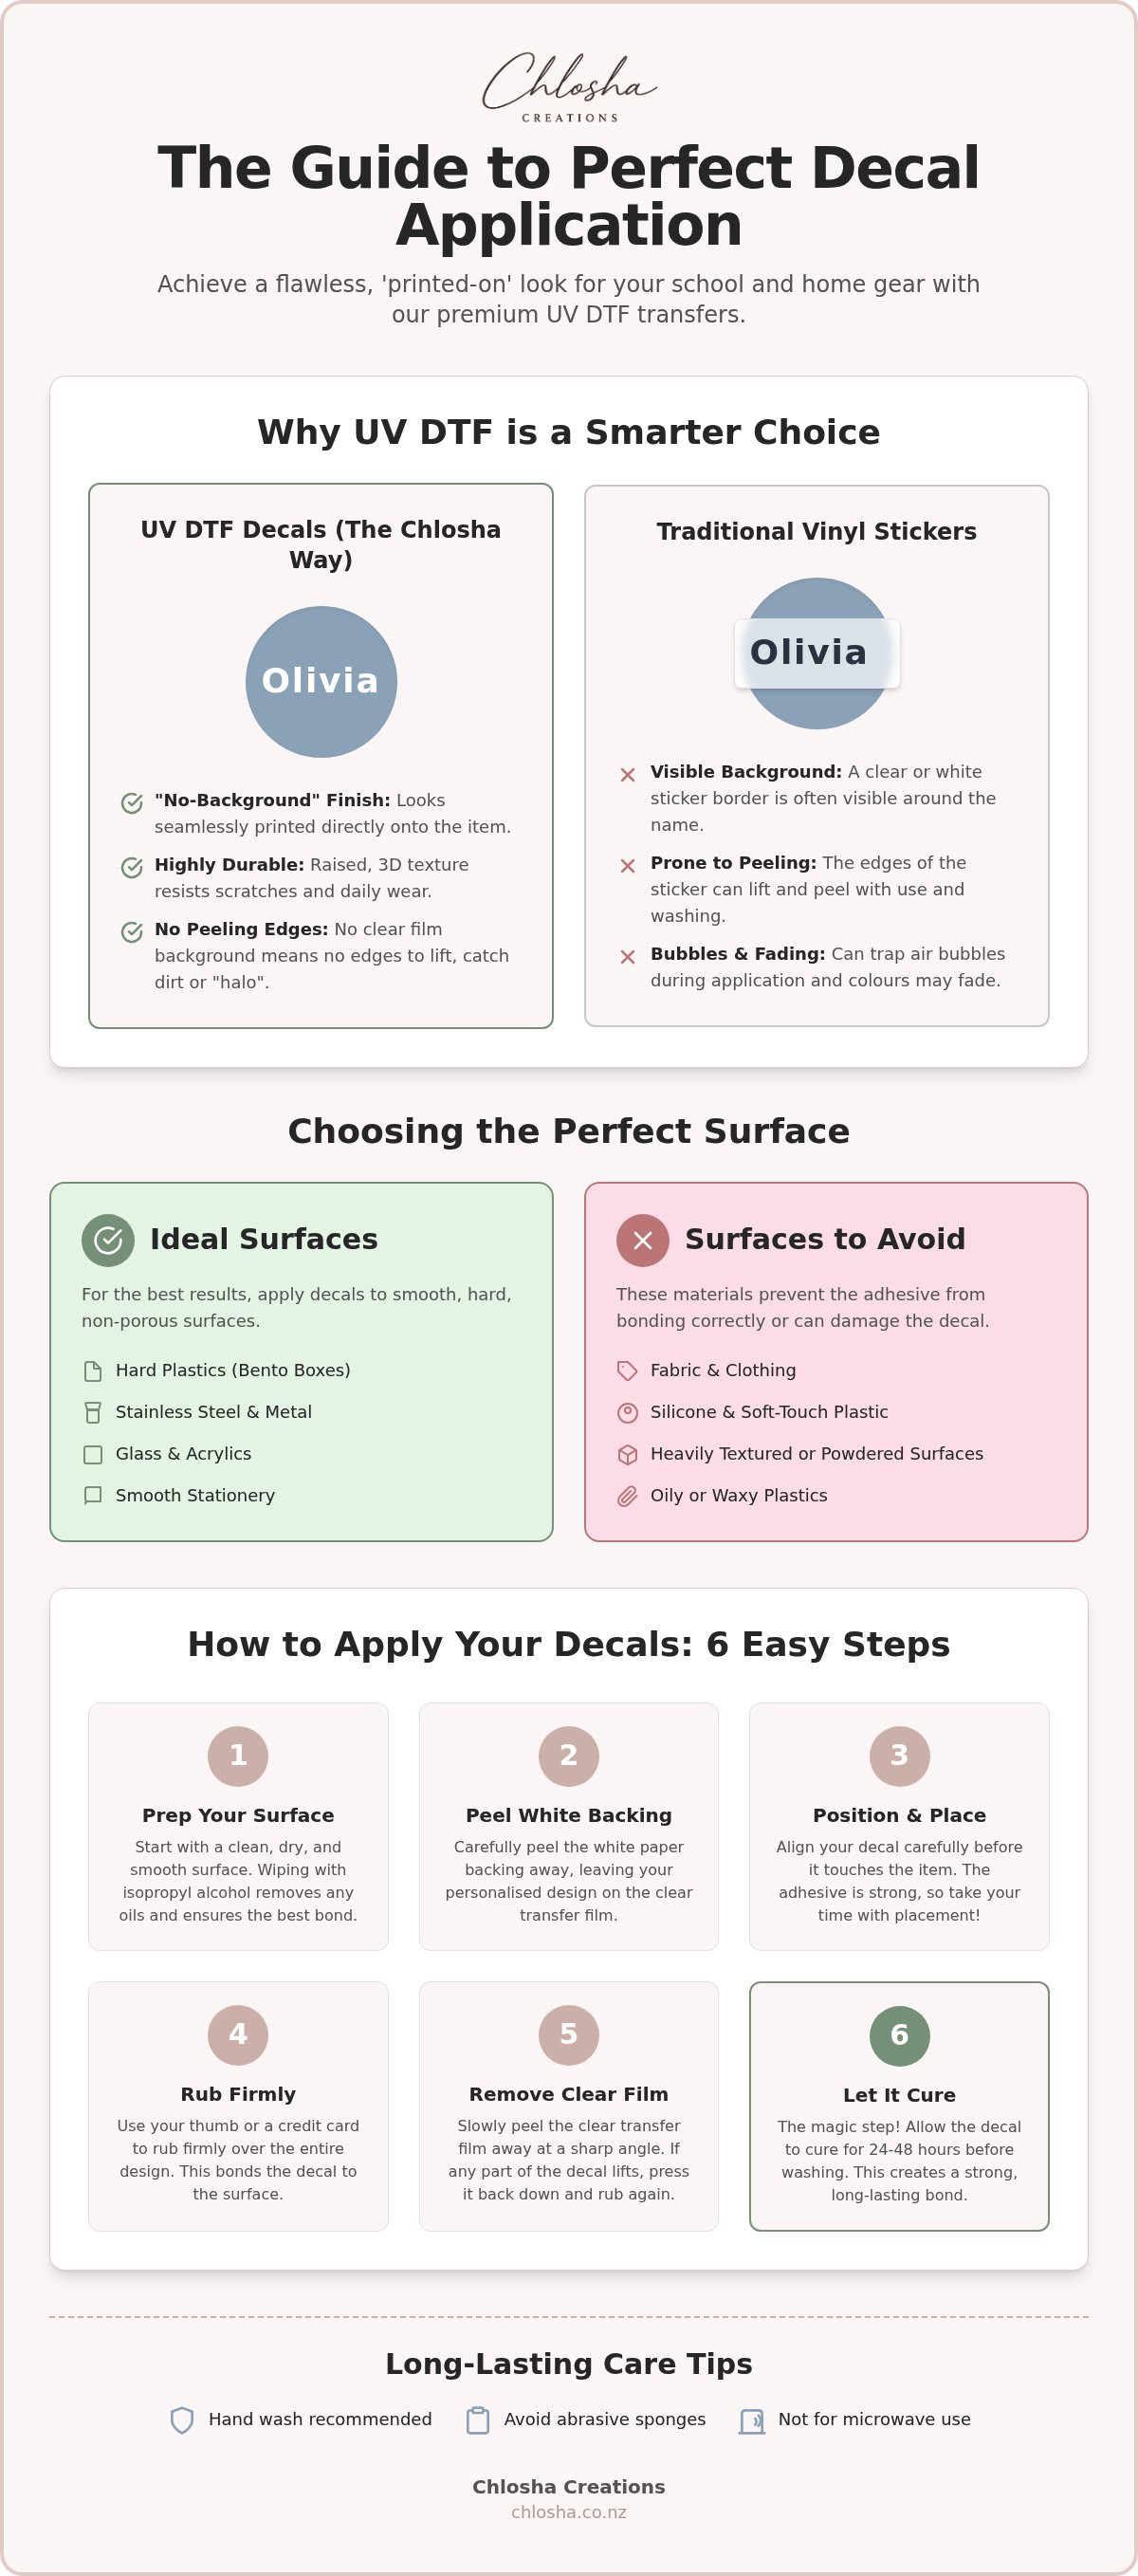
What exactly makes a name label "easy apply"? For most busy parents, it means a transfer that doesn't require a degree in engineering to get straight. These easy apply name decals are designed for simple, DIY application right at your kitchen bench. Unlike the stickers you might remember from years ago, these don't come on a thick paper backing that leaves a messy border. Instead, they use modern UV DTF (Direct to Film) technology. This process prints the ink directly onto a transfer film, allowing you to move just the design onto your item. The result is a clean, professional finish that looks like it was part of the product from the start.
Ever wondered why some labels look like an afterthought while others look bespoke? It comes down to the "no-background" finish. When you use personalised name labels NZ families trust, you aren't just sticking a piece of plastic onto a bottle. You are applying a slightly raised, 3D transfer that has a tactile, premium feel. It's a small detail that makes a big difference in how organised your gear looks.
UV DTF vs. Traditional Vinyl
Why do we choose UV DTF over standard vinyl? While vinyl stickers have been the go-to for years, they often show their age quickly. You might notice the edges starting to lift or "halo" after a few weeks of school lunches. This happens because vinyl is a solid layer of film that sits on top of the surface. UV DTF is different. It relies on a high-quality Pressure-sensitive adhesive (PSA) that bonds the ink directly to the item. Because there is no bulky background film, there are no edges to catch, peel, or trap dirt. It looks seamless, almost as if it was printed at the factory. It's also incredibly tough, resisting the scratches and daily handling that come with life in a school bag.
Common uses for name decals
Where can you use these transfers? The possibilities are endless, provided the surface is smooth and hard. They are a lifesaver for identifying:
- School and Kindy gear: Keep track of drink bottles, lunchboxes, and snack containers.
- Home organisation: Label pantry jars, toy bins, and storage boxes for a clean, uniform look.
- Sports equipment: Make sure scooters, helmets, and bikes always find their way home.
Whether you are prepping for a new school term or finally tackling the pantry, these decals provide a durable solution that stays looking fresh. They are built to handle the rigours of daily life, from the playground to the kitchen cupboard.
Choosing the right surface for your decals
Success with easy apply name decals starts before you even peel the transfer. While these transfers are incredibly versatile, they rely on a strong bond with the surface they are applied to. To get that clean, "printed-on" look, you need to identify the right materials. Generally, the smoother and harder the surface, the better the result will be. Taking a moment to check your gear now saves time and frustration later.
Have you ever wondered why a label sticks perfectly to one bottle but peels off another? It often comes down to "surface energy." Some plastics, like certain types of polypropylene, are specifically designed to be non-stick. If a surface feels slightly waxy or oily even when clean, it might be a low-energy plastic. While our UV DTF technology is robust, it needs a surface it can actually grip onto. Most modern bento boxes work well, but it is always worth checking if the plastic feels firm rather than flexible.
The "Ideal Surface" Checklist
Most of your child's school gear is perfectly suited for these transfers. Look for items made from high-density materials that don't flex or bend easily. These provide the stable foundation the adhesive needs to cure properly.
- Hard plastics: Think BPA-free bento boxes and lunchboxes with a smooth finish.
- Stainless steel: Smooth or lightly powder-coated drink bottles are excellent candidates.
- Glass and acrylics: Ideal for pantry organisation, spice jars, or bedroom decor.
- Stationery: Rulers, hard pencil cases, and smooth book covers work beautifully.
Surfaces to avoid for UV DTF
To keep your labels looking their best for the whole school year, there are a few surfaces you should steer clear of. These materials either prevent the adhesive from bonding or cause the design to fail prematurely.
- Fabric and silicone: These transfers are not designed for clothing or "rubbery" soft-touch plastics.
- Heavily textured gear: If a bottle has deep grooves or a very rough "sand" finish, the adhesive cannot make a flat seal.
- Flexible items: Plastics that twist or bend significantly can cause the slightly raised 3D design to crack over time.
Shape also matters for a successful application. Applying a decal to a simple curve, like a round drink bottle, is straightforward. However, trying to wrap a large name around a complex, multi-angled surface can lead to air bubbles. Stick to flat areas or gentle curves for the easiest experience. If you have checked your gear and it is all smooth sailing, you can browse our range of personalised name labels NZ parents love for their durability and style.
How to apply UV DTF name decals: A step-by-step guide
Applying your new transfers is a satisfying task once you know the right technique. While we call them easy apply name decals, taking a few extra seconds during the process ensures they stay looking fresh for months. Before you start, gather your tools. You don't need anything fancy; a clean cloth and a plastic card, like a credit card or a squeegee, are all you need to get a professional finish. It's a quick process that makes a world of difference.
Step 1: Surface Preparation
The golden rule for any decal is "Clean, Dry, Smooth." Even if a lunchbox looks clean, it often has invisible oils from fingers or residue from the shop. Use a clean, dry cloth to wipe the area down thoroughly. While soapy water is a common suggestion, rubbing alcohol is actually better. It evaporates quickly and leaves zero residue behind. Make sure the item is completely dry before you move to the next step; any moisture will prevent the adhesive from getting a proper grip.
Step 2: Positioning and Application
Ready to commit? Carefully peel the white backing paper away from the clear transfer sheet. Try your best not to touch the sticky side of the design with your fingers. Hold the clear sheet by the edges and hover it over your item to find the perfect spot. Once you are happy with the position, touch just one end down first. Use your card to smooth the decal down gradually, moving from that first end across to the other. This technique pushes the air out as you go. It is the best way to get that clean, bubble-free look.
Step 3: The Slow Peel
Now for the most important part. Use your card to rub over the design one last time with firm, even pressure. This helps the adhesive bond to the surface. When you are ready to remove the clear carrier sheet, peel it back slowly at a very sharp, low angle. Keep it almost parallel to the surface rather than pulling it straight up. If you see a tiny bit of the name lifting, simply stop, lay the sheet back down, and rub that spot firmly again. Once the sheet is off, give the edges a final gentle press with your thumb to ensure a secure seal. If you have a few items to do, you might find our Icon + Name packs are the perfect way to get through the pile quickly.
Troubleshooting and care for long-lasting labels
Applying your easy apply name decals is a great feeling, but the work doesn't quite end once the carrier sheet is removed. To ensure your hard work lasts through the school year, you need to respect the adhesive's bonding time. While the design looks "printed-on" immediately, the bond actually strengthens over the first few days. Treating your items with a bit of extra care during this initial window is the secret to a professional result that doesn't budge.
The Curing Timeline
Patience is your best friend for achieving long-term durability. The adhesive used in our UV DTF transfers is high-quality, but it isn't an instant weld. It needs time to settle and "bite" into the surface of your drink bottles or lunchboxes. If you rush this process, you might find the edges lifting prematurely.
- 24 Hours: Wait at least a full day before putting the item into your child's bag. The bond needs this time to stabilise against general handling.
- 72 Hours: This is the critical window. Avoid all contact with water, moisture, or cleaning products for three full days. This allows the adhesive to fully cure.
- Heat Assist: If you are applying to a difficult powder-coated surface, a hair dryer on a low setting can be helpful. Gently warming the decal for five seconds after application can help the adhesive flow into the tiny textures of the surface.
Daily Care and Maintenance
How you treat your gear in the kitchen directly impacts the lifespan of your labels. While these transfers are designed for the rigours of school life, they aren't completely indestructible. Following a few simple maintenance rules will keep them looking vibrant for much longer.
Hand washing is always the safest bet for any personalised item. While many parents find their labels hold up well in various conditions, the high heat and harsh chemicals found in some dishwashers can eventually weaken the bond. To get the maximum life out of your decals, stick to a soft cloth and mild dish soap. Avoid using abrasive scrubbers or steel wool directly over the name; this can scratch the slightly raised 3D finish.
What should you do about air bubbles? If you notice a small pocket of air after you have finished, try pushing it toward the nearest edge with your thumb. If it won't budge, a very tiny prick with a fine needle will let the air out without ruining the look. For those tricky curved surfaces, always start your application from the centre and work outwards to minimise the chance of bubbles forming in the first place. Ready to get your gear sorted? Explore our durable personalised name labels NZ parents trust for a clean, professional finish.
Why Chlosha’s UV DTF is the ultimate choice
Chlosha Creations is more than just an online shop. We are a family-run workshop based in Auckland, and we understand exactly what Kiwi parents need. We know the morning rush. We know the "lost property" struggle. That is why we have dedicated ourselves to creating the best easy apply name decals on the market. Our goal is to make organisation feel like a creative win rather than a chore. By using premium technology, we provide personalised name labels NZ families can rely on for a finish that is clean, smooth, and entirely free of those bulky clear backgrounds.
Modern Personalisation for Families
Every child is unique, and their labels should be too. Our Icon + Name Label Packs are specifically designed to help pre-readers identify their belongings at kindy or school. By pairing a name with a recognisable symbol, your little one can easily spot their lunchbox in a sea of similar containers. It builds independence and saves teachers a lot of time. For older students or even home organisers, our Name Labels collection offers a sleek, "printed-on" look that is perfect for everything from bento boxes to scooters. The slightly raised 3D effect adds a premium feel that you won't find with standard stickers.
Ready to Organise Your Gear?
We believe that durability shouldn't come at the expense of style. When you choose our transfers, you are getting a superior alternative to iron-on labels. Because there is no background to catch on edges, these decals are built to withstand the daily bumps and scrapes of a busy school day. Being a local New Zealand business, we offer fast shipping and a personal touch that larger retailers simply can't match. We take pride in our craftsmanship and love seeing our creations out in the world helping families stay organised. It's about providing a functional service that feels heartfelt and professional.
If you are looking for inspiration, feel free to browse our best-sellers. You will find a range of packs, from our Classic Name Packs to our Mega Packs, designed to suit any need. Whether you are prepping for the new school term or finally tackling the pantry jars, we are here to help. Our easy apply name decals are the simple, durable, and beautiful solution you have been looking for. Explore the shop at your own pace and find the perfect fit for your family's gear. We are excited to be a small part of your daily organisation journey.
Ready to organise your gear for the year?
Mastering the application of your easy apply name decals is a simple way to take the stress out of the school rush. By choosing the right smooth surfaces and allowing for that critical curing time, you ensure your children's belongings stay labelled and looking great for months to come. Our unique UV DTF technology means you can finally say goodbye to those messy sticker backgrounds and hello to a sleek, "printed-on" finish that stands up to daily life.
As a family-run NZ business, we take pride in helping other parents find practical, stylish solutions for their busy households. Whether you are prepping for kindy or sorting out sports equipment, we are here to support you with durable products that are made with care right here in Auckland. You don't have to settle for labels that peel after one wash when a professional look is so easy to achieve.
If you are ready to give your gear a modern makeover, explore our range of easy apply name labels at Chlosha Creations. We look forward to helping you get organised and keeping your family's favourite items exactly where they belong.
Frequently Asked Questions
Are these name decals dishwasher safe?
Our UV DTF transfers are highly durable, though we don't label them as strictly dishwasher safe. The high heat and intense chemicals in dishwashers can eventually weaken the adhesive bond over time. To ensure your labels stay looking their best for the entire school year, we always recommend hand washing your drink bottles and lunchboxes with mild soap and a soft cloth. This gentle care helps maintain the slightly raised 3D finish.
Can I use these labels on my child’s school uniform or clothing?
These transfers are designed specifically for smooth, hard surfaces rather than fabrics. They won't bond correctly to cotton, polyester, or other clothing materials. If you are looking to identify school uniforms or kindy hats, you will need to look for specific fabric-based solutions. Our decals are perfect for the hard gear in your child's bag, such as bento boxes, rulers, and helmets, where they provide a clean, printed-on look.
What is the best way to remove an old decal?
Removing an old decal is straightforward if you take your time. Start by catching an edge with your fingernail and peeling it back slowly. If the transfer is stubborn, gently warming it with a hair dryer can help soften the adhesive. Any remaining sticky residue can usually be wiped away with a bit of rubbing alcohol or a citrus-based cleaner. This leaves the surface clean and ready for a fresh, new design.
Do these decals work on powder-coated drink bottles?
Yes, these easy apply name decals typically work well on most powder-coated finishes. Some very rough textures or low-energy coatings can be more challenging for the adhesive to grip. If you have a bottle with a heavy texture, we recommend using a hair dryer on low heat for a few seconds after application. This helps the bond flow into the tiny grooves of the coating for a more secure, long-lasting seal.
How long do I need to wait before using my item after applying the label?
Patience is key for a successful bond. You should wait at least 24 hours before placing the item into a school bag for normal daily handling. Most importantly, avoid any contact with water or cleaning products for a full 72 hours. This curing window allows the adhesive to fully set against the surface, ensuring your personalised name labels NZ families love stay firmly in place through busy weeks of use.
What happens if I make a mistake during application?
Because the adhesive is designed for a strong bond, repositioning a decal after it has been pressed down is difficult. If you notice a mistake before you have applied pressure, you might be able to lift it very carefully. However, once the commitment press is done, the transfer is usually permanent. This is why we recommend checking your alignment and cleaning the surface thoroughly before you start the application process.
Are the decals scratch-resistant for things like scooters and helmets?
Our UV DTF transfers are built to be tough and offer excellent resistance to daily scratches. This makes them a fantastic choice for labelling high-impact items like scooters, bikes, and helmets that often get bumped around. While no label is completely indestructible, the slightly raised 3D effect is designed to handle the rigours of outdoor play. They stay looking vibrant and professional even when the gear takes a bit of a beating.
Can I get custom logos or icons for my small business?
We certainly offer custom options for business needs. Beyond our standard kids packs, we provide custom business logo transfers and branding decals using the same high-quality UV DTF technology. This is a great way to get a professional, no-background look for your own products or corporate gifts. If you have a specific logo or icon in mind, we can help you create easy apply name decals that perfectly match your brand's unique identity.
