

UV DTF vs Iron-on Labels: Which Personalised Choice is Best for Your Gear?
You might think an iron-on label is the standard way to name your family's gear, but using them on your hard plastic lunchboxes is a recipe for a sticky, peeling mess. It's a common mistake that many of us make while prepping for the new term. We've all been there; you spend your Sunday evening carefully labelling every drink bottle for kindy, only to find the edges lifting after a single wash. It's incredibly frustrating when cheap stickers leave a messy rectangular border or simply won't stay put on the materials you use every day.
In this guide, we'll break down the real differences in the UV DTF vs iron-on labels debate so you can stop guessing and start organising with confidence. You'll discover why a premium, no-background finish is the secret to gear that looks professionally printed rather than just "stuck on." We're looking at durability, application ease, and exactly which surfaces work best for each style. This ensures your hard work survives the school year and your home storage stays looking sharp and clean. Whether you're a busy parent or a small business owner, finding the right fit for your gear makes all the difference.
Key Takeaways
- Learn why UV DTF transfers provide a sleek, "no-background" finish that looks like it was printed directly onto your gear.
- Understand the UV DTF vs iron-on labels distinction to avoid applying heat-activated labels to hard plastics or glass where they lack the grip to stay put.
- Find out how to achieve maximum longevity for your labels by following a simple cleaning and curing process before use.
- Discover how to choose the right icons and colours for your school or business gear to create a professional and organised look.
- Get step-by-step guidance on applying transfers to drink bottles and lunchboxes for a result that survives the busy school year.
Understanding the Basics: What is UV DTF vs Iron-on?
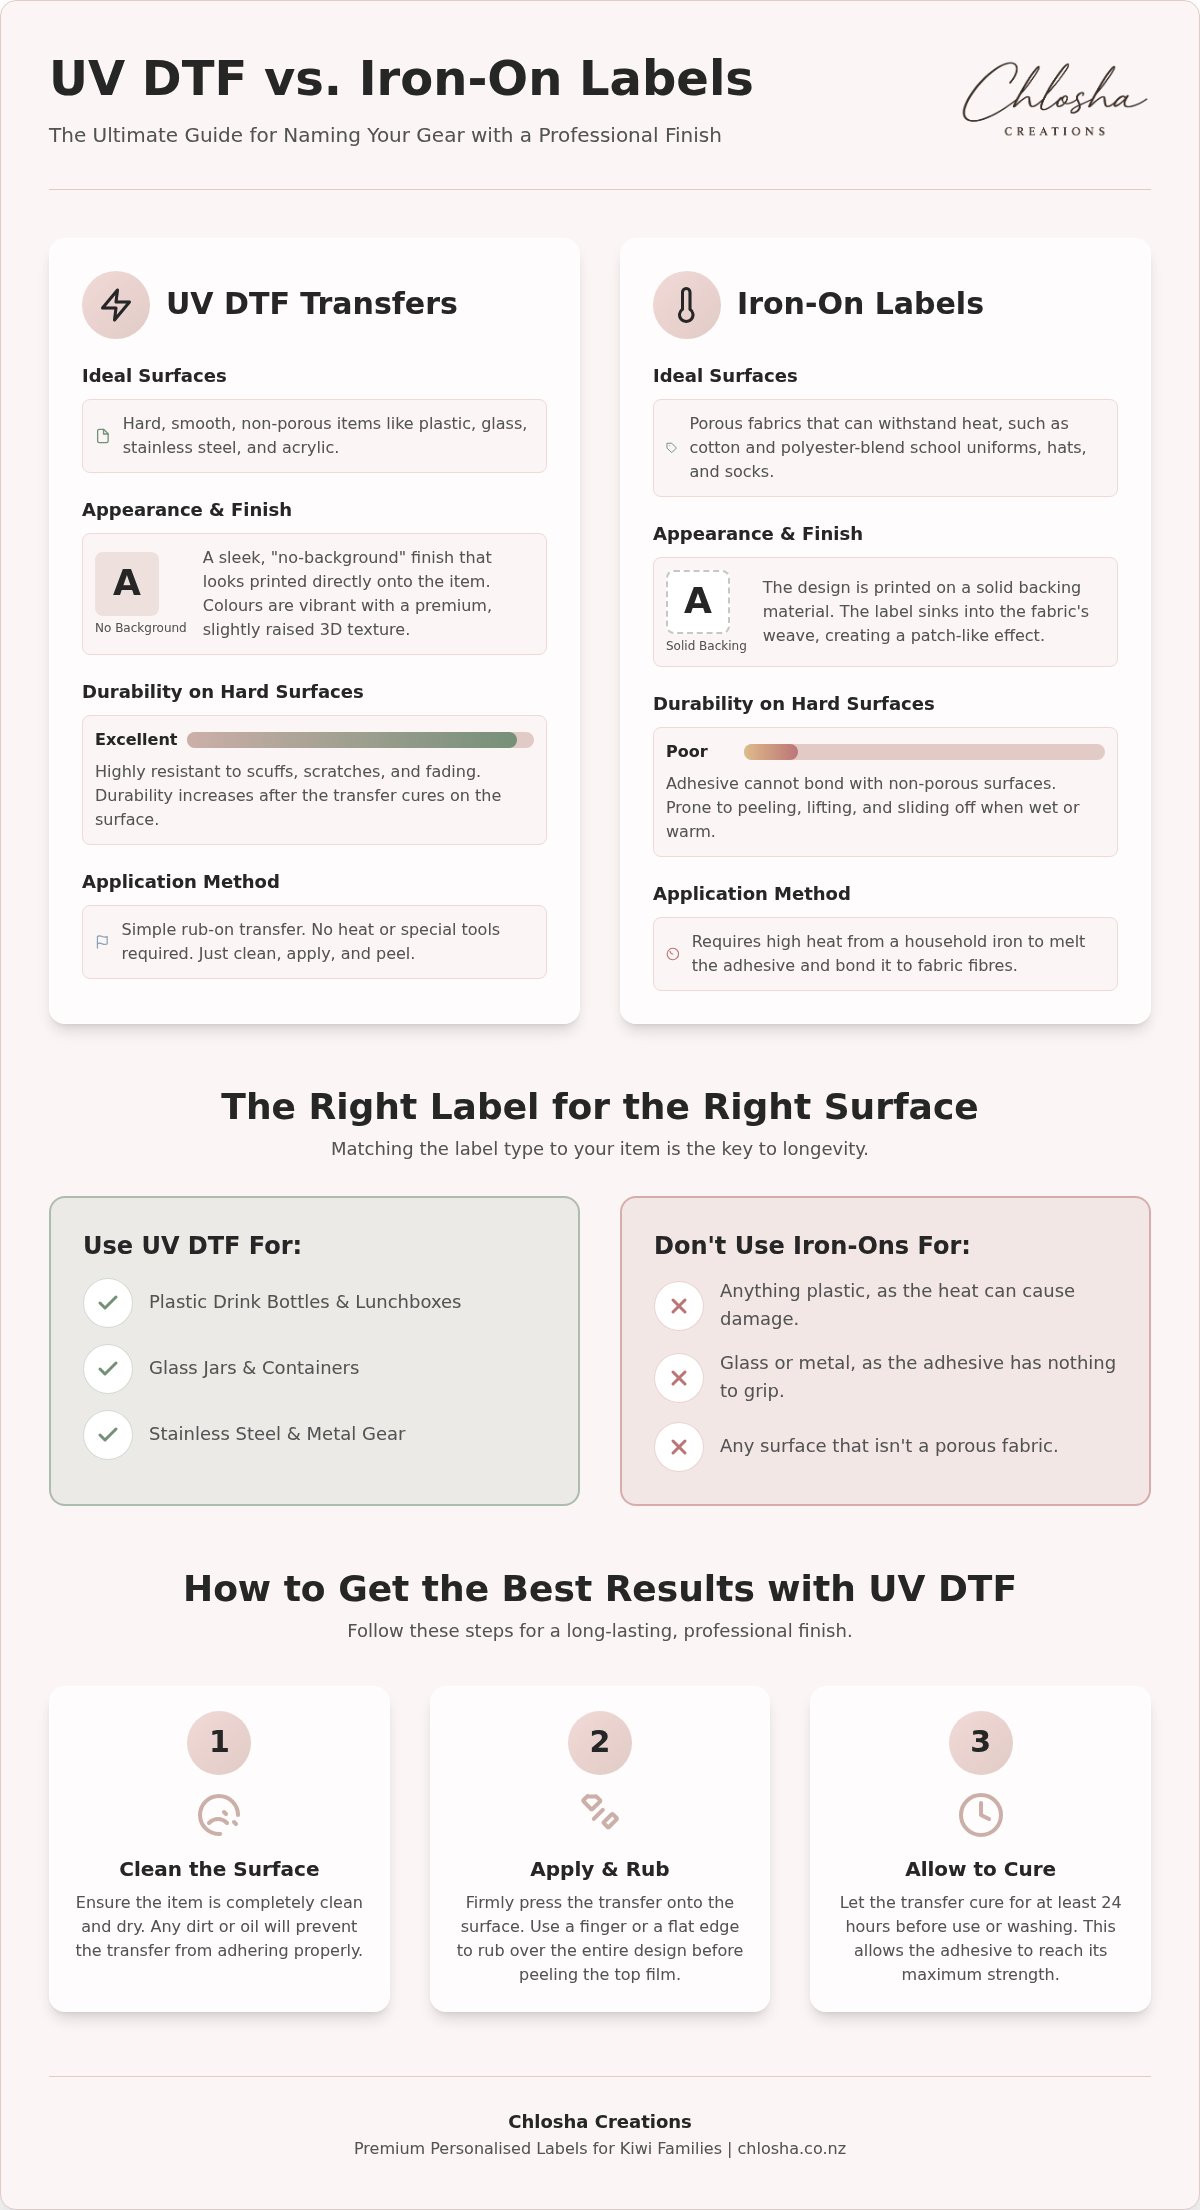
Choosing the right way to name your gear often comes down to one simple question: what is the item made of? When we look at UV DTF vs iron-on labels, we're comparing two very different technologies designed for two very different tasks. One is built for the rugged world of lunchboxes and drink bottles, while the other is the traditional choice for the soft fabrics of school uniforms. Getting them mixed up is usually why labels end up peeling off or looking messy after just a few weeks of use.
The Direct-to-film (DTF) printing process has evolved significantly, leading to the premium UV DTF transfers we use today. Unlike a standard sticker, a UV DTF transfer doesn't have a clear or white rectangular border. Instead, it's a "no-background" finish. This means once it's applied, only the ink of your design remains on the surface. It looks like the name was printed directly onto the item at the factory. Iron-on labels, however, rely on a heat-activated adhesive that needs to melt into the fibres of a material to stay put. If you're browsing for personalised name labels, the first step is matching the label type to your surface.
The Magic of UV DTF Transfers
UV DTF is a modern favourite for anything with a hard, smooth surface. These transfers are created using special UV-curable inks that are printed onto a film and then cured instantly with ultraviolet light. This process creates a slightly raised, 3D texture that feels premium to the touch. Because there is no background film left behind, you don't get those ugly lifting corners or the "sticker look" that can make gear look untidy. It's the ideal choice for glass jars, stainless steel bottles, and hard plastic lunchboxes. The finish is smooth, vibrant, and incredibly tough once it has had time to cure properly on the item.
The Classic Iron-on Label
Iron-on labels have been a staple for parents for decades, but they have a very specific job. They are designed for porous fabrics like cotton or polyester blend school shirts, socks, and hats. When you apply heat with a household iron, the adhesive on the back of the label liquefies and flows into the weave of the fabric. Once it cools, it creates a permanent bond with the fibres. However, this is exactly why they don't work on hard gear. On a plastic bottle, there are no fibres for the glue to grab onto. The label simply sits on top, waiting to slide off as soon as it gets wet or warm.
The Tech Behind the Finish: Why UV DTF Looks Superior
The secret to that high-end, factory-printed look isn't just luck; it's the science of UV curing. When comparing UV DTF vs iron-on labels, the difference in finish is night and day. While iron-ons are designed to sink into fabric, UV DTF is engineered to sit on top of hard surfaces with incredible grip and clarity. The process uses ultraviolet light to dry the ink instantly as it's printed. This results in colours that are remarkably vibrant and resistant to fading, even when exposed to the harsh sun during a school sports day. It provides a level of detail that traditional methods struggle to match.
Traditional vinyl stickers usually come with a thick, solid backing that creates a visible edge. UV DTF is a premium alternative to traditional adhesive stickers for a seamless finish. It skips the messy borders entirely. The tech shares roots with advanced digital ink jet pigment textile printing, focusing on high-resolution detail that stays crisp over time. Because the ink is cured so deeply, it doesn't smudge or bleed, ensuring your child's name remains legible even after months of heavy use.
No-Background vs Solid Backing
Most labels act like a patch, covering up whatever is underneath. UV DTF is different because it offers a "no-background" finish. This is a total win for aesthetic items like glass pantry jars or sleek stainless steel drink bottles. Because only the ink remains, the actual colour and texture of your item show through between the letters and icons. It creates a clean, sophisticated look that doesn't clutter the design of your gear. You can see how this looks in practice by browsing our Name Labels collection for your next project.
Durability and Feel
One of the first things you'll notice is the tactile quality. These transfers have a slightly raised, 3D effect that feels premium under your fingers. It's not just for show, either. This thickness adds a layer of protection against the daily scuffs and scratches that happen inside a crowded school bag. Unlike paper labels that tear or vinyl that can peel at the corners, these transfers are built to endure. This durability is why they've become the top choice for personalised gear labels NZ families trust for the long haul. They stay looking fresh and sharp, long after standard stickers have started to look a bit sad and worn.
Surface Matters: Why You Should Not Use Iron-ons on Bottles
It's a common trap for busy parents. You have a few iron-on labels left over from the school uniforms, so you try one on a new drink bottle. It might stay put for an hour, but as soon as it hits the water or gets a bit of sun, it's gone. This happens because iron-on labels are designed for a mechanical bond. They need the tiny loops and gaps found in fabric fibres to anchor themselves. On a smooth surface like stainless steel or glass, there is simply nothing for the adhesive to grab onto. In the UV DTF vs iron-on labels comparison, the surface you are labelling is the biggest factor in your success.
The Direct-to-film (DTF) printing process used for our UV transfers works on a completely different principle. Instead of melting into a weave, it uses a high-strength, pressure-sensitive adhesive combined with UV-cured ink that forms a tight bond with non-porous materials. This is why UV DTF is the modern choice for the hard gear that usually ends up in the lost property bin at kindy. It's built for the playground, not the laundry.
Best Uses for UV DTF Transfers
UV DTF is the undisputed king of the lunchroom. It thrives on hard, non-porous materials where traditional stickers often fail or peel at the corners. If you want a finish that looks like it was part of the original design, this is your best bet for these items:
- Drink bottles and lunchboxes: Works beautifully on stainless steel, glass, and hard BPA-free plastics.
- Stationery: Perfect for rulers, calculators, and hard book covers.
- Outdoor gear: Use them on helmets, scooters, and bikes to keep track of expensive equipment.
When to Stick with Iron-ons
Iron-on labels still have a very important job in the cupboard. If the item is soft, woven, or flexible, you should stick with the classic heat-applied label. These are specifically made for school uniforms, hats, socks, and library bags. Because these items are frequently tossed in the washing machine and dryer, the label needs to be part of the fabric itself. While Chlosha Creations focuses on premium UV DTF for hard gear, we know that a complete school kit usually needs a mix of both technologies to cover everything from the shirt on their back to the bottle in their bag.
One quick tip for the super-organisers: keep an eye out for "polypropylene" or very soft, bendy plastics like certain types of Tupperware. These materials can sometimes be slightly "oily" by nature, which can make it tricky for any label to stick. For the vast majority of school and home gear, however, matching the label to the surface is the best way to ensure your personalised name labels stay put all year round.
Application and Longevity: Getting the Best Results
Prep is the most important step for any labelling project. You might be tempted to just stick it on and go, but taking two minutes to clean the surface makes a world of difference. While the UV DTF vs iron-on labels choice usually depends on the surface, the success of your application always depends on the prep. Use isopropyl alcohol to wipe down the area first. This removes invisible oils from your fingers and any residue from the shop that could stop the adhesive from bonding properly. A clean surface ensures your transfers stay put through the rough and tumble of the school year.
The application process for UV DTF is straightforward but requires a steady hand. Once you've positioned your design, press down firmly across the entire transfer to remove any air bubbles. Peel the carrier sheet back slowly and at a sharp angle. If any part of the design lifts, simply lay it back down and rub it firmly again. Unlike iron-ons that bond instantly with heat, these transfers need a little time to settle. The secret to longevity is the curing period. We recommend waiting at least 24 to 72 hours before getting the item wet. This gives the adhesive time to reach its maximum strength.
We often get asked about dishwashers. While our transfers are incredibly tough, hand-washing is always the best way to keep them looking brand new for years. If you do use a dishwasher, wait the full 72-hour curing time first and stick to the top rack only. Avoid using high-heat "sanitise" cycles or harsh abrasive cleaners, as these can eventually wear down the vibrant finish. Browse our personalised name labels to find the perfect style for your next organising project.
How to Apply Your Chlosha Transfers
Applying transfers to curved drink bottles can be a bit tricky. Start by pressing the centre of the name down first, then work your way outwards to the edges. This helps prevent creases in the design. If you're working with a very cold surface or a complex shape, a quick blast with a hair dryer on a low, warm setting can help the adhesive become more pliable. For more detailed tips and application videos, check out our Pillar Guide on UV DTF Transfers.
Care and Maintenance for Busy Families
Durability is a partnership between the quality of the transfer and how the gear is treated. Teach the kids not to pick at the edges of their names, especially in those first few days after application. If you notice a corner starting to lift, it's often because a tiny bit of dust got trapped during the initial prep. You can sometimes save it by cleaning the area gently and pressing it back down, but prevention is always easier. Avoid soaking labelled items in boiling water for long periods, as extreme heat can soften the bond over time. Treat them with a little care, and they'll serve you well all year long.
Choosing Your Style: Personalising with Chlosha Creations
Now that you understand the technical side of the UV DTF vs iron-on labels choice, it's time to focus on the fun part: making it yours. At Chlosha Creations, we don't just provide a service; we're a family-run Auckland business dedicated to helping you stay organised. Supporting local means you get a personal touch and a high standard of craftsmanship. If you're in the area, our Auckland local pickup option is a fantastic way to skip the courier wait and get your gear sorted even faster.
Choosing the right look depends on where your labels are going. For dark-coloured drink bottles, bold white or bright neon colours pop beautifully. If you're labelling glass jars, a classic black or metallic finish often looks the most professional. The goal is to create a look that feels integrated with the item, which is exactly what our no-background transfers achieve. It's about finding that perfect balance between being practical and looking great.
For the Kids: School and Kindy Gear
Labelling doesn't have to be a chore; it can be a way for kids to take pride in their things. Our Icon + Name Packs are a massive hit for kindy and school-aged children. Choosing a specific icon, like a dinosaur or a butterfly, helps younger kids recognise their gear before they can even read their names. It builds independence and makes it much easier for teachers to return lost items to the right cubby.
We offer different sizes to suit every need. Slim packs are perfect for thin items like rulers and pencils, while Mega packs provide larger decals for lunchboxes and helmets. If you're managing a busy household, our multi-name packs are a lifesaver. They allow you to organise gear for multiple siblings in one go; keeping everyone's belongings in the right place has never been simpler.
For the Makers: Small Business Branding
If you're a local maker, you know that packaging is everything. Our custom UV DTF transfers allow you to elevate your brand without the cost of factory printing. Because they have no background, your logo looks like it was printed directly onto your candle jars, cosmetic bottles, or gift boxes. It's a clean, high-end finish that standard stickers just can't match. It gives your products that professional edge that customers love.
We also offer DIY decal sheets that are perfect for branding smaller runs of products. We keep our minimum orders low because we understand the challenges of starting a small business. It's a great way to test new product lines or create limited edition gifts without a huge upfront investment. Whether you're labelling for home or for profit, we're here to help you get a professional result every time.
Ready to Get Your Gear Organised?
Getting your family's gear ready for a busy term doesn't have to be a headache. The main thing to remember in the UV DTF vs iron-on labels choice is that the surface always dictates the label. While iron-ons are still the best fit for school shirts and socks, our premium UV DTF transfers are the superior choice for everything else. They provide a sleek, no-background finish that makes drink bottles and lunchboxes look like they were custom-printed just for you. By matching the right technology to your gear, you can stop worrying about peeling edges and focus on the fun of personalising.
As a family-run NZ business based in Auckland, we're dedicated to helping you find durable solutions that actually last. We focus on a high-quality, 3D raised effect that stands up to the daily grind of kindy and school life. If you're local, you can even take advantage of our Auckland local pickup to get your labelling project started even sooner. It's about making your life a little easier and your gear a lot more recognisable.
Browse our Best Sellers and get your gear sorted today! We can't wait to help you get your belongings looking sharp and staying put all year long.
Frequently Asked Questions
Can I put UV DTF labels on clothing?
No, UV DTF transfers are strictly designed for hard, non-porous surfaces like plastic and metal. They don't have the flexibility to move with fabric and won't bond to the fibres like an iron-on does. If you try to use them on school shirts or kindy hats, they'll likely crack or peel off as soon as the material stretches. For uniforms, you should always stick with traditional fabric labels.
Are UV DTF labels dishwasher safe?
While these transfers are incredibly durable, we always recommend hand-washing to keep them looking their best for longer. If you do use a dishwasher, ensure you've allowed the label to cure for a full 72 hours first. Stick to the top rack and avoid high-heat sanitise cycles. Durability depends on the surface type and how well the label was applied, so a little extra care goes a long way.
How long do UV DTF decals last on a school drink bottle?
With proper application and a bit of care, these decals can easily last for the entire school year. The longevity of your UV DTF vs iron-on labels choice depends on how much the item is handled and washed. If a drink bottle is tossed around in a bag or scrubbed with abrasive sponges, the edges might show wear. However, for most families, they provide a reliable, long-term labelling solution.
Do I need a heat press to apply UV DTF transfers?
No heat press or special equipment is required for these transfers. They are pressure-sensitive decals, meaning you just need to position them, rub them firmly with your thumb or a squeegee, and peel the carrier sheet away. This makes them much easier to use for home projects than iron-ons, which require a specific temperature and pressure to bond with fabric fibres correctly during the application process.
What surfaces will UV DTF NOT stick to?
UV DTF transfers won't stick to soft fabrics, silicone, or highly textured surfaces. They also struggle with certain "oily" plastics like polypropylene, which is often used for very flexible, bendy lunchboxes or food containers. If the surface is rough or porous, the adhesive can't create a smooth bond. For the best results, stick to hard plastics, glass, treated wood, and stainless steel items like your standard school gear.
Can I remove a UV DTF label once it is applied?
Yes, you can remove them if you need to update a name or repurpose a container. You'll usually need to pick at a corner and peel it back slowly. If there is any sticky residue left behind, a bit of warm soapy water or a gentle adhesive remover will clean it right up. Just keep in mind that once a label is removed, it can't be reapplied or reused.
Is UV DTF better than traditional vinyl stickers?
It's a different style of finish rather than just being "better." Traditional vinyl stickers have a visible background or border, while UV DTF offers a clean, no-background look that feels like a professional print. It also has a slightly raised 3D texture that feels more premium to the touch. For items where you want a seamless aesthetic, like personalised gifts or business branding, UV DTF is often the preferred choice.
How long should I wait before washing an item with a new label?
You should wait at least 24 hours before hand-washing any item with a new label. If you plan to use a dishwasher, it's critical to wait the full 72-hour curing time first. This window allows the adhesive to bond completely with the surface of your drink bottles or lunchboxes. Rushing this process is the most common reason labels fail, so giving them a few days to settle is the key to lasting results.
