

Personalised Lunchbox Decals: New Zealand Family Guide
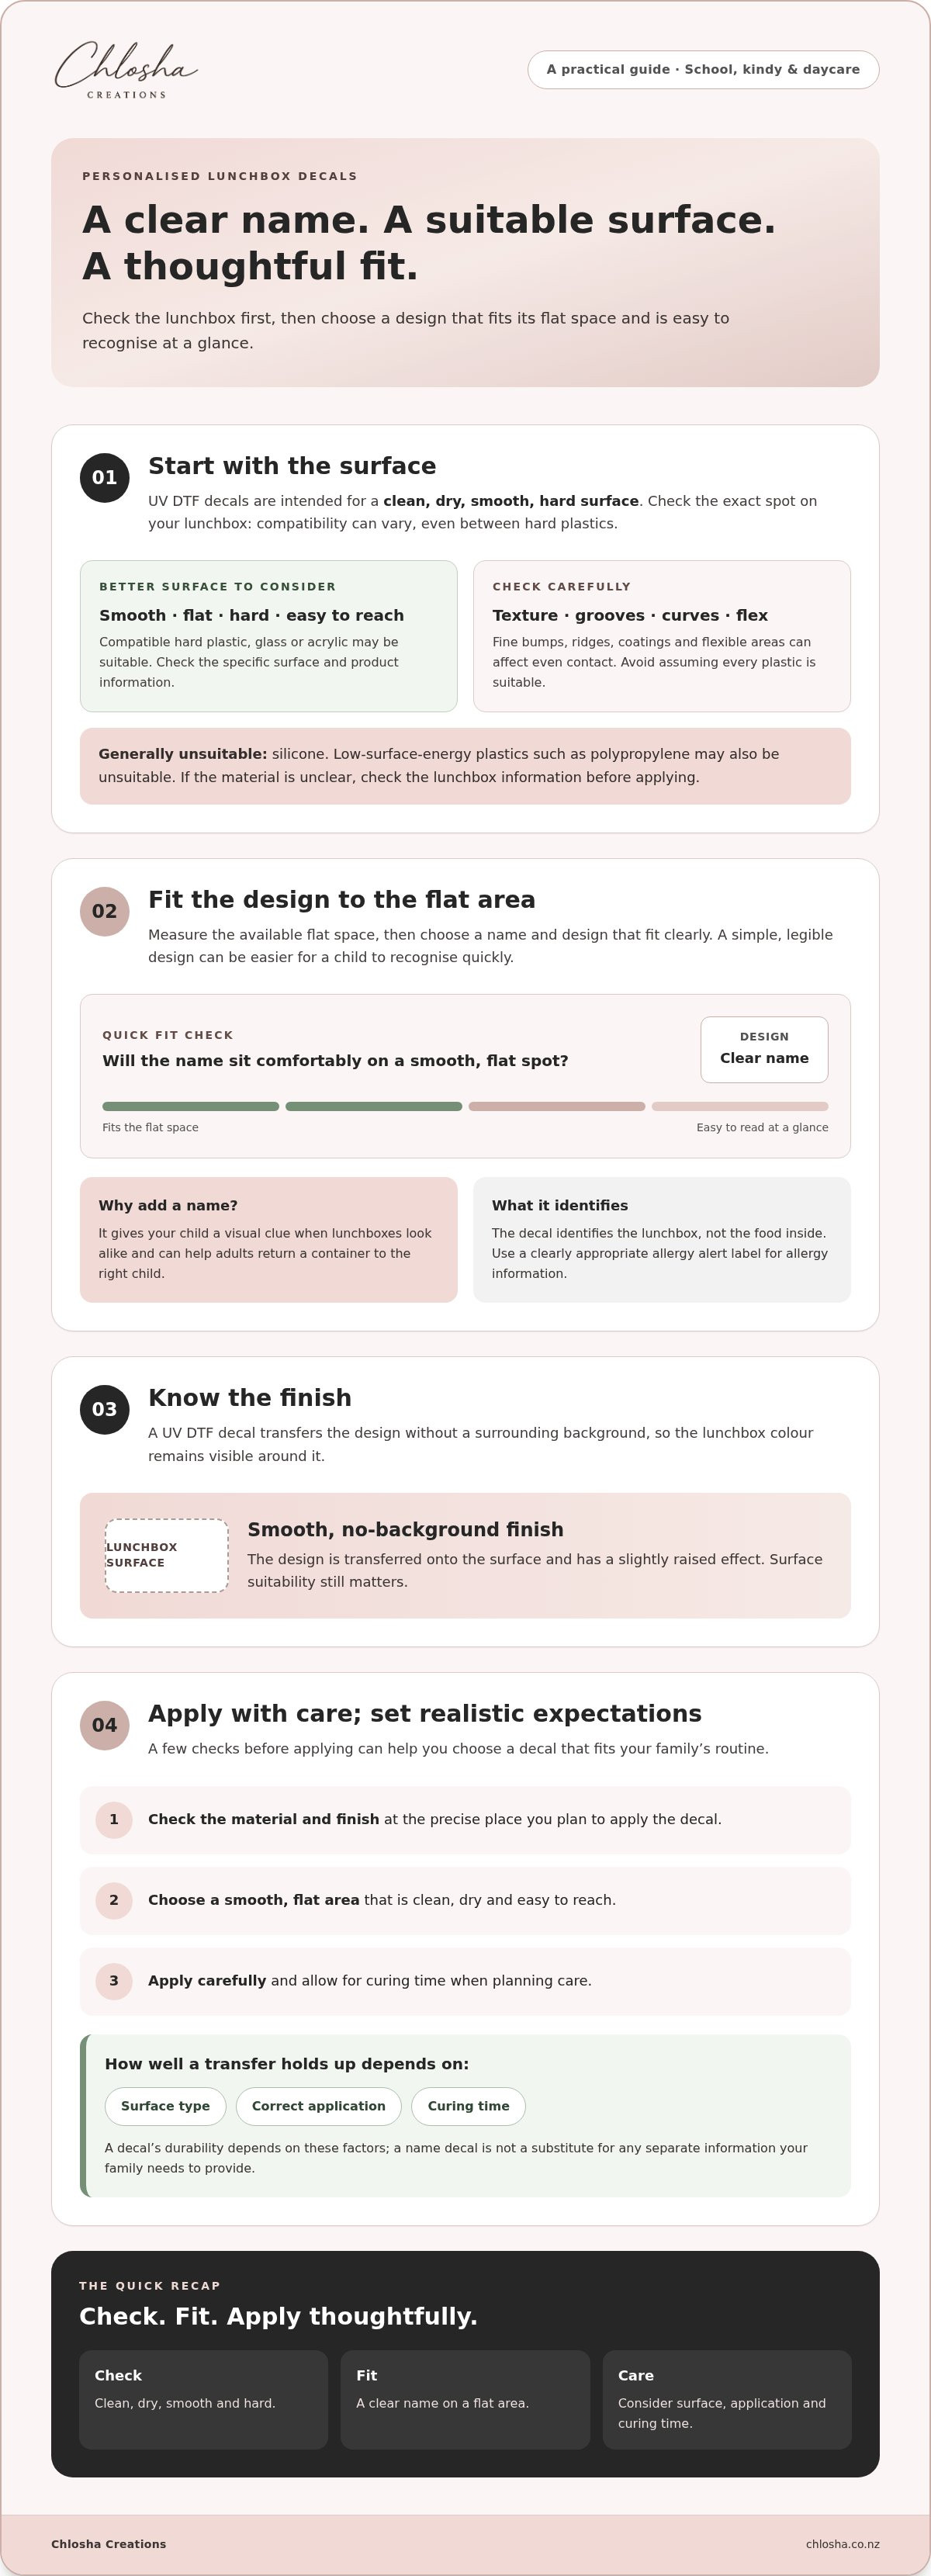
What makes personalised lunchbox decals easy to spot without taking over the whole lid? Start by checking the lunchbox surface, then choose a name and design that fit the flat area and are readable at a glance.
Surface matters because a decal intended for a clean, dry, smooth, hard surface may not suit every lunchbox. A small or busy design can also be harder for your child to recognise at school, kindy or daycare. Chlosha Creations’ UV DTF decals have a clean, no-background finish, so the lunchbox colour remains visible around the design.
This guide explains how to check surface suitability, choose a clear name and design, and apply and care for a decal. It also sets realistic expectations about peeling: how a transfer holds up depends on the surface, correct application and curing time. A few checks before applying can help you choose an option that fits your family’s routine.
Key Takeaways
- See how personalised lunchbox decals can help your child identify their lunchbox at school, kindy or daycare.
- Check that the lunchbox has a clean, dry, smooth hard surface before choosing a decal.
- Measure the flat space available and choose a clear name that’s easy to read at a glance.
- Apply the decal carefully, and consider the surface type and curing time when planning its care.
- Find out what to look for in Chlosha Creations’ personalised UV DTF labels for bottles and lunchboxes.
Why choose personalised lunchbox decals for school, kindy, or daycare?
Lunchboxes can look much alike when they’re lined up in a classroom, kindy fridge or daycare space. Adding a child’s name gives them a visual clue when it’s time to find their lunch. It can also help adults return a lunchbox to the right child if containers get mixed up.
A decal is a design transferred onto a surface, rather than a separate tag attached to the container. For a general introduction to what a decal is, see Wikipedia. Before choosing one, check the lunchbox itself: Chlosha Creations’ UV DTF decals are intended for suitable clean, dry, smooth hard surfaces, so they won’t suit every material or finish.
A name decal identifies the lunchbox, not its contents. If you need to communicate allergy information, use a clearly appropriate allergy alert label rather than relying on a name decal.
What makes a lunchbox decal different visually?
A UV DTF lunchbox decal transfers the design without a surrounding background, leaving the lunchbox colour visible around it. The finish is smooth, with a slightly raised effect. In short, it’s a personalised design transferred onto a suitable hard surface, with no background around the design. This can suit families who want to add a name without covering part of the lunchbox with a solid block of colour. Surface compatibility still matters.
Who can use personalised lunchbox decals?
Families can use personalised lunchbox decals on children’s school, kindy or daycare gear, particularly when several children have similar containers. They can also help distinguish shared lunch containers at home. Choose a name that’s easy to recognise, then check that the flat area can fit it clearly. For more options, explore personalised name labels.
Think about who will need to identify the lunchbox. A simple, legible design may be easier for a child to recognise quickly, while adults can also spot it during pack-up. A decal can help distinguish the container, but it doesn’t identify the food inside or replace any separate information your family needs to provide.
Will a personalised lunchbox decal stick? Check the surface first
The lunchbox finish underneath the decal matters as much as the design. Chlosha Creations’ UV DTF decals are intended for clean, dry, smooth hard surfaces, such as compatible hard plastic, glass or acrylic. A material name alone doesn’t guarantee a suitable match. Hard plastic lunchboxes vary, so check the specific application area rather than assuming every plastic container will work.
How can you check whether a lunchbox surface is suitable?
Look closely at the spot where you want to apply the decal. Is it flat and smooth, or does it have a pebbled texture, grooves, ridges or a coating? Check whether the material flexes when pressed. A broad, smooth area is a better option to consider than a curved corner or moulded detail. If you’re unsure what the lunchbox is made from, check its care or product information and seek guidance before applying the decal.
Choose a clean, dry, smooth, hard surface for a UV DTF decal.
Why are some lunchbox materials unsuitable?
Texture and material can affect how evenly a transfer adheres. Fine bumps and grooves may prevent even contact, while a flexible surface can bend as the lunchbox is handled. Silicone is generally unsuitable, and low-surface-energy plastics such as polypropylene may also be unsuitable. If you can’t identify the material, don’t rely on appearance alone. Check the product information first.
- Check the finish: avoid textured, grooved or heavily curved areas.
- Check the feel: avoid soft or flexible surfaces that bend easily.
- Check the material: compatibility varies across plastics, including hard plastics.
- Choose the spot: look for a smooth, flat area that’s easy to reach and keep clean.
Suitability involves more than whether a decal sticks at first. The surface, application and curing time all affect how a transfer holds up with everyday use. If you’re choosing a personalised lunchbox decal for a particular container, checking its material before ordering can help you avoid applying it to a surface that isn’t suitable.
A name decal identifies a container; it isn’t a comfort object. For families also considering how familiar belongings can help some children feel settled, Cornell Cooperative Extension explains the importance of security objects. That’s a separate consideration from decal adhesion.
Once you’ve checked the lunchbox surface, browse personalised name labels and compare the options with the space available on your container.
Choosing an Easy-to-Read Lunchbox Decal for Your Child
A decal should be easy to recognise in a quick glance, not just look good up close. Find a flat area on the lunchbox and consider how much room the child’s name needs. Don’t estimate from the lid’s overall size: raised edges, curves and moulded sections reduce the usable space.
When comparing personalised lunchbox decals, prioritise clear lettering over fine detail. A simple design can be easier to read when lunchboxes are stored together. Check the product dimensions and compare them with the flat area you measured. Sizes can vary between options, so don’t assume one design will fit just because another does.
What name and design details should you consider?
Choose the name your child and their caregivers recognise. It could be their everyday first name or a familiar shortened name. A name-only design keeps attention on the words; an icon-plus-name design adds a visual cue that may help distinguish similar belongings. Choose an icon that remains clear at the displayed size. You can explore the Icon + Name Packs collection for themed options.
Check contrast as well. The letters should stand out against the lunchbox colour, and decorative details shouldn’t crowd the name. If both a child and an adult will use the label to identify the lunchbox, make sure the design is comfortable for each to read.
Where should you place a decal on a lunchbox?
Choose a visible, smooth area that’s large enough for the design. Keep it clear of grooves, joins and edges, where the surface changes or the decal may be handled more often. Before applying it, open and close the lunchbox to check that the design won’t interfere with the closure or sit where the lid rubs against the base.
Place the decal on the outside of the lunchbox, on a suitable surface and away from areas that touch food. This helps identify the container without suggesting what’s inside. If you need to communicate allergy details, use an appropriate allergy alert label rather than relying on a name design.
- Measure the usable area: focus on the flat space, not the full lid.
- Check readability: favour clear lettering and an uncluttered design.
- Test the placement: keep clear of joins, edges and closure points.
How to apply and care for a lunchbox decal
Preparation gives a UV DTF transfer the best chance of adhering well. Follow any instructions supplied with the decal and take your time with the surface. Careful application can’t guarantee a particular result: how the transfer holds up depends on the lunchbox material, application and time allowed to cure.
What is the careful way to apply the decal?
Start with a suitable smooth, hard surface. Clean the chosen spot thoroughly to remove dirt, grease or residue, then let it dry completely. Position the transfer and check its alignment before pressing. Press firmly across the design, using a squeegee if one is supplied, then peel the carrier back slowly at a low angle. If it resists, stop and press the area again rather than pulling quickly.
- Clean: remove dirt and residue from the application spot.
- Dry: make sure the surface is completely dry before applying.
- Position: line up the design carefully before pressing it down.
- Press: apply firm, even pressure across the transfer.
- Peel: remove the carrier slowly and carefully.
If the carrier is difficult to lift, gentle warmth from a hair dryer on a low setting may help. Keep the dryer moving and avoid overheating the lunchbox, particularly if it’s plastic. After applying the transfer, allow about 24 hours before normal use. This gives it time to cure, but doesn’t guarantee a particular level of durability.
Can a labelled lunchbox go in the dishwasher?
Don’t assume a decal is dishwasher-proof. If both the lunchbox and decal are suitable for dishwasher cleaning, wait about 72 hours after application before exposing the decal to a dishwasher. The extra curing time doesn’t guarantee dishwasher performance. Heat, water, cleaning conditions and the surface can all affect how the transfer holds up.
For a more cautious care routine, wash the lunchbox by hand and avoid scrubbing directly over the design. Check the lunchbox maker’s care guidance too, as the container’s cleaning instructions still apply. If an edge starts to lift, avoid picking at it, which may cause further lifting.
Choosing a suitable surface, applying the transfer carefully and allowing enough curing time all matter. Keep these steps in mind when comparing personalised name labels for lunchboxes and other everyday items.
Explore personalised lunchbox decals from Chlosha Creations
Choosing a decal comes down to a few practical checks: confirm the lunchbox surface is suitable, choose a readable name and design, find an appropriate spot, then apply it carefully. This helps you compare options against the container and your child’s routine without assuming every material or finish will be suitable.
What can readers expect from Chlosha’s lunchbox labels?
Chlosha Creations is a family-run New Zealand business offering personalised UV DTF labels for bottles and lunchboxes. The transfers have a clean, smooth, no-background finish with a slightly raised effect. They’re intended for suitable clean, dry, smooth hard surfaces, so check the lunchbox material before choosing a placement. Some hard plastic surfaces may be suitable, but not every lunchbox will be.
The finish is a visual feature, not a promise of performance. How a decal holds up depends on the surface, correct application and curing time. Follow the application and care guidance, and allow the recommended time for the transfer to cure before regular use or dishwasher exposure, where appropriate.
Where can families find more label guidance?
Use the steps in this guide as your starting point: check the surface, choose clear lettering, place the design away from joins and closures, and apply it carefully. If you’re comparing options for a child’s lunchbox or drink bottle, explore Chlosha’s personalised name labels. Check the product details and consider which option fits the item you have at home.
Choose a decal that fits your lunchbox
The right personalised lunchbox decals start with the lunchbox itself. Check that the intended spot is clean, dry, smooth and hard, then choose a readable design and place it away from joins, edges and closures. Careful application and enough curing time matter too. Everyday durability depends on the surface and how the decal is used and cared for.
Chlosha Creations is a family-run New Zealand business offering personalised UV DTF labels for bottles and lunchboxes. The transfers have a clean, smooth, no-background finish that lets the lunchbox colour show around the design. That appearance doesn’t guarantee how a decal will perform, so check that your child’s lunchbox surface is suitable before choosing one.
Ready to find an option for your family? Explore personalised name labels for bottles and lunchboxes, and compare the design with the suitable flat space on your item.
Frequently Asked Questions
Are personalised lunchbox decals suitable for every lunchbox?
No. Personalised lunchbox decals are intended for clean, dry, smooth hard surfaces, and lunchboxes can have different materials and finishes. Textured or grooved areas, silicone, flexible surfaces, soft plastics and polypropylene may not be suitable. Check the lunchbox material and decal guidance before applying one. Adhesion and durability depend on the surface and correct application, so don’t assume a decal will suit every container.
Can I put a personalised lunchbox decal in the dishwasher?
Not necessarily. Dishwasher exposure isn’t suitable for every decal or lunchbox surface, so don’t assume a decal is dishwasher-proof. Where dishwasher use is appropriate, wait about 72 hours after applying the transfer before exposing it to a dishwasher. Surface type, placement, application and care all affect how it holds up. If you’re unsure about the lunchbox material or care instructions, hand-cleaning is a more cautious option.
How do I apply a UV DTF lunchbox decal?
Start with a clean, dry, smooth hard surface. Position the decal carefully, press or squeegee it firmly, then peel the carrier away slowly at a low angle. If needed, use a warm hair dryer on a low setting. Allow about 24 hours before normal use, and about 72 hours before dishwasher exposure where appropriate. Follow the specific product guidance, as correct application and curing time affect durability.
What should I check before choosing a lunchbox decal?
Check that the lunchbox has a smooth, hard area with enough flat space for the design. Choose a name that’s easy to read at a glance, and consider whether an icon would help distinguish similar lunchboxes. Don’t base your choice on appearance alone. Textured or grooved spots, flexible surfaces, silicone and some plastics may not suit UV DTF transfers, so check the material and product guidance first.
Will a UV DTF decal stick to a plastic lunchbox?
It may suit some hard plastic surfaces, but plastic lunchboxes vary in material and finish. The application area should be clean, dry and smooth. Polypropylene, flexible plastics and textured surfaces may not be suitable, so don’t assume every plastic container will give the same result. If you can’t identify the lunchbox material, check its product information and the decal guidance before applying the transfer.
How long should I wait before using a labelled lunchbox?
Allow about 24 hours after application before normal use. If dishwasher exposure is appropriate for both the lunchbox and decal, wait about 72 hours before putting it in the dishwasher. These timings are care guidance, not a guarantee of dishwasher performance or a particular lifespan. The surface, application and everyday handling all affect how well a transfer holds up, so follow the product instructions.
Are personalised lunchbox decals the same as traditional name stickers?
Chlosha’s personalised labels use UV DTF transfers, with a clean, no-background appearance and a slightly raised finish. They’re intended for suitable smooth, hard surfaces. Rather than choosing by appearance alone, check whether the lunchbox material is compatible and whether you can follow the application and care guidance. Surface type, correct application and curing time all influence how the transfer performs in everyday use.
