

Sports Gear Name Decals: The Ultimate Guide to Labelling Your Kit in 2026
You have just spent a small fortune on a new cricket helmet and a pair of shin guards, only to find them buried at the bottom of the club's smelly lost property bin two weeks later. It is a common headache for Aussie parents, especially when standard labels just don't stick to curved gear. If you are tired of cheap stickers fading in the sun or peeling off your child's bike, it is time for a better solution. High-quality sports gear name decals offer a professional, no-background finish that stays put, even on the toughest surfaces.
We understand that keeping track of expensive equipment is a full-time job. You want a label that looks like it was printed directly onto the kit, not a messy piece of tape that ruins the aesthetic. In this guide, you will discover how premium UV DTF decals can keep your family's equipment organised and out of the lost property bin this season. We will walk you through the benefits of our Chlosha Creations transfers, explain why they outperform traditional options on curved surfaces, and provide practical tips to help your decals go the distance.
Key Takeaways
- Learn why the no-background finish of UV DTF transfers provides a professional look that traditional stickers cannot match.
- Discover how to properly apply sports gear name decals to difficult, curved surfaces like helmets and bikes.
- Understand the importance of surface preparation and curing time to help your labels last through every practice and match.
- Find the right fit for your kit by exploring specialised options like Big Gear and Mega packs designed for larger equipment.
What are Sports Gear Name Decals and Why Does Your Kit Need Them?
Sports gear name decals are high-durability transfers designed for the hard, often curved surfaces of sporting equipment. They aren't your average paper stickers. These decals are built to handle the grit of the hockey turf and the heat of the summer sun. By using a specialised transfer process, we provide a way to mark everything from cricket bats to carbon fibre bike frames with ease. For busy families in Auckland and across NZ, these personalised name labels are the first line of defence against the chaotic environment of team sports.
The Reality of the Lost Property Bin
Saturday mornings at the local club can be a whirlwind. Between the excitement of the game and the rush to get to the car, it is incredibly easy for gear to get swapped. When twenty kids have identical black helmets or blue drink bottles, mix-ups are inevitable. The local lost property bin is usually a graveyard of expensive, unlabelled kit that no one can claim with certainty.
The financial impact of replacing gear adds up quickly. A quality tennis racket, a protective helmet, or even a set of specialised shin guards represents a significant cost. Using sports gear name decals is a practical way to avoid these unnecessary replacement fees. It also helps settle those 'kit anxiety' moments for younger players. When a child can clearly see their name in a bold, professional finish, they feel a sense of ownership. They are less likely to leave their gear behind when they know exactly which one is theirs.
Professional Finish vs. Basic Stickers
Many of us have tried the permanent marker approach. It starts out clear, but after a few games and some sweat, it becomes a messy, illegible smudge. It can even devalue the gear if you ever plan to sell it later. Standard stickers often fail because they have a bulky background that catches on bags or peels off curved surfaces.
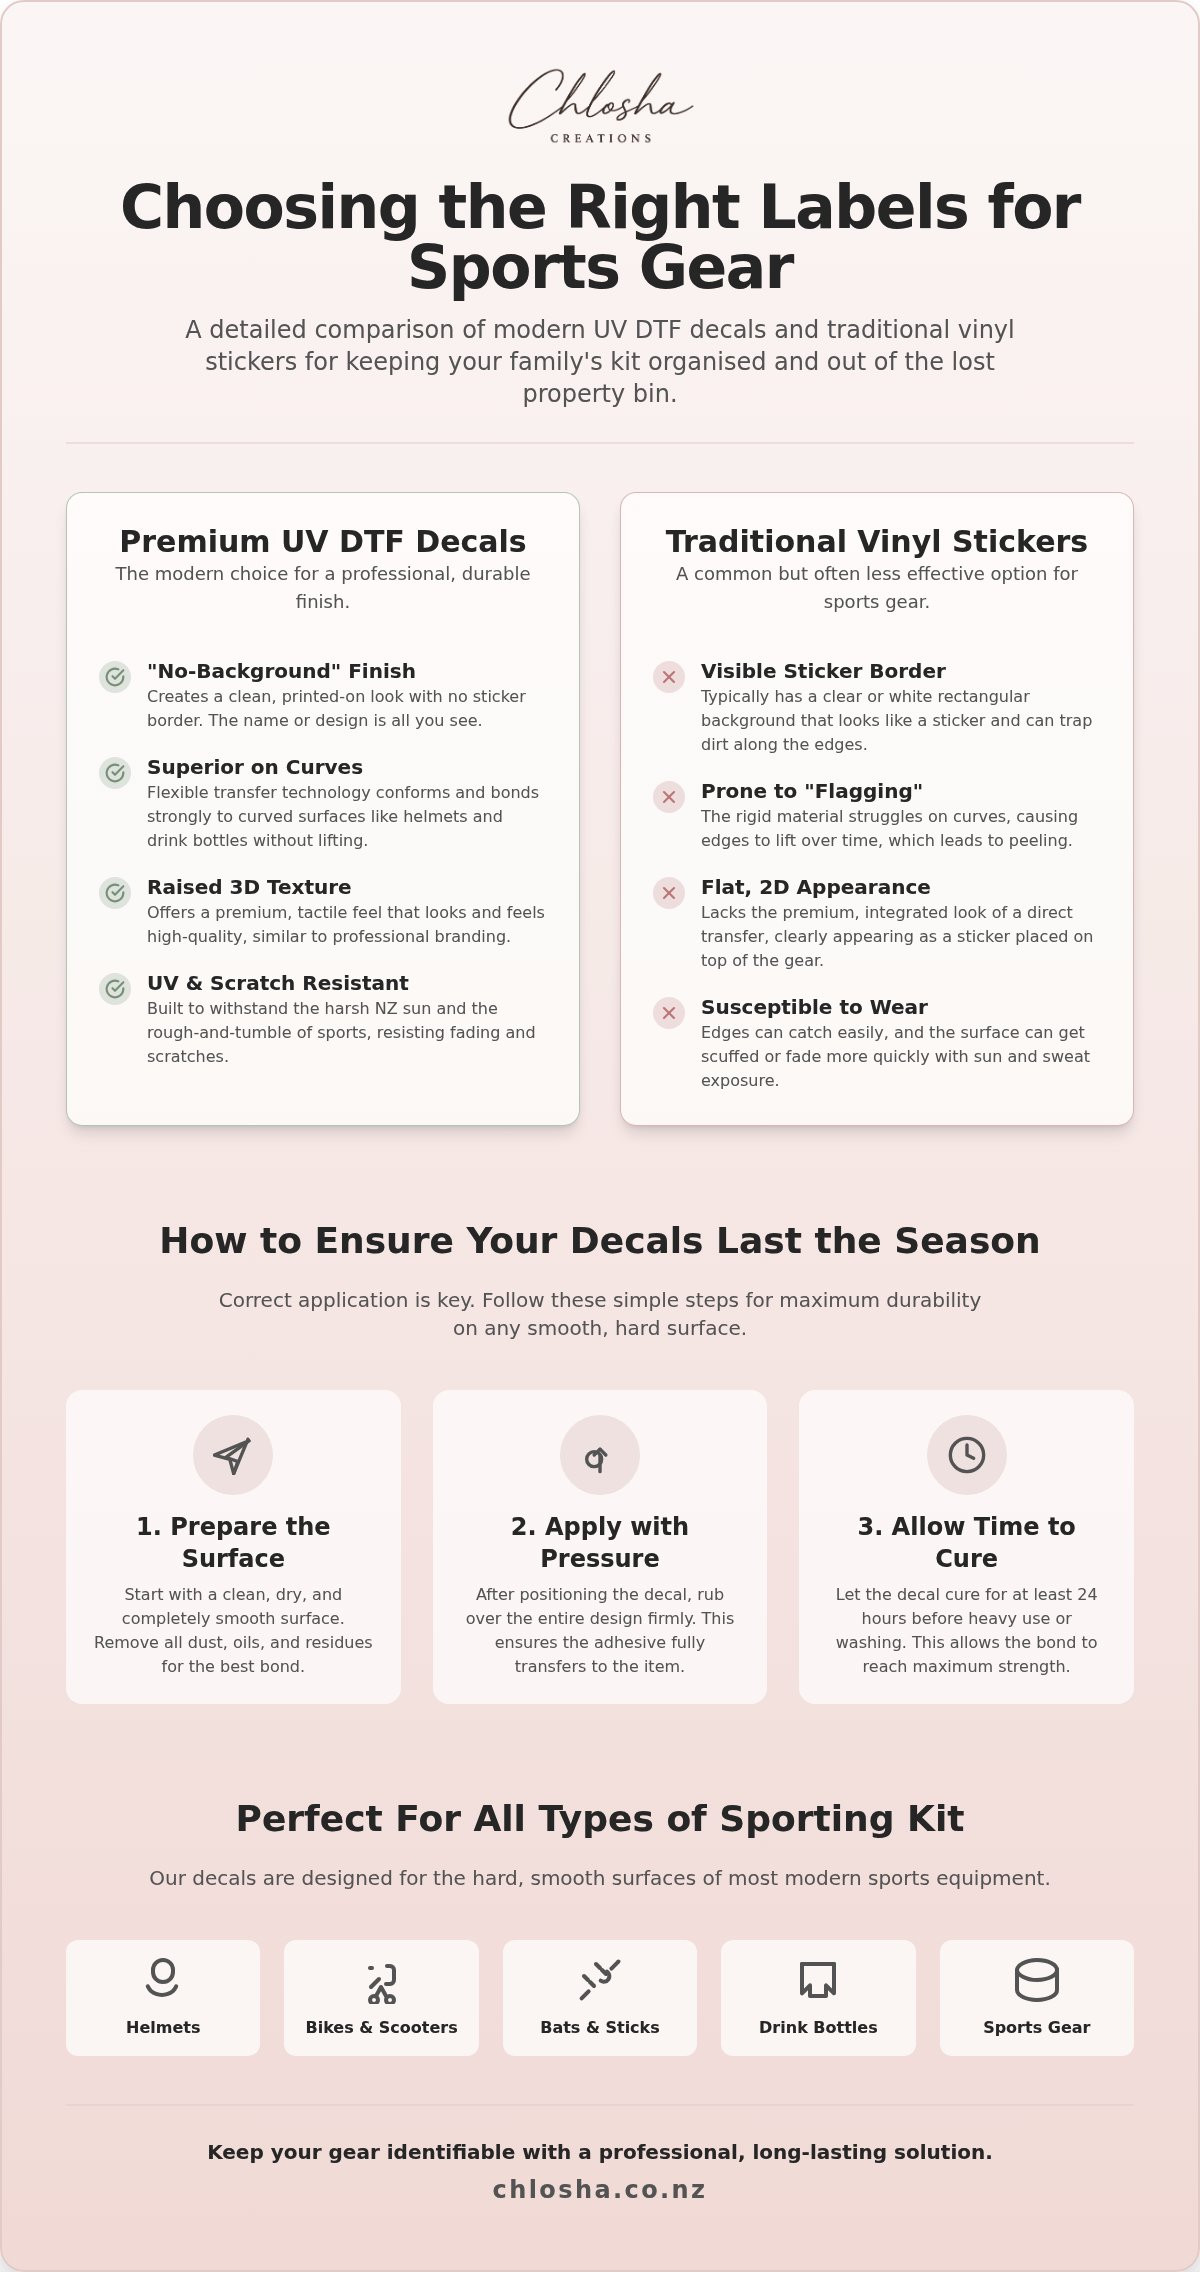
We use a premium UV DTF process, which creates a transfer that looks like it was printed directly onto the gear. This means there is no clear rectangular border around the name. It is a clean, 3-D raised effect that mirrors the branding you see on professional equipment. This technology offers several benefits for your kit:
- No messy borders: There is no background film to peel or trap dirt.
- UV Resistance: The finish is designed to resist fading from harsh NZ sun.
- Superior Bonding: They bond to smooth, hard surfaces like plastic, metal, and fibreglass.
- Aesthetic Appeal: Gives gear a custom, high-end look that kids love.
When equipment looks this good, kids are naturally more inclined to take care of it. It moves the gear from being a generic item to a prized, personalised possession.
UV DTF vs. Traditional Vinyl: Choosing the Best Labels for Sports Equipment
Deciding how to mark your kit usually comes down to two options: old-school vinyl or modern UV DTF. While vinyl has been the standard for years, it often leaves a lot to be desired when it comes to high-performance equipment. For those seeking the best sports gear name decals, understanding the technology behind the label is the key to a long-lasting finish.
Why UV DTF is the Superior Choice for Hard Gear
One of the biggest wins for this technology is the clean, "no-background" finish. Traditional labels usually have a clear or white border that sits on top of your gear, which can look a bit "DIY." With UV DTF transfers New Zealand families can achieve a professional look that is virtually indistinguishable from factory printing. The ink is transferred directly onto the surface, leaving only the text or icon behind without any messy rectangular borders.
There is also the tactile feel to consider. These decals have a slightly raised, 3-D texture that feels smooth and premium to the touch. This doesn't just look great; it adds a layer of durability. Because the transfer is flexible, it handles the complex curves of cycling helmets or rowing oars far better than stiff vinyl. It wraps around the surface rather than fighting against it, ensuring a better bond on smooth plastics, metals, and glass.
The Limits of Standard Vinyl Stickers
Standard vinyl stickers are often too rigid for the dynamic shapes found in modern sports equipment. If you apply a flat vinyl sticker to a curved cricket helmet or a tapered bike frame, the tension eventually causes the edges to "flag" or lift. Once that happens, dirt and moisture get underneath, and the label is destined to peel off during the next practice session.
Vinyl also shows its age through the sticker backing itself. The clear film can become cloudy, scratched, or yellowed over time, making the name difficult to read. In contrast, UV DTF is cured with ultraviolet light during the production process. This creates a tough, resilient bond that stays vibrant through the bumps and scrapes of a busy season. If you want a sleek, permanent-feeling solution that won't let you down, you might like to browse our range of personalised sports gear name decals to see the quality for yourself.
Objectively, UV DTF is the modern choice for hard surfaces because it offers:
- Seamless Integration: No visible edges to catch on gear bags or clothing.
- Superior Adhesion: A stronger bond to non-porous surfaces like carbon fibre and polycarbonate.
- Premium Aesthetics: A high-end, 3-D raised effect that looks like part of the original kit.
- Durability: Better resistance to the friction and impact common in contact sports.
Top Tips for Labelling Different Types of Sporting Kit
Not all sports equipment is created equal, so your approach to labelling shouldn't be either. The goal is to ensure your sports gear name decals are visible enough to find in a pile of kit, yet placed carefully enough to withstand the rigours of the game. Whether you are prepping for the Saturday morning netball rush or a midweek cricket practice, strategic placement is your best friend.
Helmets, Bikes, and Scooters
Finding the right spot for your decals on a helmet or bike frame requires a quick eye for flat, smooth areas. While our UV DTF transfers handle curves beautifully, they perform best on non-textured surfaces. For helmets, we recommend placing the decal on the back or the side, away from vents and moving parts like visors. This keeps the ID visible for safety and organisation without interfering with the gear's function.
Bikes and scooters often have limited flat real estate. Look for the head tube or the top of the down tube for maximum visibility. If the gear itself is too textured or small for a decal, consider using custom name keyrings NZ to identify gear bags and backpacks. It's a simple way to add an extra layer of identification that travels with the equipment.
Rackets, Bats, and Sticks
Cricket bats, hockey sticks, and tennis rackets take a lot of impact. When applying decals to these items, avoid high-friction areas where hands constantly grip. For a cricket bat, the shoulder or the back of the blade is ideal. For hockey sticks, try the upper part of the shaft. This ensures the name doesn't wear down from constant contact with gloves or palms.
If you are labelling larger items like rowing oars or surfboards, our "Big Gear" labels are the way to go. These are specifically designed for larger equipment where a standard-sized label might get lost. Placing these larger decals near the handle or the base of the equipment ensures readability from a distance. It's about making it as easy as possible for a coach or another parent to identify who the kit belongs to at a glance.
Don't forget the smaller essentials like drink bottles. Sharing bottles is a major hygiene risk in team sports. A clear, personalised decal on a drink bottle ensures your child always grabs their own water, keeping them healthy and hydrated. Because our transfers have no background, they look sleek and modern on both plastic and stainless steel bottles, helping them stand out in the team crate.
How to Apply and Care for Your Sports Gear Decals
Getting the best results from your sports gear name decals depends entirely on how you apply them. Because UV DTF transfers create a permanent bond, you only get one shot at positioning. Following a methodical approach ensures your kit looks professional and stays labelled for the long haul. It is not just about sticking it on; it is about ensuring the adhesive has the best environment to do its job.
- Step 1: Clean the surface thoroughly. Use isopropyl alcohol or warm soapy water to remove oils, grease, and dust. Even invisible finger oils can weaken the adhesive bond over time.
- Step 2: Position your decal carefully. Once the adhesive touches the surface, it starts to bond immediately. Take your time to align it perfectly before pressing down, as these transfers cannot be repositioned.
- Step 3: Apply firm pressure. Use a squeegee or the edge of a credit card to rub the decal from the centre outwards. This removes air bubbles and ensures every part of the transfer is in contact with the equipment.
- Step 4: The low-angle peel. Slowly pull back the clear carrier sheet. Keep it flat against the surface rather than pulling upwards. If any part of the decal lifts, lay the sheet back down and rub it firmly again.
- Step 5: Let it cure. This is the most critical step. Resist the urge to use the gear immediately to allow the bond to reach its full strength.
The Importance of Surface Preparation
A little bit of dust is the enemy of a good bond. If you are applying decals on a cold morning, the surface might feel slightly damp or slick. You can use a hair dryer on a low, warm setting to gently warm the surface before application. This helps the adhesive "grab" more effectively. However, be aware that some "low-energy" plastics like polypropylene or surfaces coated in silicone are naturally resistant to adhesives. If your gear has a very oily or waxy feel, the decal may struggle to stay put regardless of how much pressure you use.
Long-Term Care for Your Decals
Patience pays off for long-term durability. We recommend waiting at least 24 hours before taking your kit out for a normal practice session. For items that might need a deeper clean, like drink bottles, wait a full 72 hours before any exposure to water or mild detergents. While our transfers are incredibly hardy, they aren't indestructible. Avoid using harsh abrasives, steel wool, or industrial solvents directly over the labelled area. A gentle wipe with a damp cloth is usually all it takes to keep your gear looking sharp and identifiable.
Ready to get started? You can find our full range of personalised sports gear name decals online to find the perfect style for your team.
Organise Your Season with Chlosha Creations’ Premium Name Labels
At Chlosha Creations, we know the chaos of a busy sports season. We are a family-run team based in Auckland, dedicated to helping Kiwi families keep track of their gear with high-quality, durable solutions. Our sports gear name decals aren't just functional; they are designed to look professional and stay put. Whether you are labelling a single cricket bat or outfitting an entire family of athletes, we have a pack that fits your needs perfectly. We take pride in every transfer we produce, ensuring your equipment stays out of the lost property bin.
Personalised Packs for Every Athlete
Every sport has different requirements, which is why we have created specific packs to make your life easier. For those with larger equipment like rowing oars, surfboards, or gear bags, our 'Big Gear' and 'Mega' packs provide the visibility you need. If you have multiple children in different sports, our Sibling packs allow you to split the labels between names, saving you time and money. We also offer Classic packs for those who need a standard set of reliable labels for their everyday kit.
Younger athletes often struggle to read their own names in a hurry. Our Icon + Name packs are a popular choice for kindy and primary school kids. By adding a small icon, like a soccer ball or a dinosaur, your child can recognise their equipment at a glance. You can choose from a range of fonts and colours to match your team's kit or your child's personality. For more information on finding the right fit for your family, check out our personalised name labels NZ guide.
Support Local While Protecting Your Gear
When you choose Chlosha Creations, you are supporting a local business that understands the unique conditions of the New Zealand climate. We take pride in our craftsmanship and offer a level of customer support that faceless retailers simply cannot match. Because we are based in Auckland, we even offer a local pickup option for those nearby who want to get their sports gear name decals ready for the weekend match as quickly as possible.
Ordering is a simple, stress-free process through our website, with shipping available right across the country. We handle every order with meticulous care, ensuring your decals arrive ready for application. Don't let another season go by with expensive gear ending up in the lost property bin. It is time to explore the sports gear collection and get your kit sorted for 2026.
Get Your Kit Ready for the 2026 Season
Labelling your equipment shouldn't be an afterthought or a messy job with a permanent marker. By choosing premium UV DTF technology, you're giving your gear a professional, no-background finish that stands up to the rigours of the game. Remember that the secret to a long-lasting bond lies in thorough surface preparation and allowing that critical 72-hour curing time before the first big match. It's the best way to ensure your investment stays exactly where it belongs: with you.
As a family-run Auckland business, we take pride in helping families across New Zealand stay organised. Our signature 3-D raised finish ensures your sports gear name decals look like a factory-original part of your kit, and we offer national NZ shipping to get you sorted wherever you're located. Ready to tick one more thing off your to-do list? You can Shop Personalised Sports Gear Name Decals today and enjoy the peace of mind that comes with a perfectly labelled kit. We can't wait to see your gear out on the field!
Frequently Asked Questions
Are sports gear name decals waterproof?
While we don't use absolute terms like "permanently waterproof," our UV DTF decals are designed to be highly water-resistant once they are fully cured. They handle rain, sweat, and regular cleaning well on smooth, hard surfaces. For the best bond, always wait at least 72 hours before exposing your labelled gear to significant moisture. This curing time allows the adhesive to settle properly, ensuring your sports gear name decals stay vibrant and secure through every season.
Can I use these decals on my child's bike helmet?
Yes, these decals are perfect for bike helmets because the UV DTF technology is flexible enough to bond with curved surfaces. Unlike stiff stickers that might lift at the edges, our no-background transfers wrap smoothly around the polycarbonate shell. Just ensure the area you choose is smooth and non-textured. A quick wipe with isopropyl alcohol before application will help remove any oils or dust that might interfere with the adhesive bond.
How long do UV DTF decals last on sports equipment?
The longevity of your decals depends on the surface type, correct application, and the amount of friction the gear faces. On high-impact items like hockey sticks, they are built to be resilient, but they aren't indestructible. When applied to clean, smooth surfaces and allowed to cure for 72 hours, they offer a durable finish that resists fading in the harsh NZ sun. Most families find they last for several seasons with proper care.
Will the name decals stay on my drink bottle in the dishwasher?
Our decals are designed to be durable, but we don't guarantee they are "dishwasher-proof" due to varying cycle temperatures and detergents. If you choose to use a dishwasher, wait at least 72 hours after application to allow the bond to reach full strength. For the longest lifespan, we recommend hand-washing your drink bottles with a soft cloth. This gentle approach prevents the high heat of some dishwashers from prematurely weakening the adhesive.
What surfaces are NOT suitable for these decals?
You should avoid applying these decals to textured, grooved, or highly flexible surfaces. They won't bond effectively to fabrics, silicone, or "low-energy" plastics like polypropylene. If the surface feels waxy or has a heavy grain, the transfer may not adhere correctly. For the best results, stick to smooth, hard materials like glass, metal, acrylic, or high-quality hard plastics commonly found on helmets, rackets, and cricket bats across New Zealand.
How do I remove the decals if I want to sell the gear later?
While UV DTF transfers are designed for permanent application, you can remove them with a bit of patience. Gently warming the decal with a hair dryer on a low setting can help soften the adhesive. Once warm, use a fingernail or a plastic scraper to slowly lift the edge and peel it away. Any remaining sticky residue can usually be cleaned off with a mild adhesive remover or warm soapy water and a soft cloth.
Can I get a custom icon or logo for my sports team?
We certainly offer custom UV DTF printing for sports teams and clubs across the country. Whether you need a specific team logo or a unique icon to match your kit, we can help you create a professional look. This service is ideal for branding water bottles, helmets, or equipment crates for the whole squad. Simply reach out to us with your design requirements, and our family-run team will guide you through the process.
