

Stationery Name Labels: How to Choose the Right Pack
Could the prettiest label be the wrong choice for your stationery? It can be if it doesn’t fit the item or the surface isn’t suitable. Choosing stationery name labels means considering the space available, how clearly the name will show and what the item is made of, not just the design.
One pack may not suit everything from exercise books to pencil cases. Chlosha Creations’ personalised UV DTF labels have a clean, no-background finish with a slightly raised effect. They’re designed for clean, dry, smooth hard surfaces, so check the material and finish before applying one.
This guide compares Classic, Slim and Icon + Name packs, including their label quantities, to help you choose a format for your stationery. You’ll also find practical tips for selecting a readable name layout, checking surfaces and applying and caring for labels. A little planning can help you find a suitable match for school, daycare or kindy supplies.
Key Takeaways
- Choose stationery name labels based on the item’s size, surface and the look you prefer.
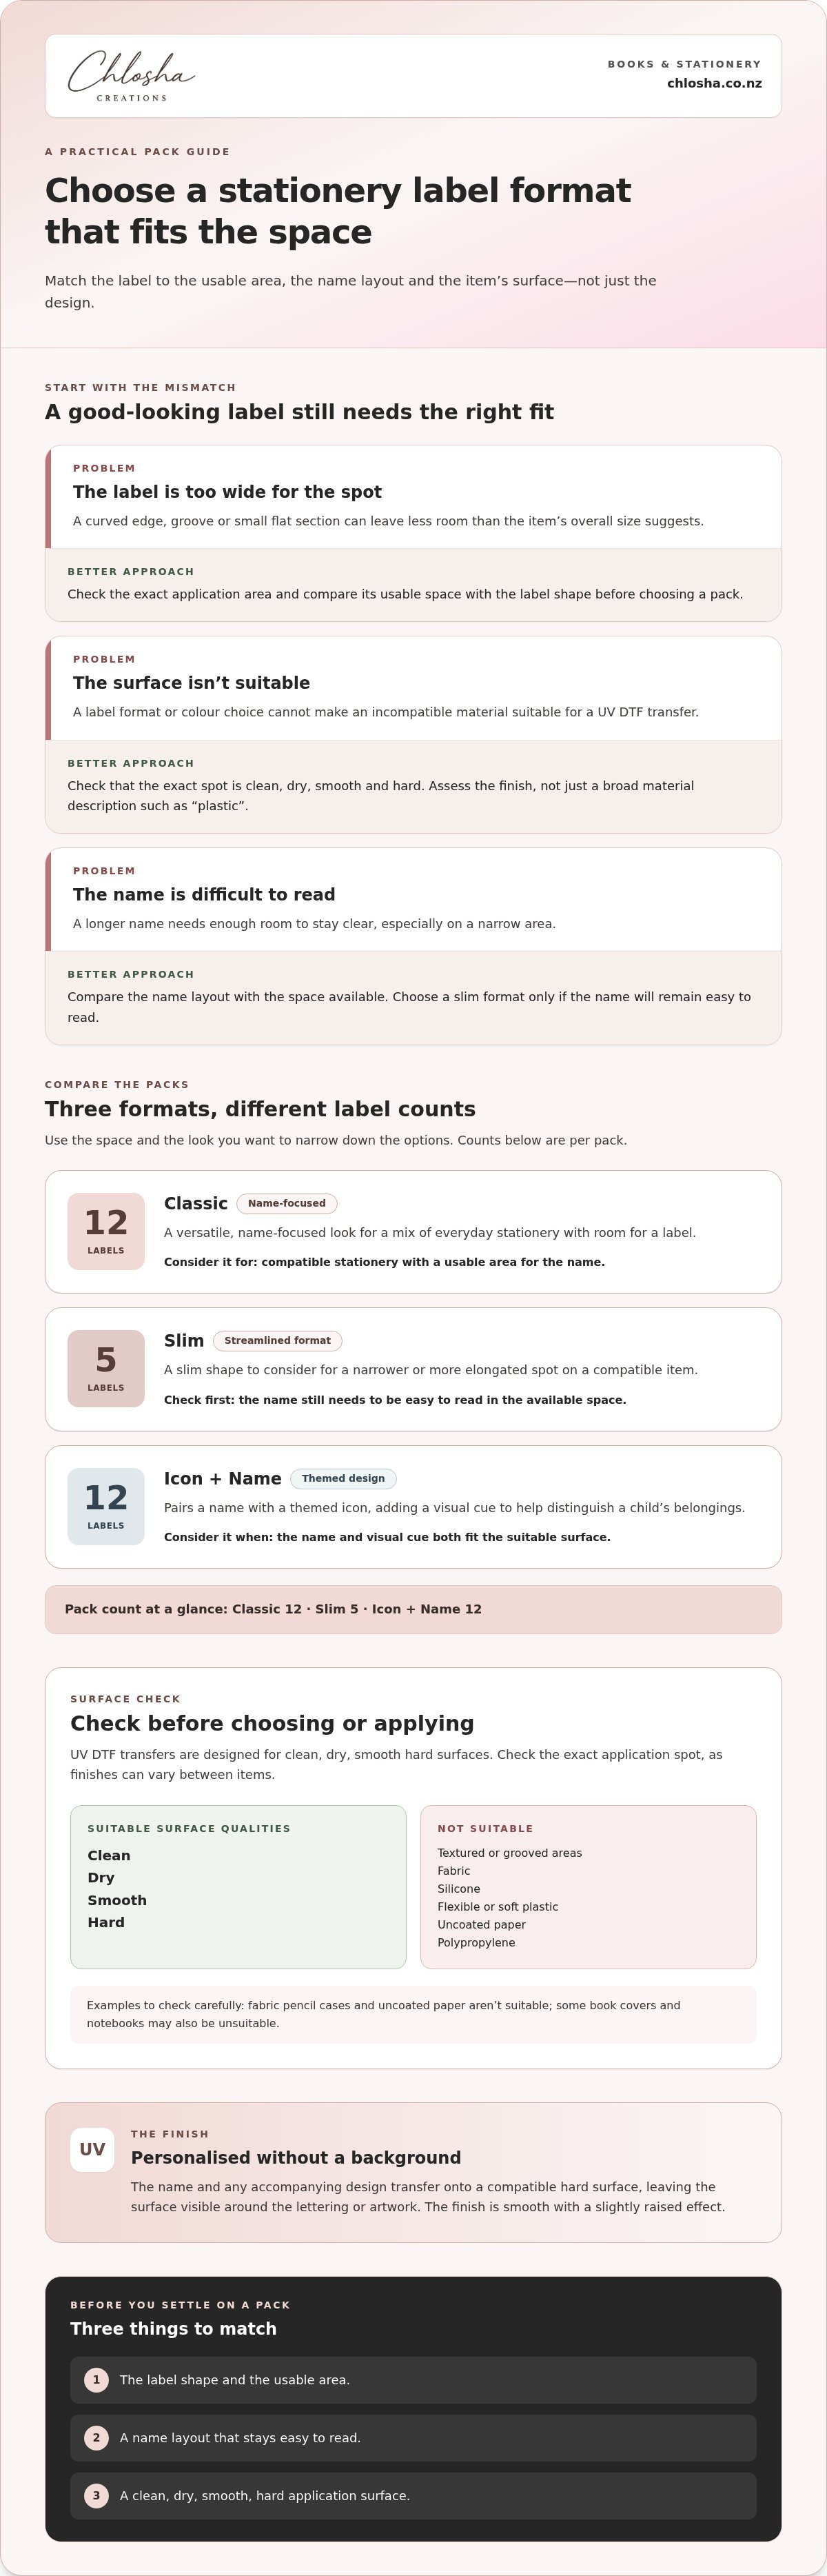
- Compare pack formats before ordering: Classic and Icon + Name packs include 12 labels, while Slim packs include 5.
- Choose a clear, easy-to-read name and a label size that fits the stationery.
- Check that the application area is clean, dry, smooth and hard before applying a UV DTF label.
- Follow the application steps to position the label neatly and avoid common mistakes.
Stationery name labels: what to consider before choosing a pack
A missing name can make it difficult to tell whose folder or pencil box is whose, particularly when several children have similar supplies. A name label makes ownership easy to see and can help children and teachers identify everyday belongings.
The right choice depends on the item’s size, surface, how it’s used and the design your child prefers. Before choosing a pack, identify where the label will go and check that spot is smooth, hard, clean and dry. UV DTF transfers aren’t suitable for every stationery material, so check compatibility as well as colour and style.
Which school and stationery items might need a name label?
Start with belongings that are often shared, picked up by mistake or easy to leave behind. A folder, calculator casing, stationery container or pencil box may be suitable if the application area is smooth, hard, clean and dry. Check the exact spot, as the surface finish can vary between items.
Fabric pencil cases and uncoated paper aren’t suitable for these transfers. Some book covers and notebooks may also be unsuitable, so don’t assume every book can take a label. Make a list of the items your child uses most, then check each surface before deciding how many labels you need.
What does a UV DTF stationery label look like?
A UV DTF label has a smooth, no-background finish with a slightly raised effect. The personalised name and any accompanying design transfer onto a compatible hard surface, leaving the surface visible around the lettering or artwork.
This gives stationery a neat, personalised look, but surface compatibility comes first. Textured or grooved areas, silicone, flexible or soft plastic, fabric and uncoated paper aren’t suitable. For background on how a different type of self-stick label uses a pressure-sensitive adhesive, see the linked explanation. That technology is different from a UV DTF transfer.
Once you’ve identified suitable items, measure or compare the space available for the name. A broad, flat area gives you more layout options than a narrow section on a small container. Browse personalised name labels to compare options for books and stationery, keeping each item’s surface and available space in mind.
How to compare stationery name labels by size, format and surface
The right pack depends on the space available and how you want the label to look. A wider area may suit a more prominent name, while a narrow, elongated spot may need a slimmer format. Use the comparison below as a starting point, then check the actual application area before choosing.
| Pack format | Label count | May suit | Design style |
|---|---|---|---|
| Classic | 12 | A mix of everyday stationery with room for a name label | Name-focused, versatile look |
| Slim | 5 | Narrow or elongated spaces on compatible items | Streamlined format |
| Icon + Name | 12 | Suitable hard surfaces where a name and visual cue fit | Themed icon paired with a name |
Classic, Slim or Icon + Name: which pack format fits?
Choose Classic if you’re labelling a mix of items and want a versatile format. Slim is worth considering for a narrower, longer space, provided the name remains easy to read. Icon + Name pairs a name with a themed design, giving children another visual cue for recognising their belongings. The best format depends on the items you’re labelling, rather than the pack name alone.
Before ordering, compare the label shape with the usable area on each item. Don’t judge by the item’s overall size: a curved edge, groove or small flat section can limit where a label will sit neatly.
Check the stationery surface before choosing
UV DTF transfers are designed for clean, dry, smooth hard surfaces. Material and finish matter. Textured or grooved areas, fabric, silicone, flexible or soft plastic, uncoated paper and polypropylene aren’t suitable. Check the exact spot rather than relying on a general description such as “plastic”, as different finishes can affect suitability.
For more guidance on choosing a format for books and stationery, browse the personalised name label collection. Once you’ve considered the surface and available space, explore labels for books and stationery and compare the options with your child’s supplies in mind.
Which stationery name-label design suits your child or school gear?
A label can reflect your child’s style, but the name still needs to be easy to spot. Some families prefer simple typography for a tidy, understated look. Others choose a colourful or themed design to give belongings a more personal feel. Neither style makes a label more suitable for a particular item. That depends on the surface and correct application.
Standout packs for different stationery styles
These examples show how pack format and design can help narrow your choice:
- Modern Minimal Personalised Name Labels - Classic Pack - 12 Labels: a name-focused option for a clean, simple look on compatible stationery.
- Retro Pop Slim Personalised Name Label Pack - 5 Labels: a slim format to consider for narrower spaces where a wider label may not fit as neatly.
- Magic Dreams Personalised Icon + Name Label Pack - 12 Labels: a themed option pairing an icon with a name, adding a visual cue to help distinguish a child’s belongings.
Think about the items you plan to label as well as the design. A slim label may suit a narrow, flat area, while a broader space can fit a larger layout. Check that the intended spot is a clean, dry, smooth hard surface before settling on a pack. A design won’t make an unsuitable surface compatible.
How to choose a readable design
Start with the name. Longer names need enough space to remain legible, so compare the label size with the item’s flat area and consider how much space the lettering will take up. A compact format may be easier to place on a small stationery container. On a wider surface, you may have room for a name-only layout or one with an icon.
Look for clear contrast between the lettering and surrounding design. Colourful artwork can add personality, but it shouldn’t make the name hard to pick out at a glance. If your child recognises an icon quickly, a themed design can provide an extra visual cue. A simpler style may suit families who prefer a less decorated look.
Colour and theme are personal preferences, not indicators of performance. With stationery name labels, readability, suitable size and surface compatibility are the practical priorities. Then you can choose a look your child likes. Browse the Icon + Name Packs if you’re considering a themed design with a personalised name.
How to apply stationery name labels and avoid common mistakes
Start by checking the surface. UV DTF stationery name labels are intended for clean, dry, smooth hard surfaces, so prepare the application area before positioning the transfer. Dust, residue, moisture or an unsuitable finish can affect how it adheres.
A simple application sequence for compatible hard surfaces
- Clean the chosen area to remove dust and residue, then make sure it’s completely dry.
- Position the transfer before pressing so the name sits neatly on the flat area.
- Press firmly over the design, using a squeegee if provided.
- Peel the carrier back slowly at a low angle. If the transfer resists, press it down again instead of pulling sharply.
A warm hair dryer on a low setting may help if needed, but it isn’t essential for every transfer. Use gentle heat and avoid overheating the item. After application, wait about 24 hours before normal use.
Common mistakes that can affect application
Don’t apply a transfer to fabric, uncoated paper, polypropylene, silicone, or flexible or soft plastic. Textured and grooved areas can also make it harder to get a neat application. Check the exact spot, as the material and finish can vary even across similar stationery items.
For drink bottles or other items that need washing, hand washing is recommended. If dishwasher exposure is appropriate for the item and unavoidable, wait about 72 hours after application first. This isn’t a claim that the label or item is dishwasher-safe. How a label holds up can depend on the surface, correct application, curing time, washing conditions and ongoing use. Don’t use a microwave unless the item and label are specifically stated to be microwave-safe.
For stationery, handle the item gently after application. Avoid rubbing or picking at a newly applied transfer, and follow any care instructions supplied with the product. If you’re choosing labels for books and school supplies, browse labels for books and stationery and consider the surface before deciding where each one will go.
Choose your stationery name labels and browse the right collection
Choose a pack by starting with the stationery. Confirm that each item has a suitable surface, then check the flat space available for a name. Once you know what will fit, decide between a simple name-only design and an icon-and-name option if a themed visual cue would suit your child.
A quick checklist before ordering
- List the items: Note which books, containers or other school supplies you want to identify.
- Check the material: UV DTF transfers are for clean, dry, smooth hard surfaces. Avoid fabric, uncoated paper, polypropylene, silicone, flexible or soft plastic, and textured or grooved areas.
- Estimate the space: Look for a flat area large enough for the label while keeping the name easy to read.
- Pick the format and look: Choose a name-only pack for a simple finish or a themed design for extra visual distinction, based on the available space.
- Review application guidance: Prepare the surface and follow the application steps before putting the item into regular use.
This check helps you avoid choosing a design based on appearance alone. A label may look right but still be unsuitable if the material or finish isn’t compatible. Keep your school stationery list nearby and match each label to a specific item instead of assuming one format will suit everything.
Browse books and stationery label options
Chlosha Creations’ personalised UV DTF labels have a clean, no-background finish with a slightly raised effect. Choose understated name-only stationery labels or an icon paired with the name for a more distinctive look. Either way, prioritise a readable name and a compatible surface.
Use your list of items and surfaces to narrow down the options. Then compare the personalised name label collection and pack formats for books and stationery, considering which labels will fit the items you’ve checked.
Make a confident choice for school stationery
The right stationery name labels start with a suitable surface and a size that fits the item. Check that the application area is clean, dry, smooth and hard, then choose a pack to match the available space and the look you prefer. Classic, Slim and Icon + Name formats offer different ways to personalise compatible school supplies.
Chlosha’s personalised UV DTF transfers have a clean, no-background finish. Whether you prefer a simple name or a themed design, make sure the name is easy to read and follow the application and care guidance. Chlosha Creations serves customers throughout New Zealand, with personalised options for families preparing school supplies.
Ready to compare options for books and stationery? Browse personalised Books & Stationery labels and choose a format for the suitable surfaces you’ve identified.
Frequently Asked Questions
Can I use stationery name labels on books and notebooks?
Only if the spot you plan to label is a clean, dry, smooth hard surface. Many book and notebook covers are paper-based or textured, so they may not be suitable for a UV DTF transfer. Check the actual cover and finish rather than assuming every book will work. A compatible smooth, hard area may be suitable, but uncoated paper isn’t.
What size name label is best for school stationery?
Choose a size that fits the item’s flat area while keeping the name easy to read. Check the available space on each piece of stationery, especially narrow items. Chlosha’s Slim Name Pack includes 5 labels, while the Classic Name Pack includes 12. Consider the intended items and label layout rather than choosing by pack name alone.
Are UV DTF name labels the same as paper stickers?
No. UV DTF name labels are transfers, not paper stickers. They transfer a design onto a compatible hard surface and have a clean, no-background finish with a slightly raised effect. The surface remains visible around the design. They’re intended for clean, dry, smooth hard surfaces, so they aren’t suitable for uncoated paper, fabric or every type of stationery.
Can I put name labels on a fabric pencil case?
No. UV DTF transfers aren’t suitable for fabric pencil cases. They’re designed for clean, dry, smooth hard surfaces, not soft or flexible materials. Check the case material before choosing a label. If the pencil case is fabric, you could label a compatible hard item your child uses with it, such as a suitable smooth stationery container.
How do I apply a UV DTF name label to stationery?
First, make sure the item has a compatible smooth, hard surface. Clean it to remove dust or residue, then let it dry fully. Position the transfer, press or squeegee it down firmly, and peel the carrier back slowly at a low angle. If needed, use a warm hair dryer on a low setting. Wait about 24 hours before normal use.
Should I choose a name-only pack or an Icon + Name pack?
Choose a name-only pack for a simple, tidy look. An Icon + Name pack pairs the child’s name with themed artwork, which can provide an extra visual cue for spotting their belongings. Before deciding, consider the flat space available and make sure the name will remain clear and easy to read on the item.
How many stationery name labels come in a pack?
Pack quantities depend on the format. The Classic Name Pack includes 12 labels, the Slim Name Pack includes 5, and the Icon + Name Pack includes 12. Think about how many compatible items you want to label and whether a wider or narrower format suits the available space. Check the pack details when comparing options for your school supplies.
How should I care for items with UV DTF name labels?
Wait about 24 hours after application before normal use, and handle labelled stationery gently. For items that need washing, hand washing is recommended. Where dishwasher exposure is appropriate, wait about 72 hours after application, but this isn’t a dishwasher-safety guarantee. Results can depend on the surface, application, curing time, washing conditions and ongoing use. Don’t assume an item is microwave-safe.
