

Back to school labels in NZ: Find sizes, packs and personalisation
A name label can make it easier to identify a child’s belongings and return misplaced items to their owner. A back-to-school checklist for NZ labels starts with what your child takes to school, such as drink bottles, lunchboxes and school supplies. Clear names are most useful on items that can easily be mixed up or left behind.
Getting school things ready can feel like a lot, especially when you’re comparing label packs and working out what suits each item. The right labels depend on what needs naming, the space available and whether you prefer a name alone or a name with an icon.
This guide explains why school name labels are useful, how to compare pack sizes and dimensions, and what to consider when choosing personalisation and stick-on options. You’ll also find practical checks for labelling school gear, so you can get organised without overcomplicating your back-to-school list.
Key Takeaways
- Prioritise belongings that are easy to mix up or leave behind, then make a simple list of what needs a name.
- Compare pack sizes with the number and types of items you plan to label, rather than choosing by pack size alone.
- Match label dimensions to the available space on each item so names remain easy to read.
- Choose name-only or name-and-icon personalisation based on what will help your child recognise their belongings.
- For stick-on labels, consider the item’s surface and follow the application and care guidance for the best fit.
Why Are Name Labels Important in School?
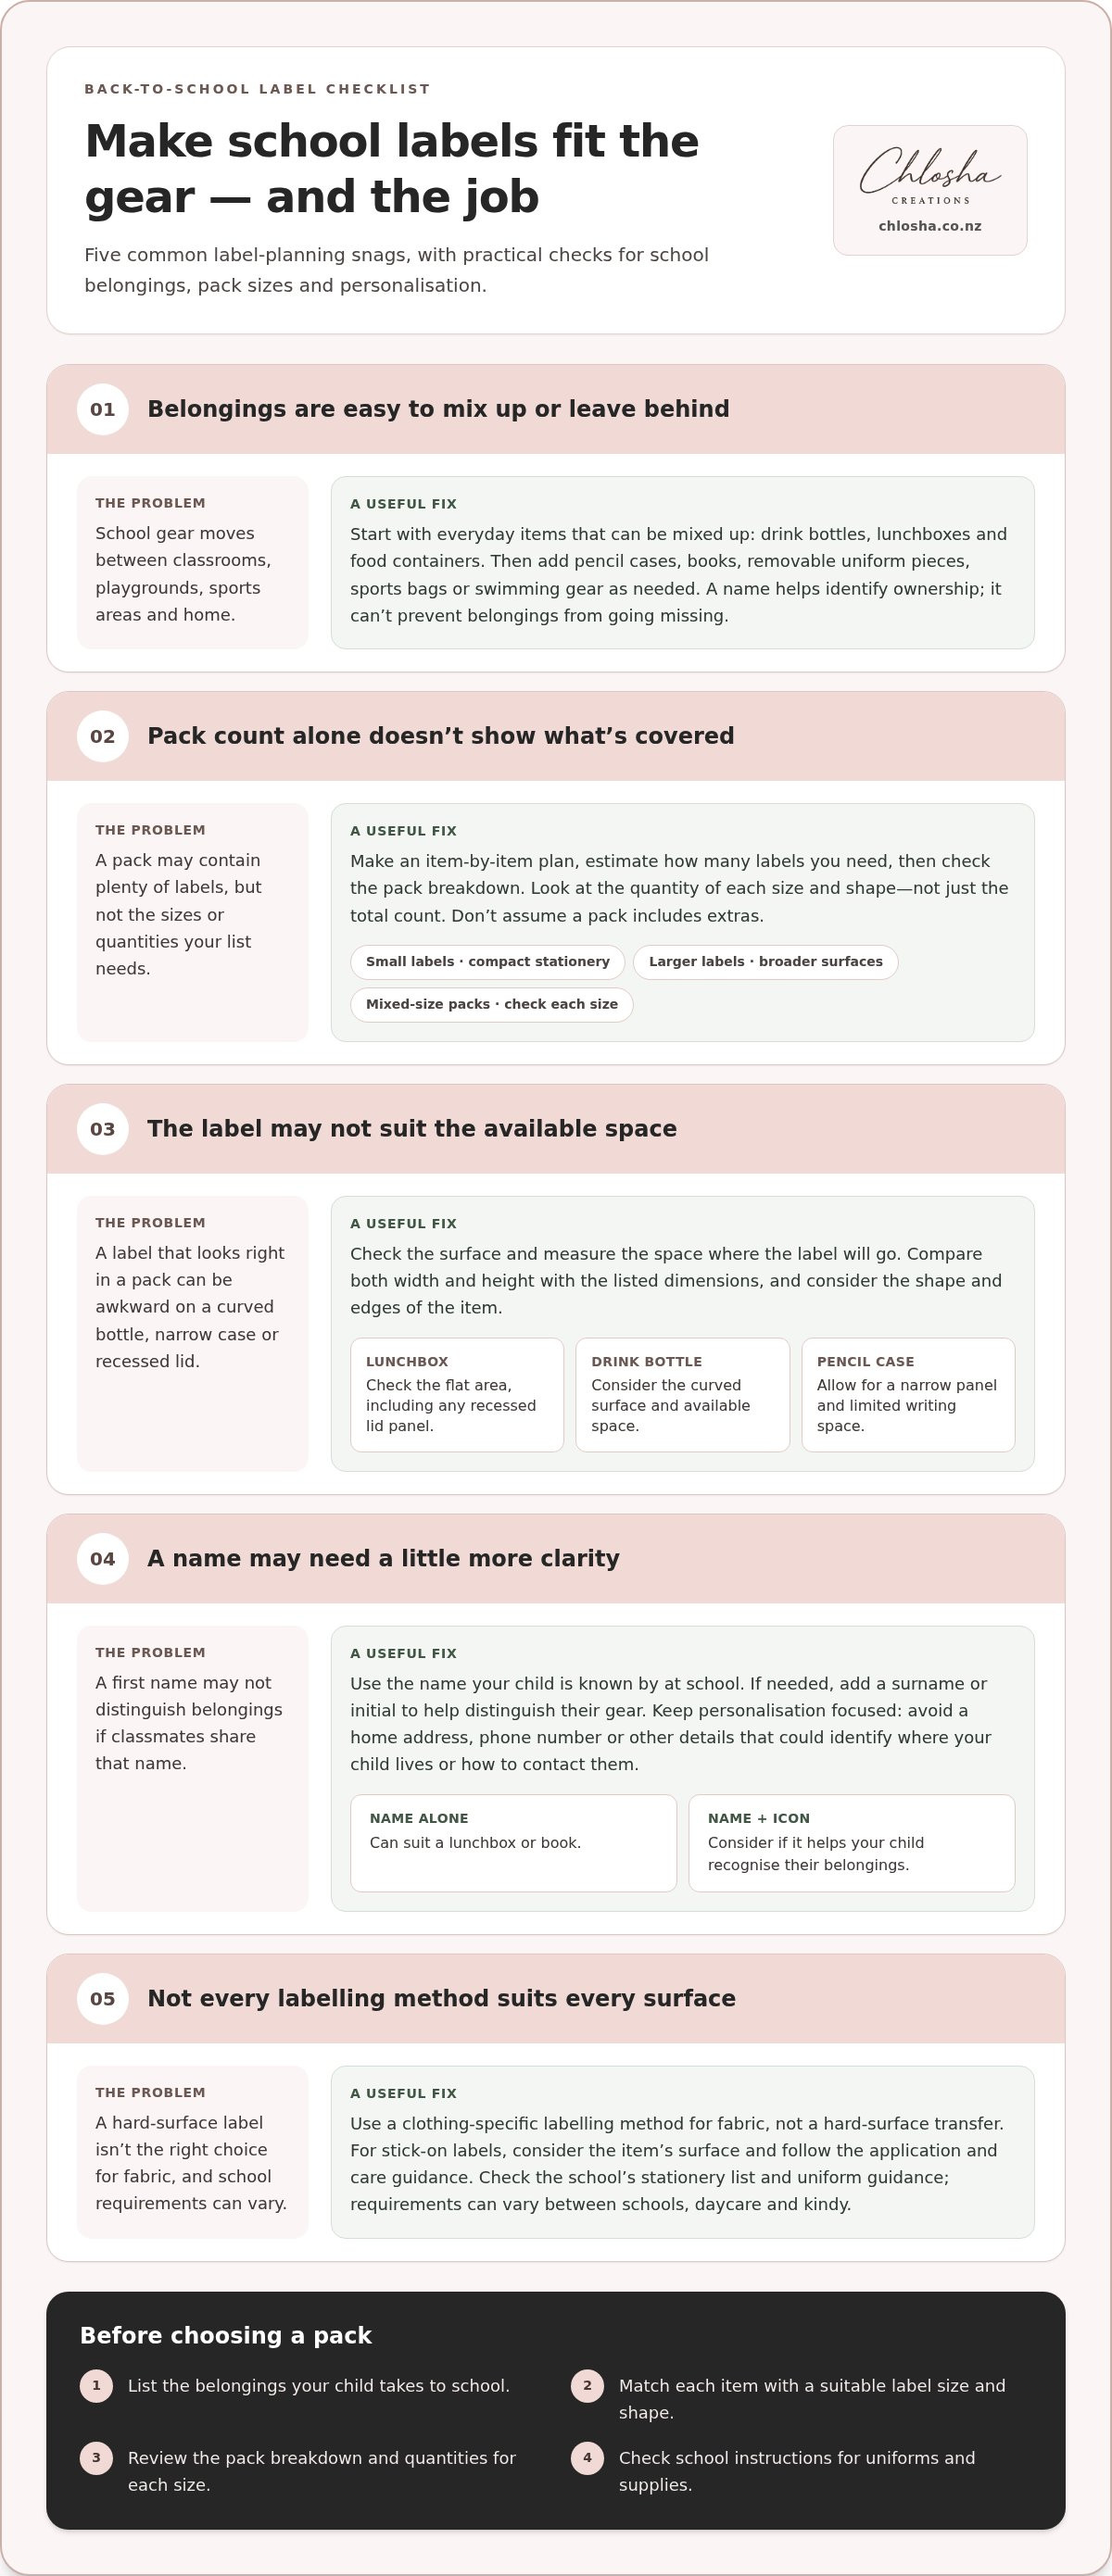
School belongings move between classrooms, playgrounds, sports areas and home. A name on a drink bottle, lunchbox or pencil case helps distinguish one child’s gear from another’s. It also gives teachers and school staff a useful clue when an item is left behind. Labelling can’t prevent belongings from going missing, but it makes ownership easier to identify.
Start with the items your child uses every school day. Add less frequently used gear, such as a swimming bag or sports equipment, if it travels between home and school. For a practical back-to-school checklist, write down each item before choosing labels. This list helps you compare pack sizes and remember items such as a spare uniform or stationery case.
- Everyday essentials: Label drink bottles, lunchboxes and food containers so they’re easier to identify at shared eating spaces.
- Stationery: Add a name to pencil cases, books and other supplies that may be used around classmates.
- Uniform pieces: Check jackets, hats and other removable items, especially gear taken to PE or swimming lessons.
- Activity gear: Include sports bags and other belongings that travel between school, training and home.
Check uniform requirements before buying school clothing. Then identify pieces your child may take off or set down, such as a jacket during PE. Keep the name visible and place it where it won’t interfere with the garment’s normal use. Use a clothing-specific labelling method for fabric, not a hard-surface transfer.
Do New Zealand schools or early childhood centres have specific labelling requirements? Requirements can vary between schools, daycare and kindy, so check the school’s stationery list and uniform guidance. Follow any instructions about which belongings to label and where a name should go.
How much do personalised school labels cost in New Zealand? Prices depend on the pack size, label dimensions and personalisation selected. Compare the number of labels in a pack and check whether their sizes suit your child’s belongings.
Where can I buy school name labels in New Zealand, including local retailers and online stores? Look for them at local stationery retailers or through New Zealand online stores. Compare pack contents and dimensions before choosing. For example, the personalised name label range shows one online option.
When should families order school labels before the New Zealand school year starts? Order once you know which uniforms, supplies and other belongings need names. Allow time for the labels to arrive and for you to apply them before the first school day.
One final check helps keep the list useful: match each label to a specific item rather than labelling only the obvious belongings. A named hat, for example, is easier to return when it’s separated from a school bag. Review the list after buying uniforms and stationery, then remove anything your child won’t take to school.
Label pack sizes and dimensions
A pack’s total label count only tells part of the story. Check how many labels it includes, which shapes or sizes are supplied, and whether those dimensions suit the belongings on your school list. A pack with plenty of small labels may suit pencils and stationery but leave less room for a drink bottle or lunchbox name.
For a back-to-school checklist in NZ, group items by the space available. A broad, flat lunchbox lid can take a different label shape from a narrow pencil case or curved drink bottle. Check the surface where each label will go, then compare it with the listed dimensions. This helps you avoid choosing a size that’s awkward to apply or hard to read.
Before selecting a pack, make an item-by-item plan. Include school supplies, uniform accessories and activity gear. Match each item to a suitable label size, then estimate how many you’ll need. Add the sizes to your checklist so you can review the pack breakdown and see whether it covers your planned use. Don’t assume every pack includes extra labels.
- Small labels: Consider these for compact stationery, such as a ruler or pencil case, where writing space is limited.
- Larger labels: Compare these with the flat areas on lunchboxes, drink bottles or sports gear.
- Mixed-size packs: Check the quantity of each size, not just the overall pack count.
- Label shape: Compare the outline with the item’s surface, especially around curved edges or narrow panels.
Read dimensions in the units shown in the product details. If measurements list width and height, compare both with the item rather than judging by one side. For example, a label may fit the width of a lunchbox but not its recessed lid panel. Measuring the flat area first gives you a clearer guide.
Pack size is about coverage, not just quantity. A household labelling school gear for more than one child may need labels in different names. One child with several activity bags may need a mix of sizes. Estimate coverage from your list, then check the pack breakdown to see whether the quantities suit your planned use.
If you’re comparing personalised name label options, use each item’s measurements and your list together. Choose a pack whose sizes suit the surfaces you plan to label, rather than relying on the largest count alone. This makes it easier to apply each label neatly and keep names legible.
Personalisation options
Use the name your child is known by at school, such as their first name. If classmates share that name, add a surname or initial to distinguish belongings. For privacy, avoid adding a home address, phone number or other details that could identify where your child lives or how to contact them.
Next, decide whether a name alone will be clear enough. A simple name can suit a lunchbox or book, while an icon alongside the name can help a younger child spot their belongings. Think about what your child can recognise quickly, especially when several similar drink bottles are together.
Use these checks to choose a personalisation style that suits your child and their belongings:
- Check the name: Write it as your child uses it at school, including correct spelling and any macrons.
- Consider an icon: Pairing a familiar picture with a name can give a child another visual cue.
- Keep it readable: Longer names need enough room, so compare the text with the label dimensions.
- Distinguish siblings: Use each child’s own name, rather than a shared family name alone.
For children still learning to read, a recognisable icon can provide a helpful visual prompt. Choose an image they can identify and distinguish from other children’s designs. For an older student, a name-only layout may feel simple and clear on a pencil case or sports bag.
Check every detail before ordering or applying labels. Compare the spelling with the name used at school, then check the label text against the item. If your child uses a preferred name at school, use the name they recognise and their teachers know. Avoid adding unnecessary personal details just to fill the space.
Personalisation also helps families distinguish similar belongings. For example, two siblings may have matching lunchboxes, but their individual names make them easier to tell apart. If a child uses a short name at kindy and a full name at school, decide which version will be most useful across their belongings.
Finally, match the wording to the label’s purpose. A name identifies ownership; an allergy message serves a different purpose and should be clear on the relevant item. Keep each label focused so the name or message is easy to read on a small surface.
Stick-on labels for school supplies
Stick-on labels suit many smooth, hard school items, including pencil boxes, lunchboxes and drink bottles. Check the surface before choosing a label: a clean, flat area gives you room to apply it neatly. Avoid textured, grooved, silicone, flexible or soft surfaces. If an item is curved or recessed, look for a smoother, flatter spot.
Prepare each surface before application. Clean away dirt or residue, then let the item dry completely. Oils, moisture and dust can interfere with adhesion. Position the label before pressing it firmly into place, as moving it afterward may affect the finish. Follow the product’s instructions and allow the recommended curing time before washing.
For a tidy result, use these steps on a school supply:
- Choose the spot: Find a smooth, flat area that won’t rub against a bag or lid.
- Clean and dry: Remove grime and moisture, then wait until the surface is fully dry.
- Position carefully: Align the name where it’s easy to see and away from edges.
- Press as directed: Apply even pressure and allow the stated curing time before washing.
On a drink bottle, avoid placing a label across a seam, raised ridge or frequently handled grip area. For a lunchbox, check that it won’t sit inside a lid or rub against another container. On a pencil case, choose a smooth, hard panel that won’t fold or flex during everyday use.
How do you apply school labels so they survive washing and dishwashing? Clean and dry the surface, apply the label as directed, and allow its recommended curing time before washing. Durability depends on the surface, correct application, curing time, washing conditions and ongoing use, so hand wash labelled drink bottles and lunchboxes rather than relying on dishwasher use.
Conventional peel-and-stick labels and UV DTF transfers use different application methods. UV DTF transfers are applied to suitable smooth, hard surfaces and leave a clean, no-background finish. Chlosha Creations’ UV DTF labels are peel-and-apply, with no heat press required. Follow the instructions for the particular product, and don’t assume any label suits every material or washing routine.
Check the item’s care instructions too. A school bottle exposed to frequent washing may need more careful handling than a stationery box kept dry. Avoid scrubbing directly over the label, and inspect the edges during regular cleaning. If the surface is curved or textured, choose a flatter placement area instead.
For uniforms and fabric belongings, use a labelling method made specifically for fabric. A label suited to a lunchbox won’t suit a shirt or jacket. Match the label type to the material to choose a practical option for each item on your school supplies list.
What are the best name labels for school uniforms, lunchboxes and stationery in New Zealand?
The best choice depends on the material, surface and care routine. A UV DTF label may suit a smooth, hard lunchbox or stationery case, while a uniform needs a method made for fabric. Match the label to each item rather than expecting one type to work everywhere.
For uniforms, first check the school’s rules and the garment’s care label. If the uniform includes a name tag, writing your child’s name there can keep the information discreet. A laundry marker may also suit some garment tags, provided its instructions match the fabric and washing routine. Hard-surface transfers aren’t a substitute for clothing labels.
Lunchboxes and drink bottles need a different approach. Choose a clean, dry, smooth, hard area clear of seams, ridges and moving parts. A name should be easy to see when the item sits among others. Hand wash labelled containers and follow the label’s application and care instructions.
For stationery, consider each item’s size and shape. A flat pencil case panel can take a larger name than a narrow ruler. Books and folders may have broad surfaces, but don’t cover important school information. Choose a label that fits without wrapping around an edge or crossing a fold.
- Uniforms: Use a fabric-suitable method, such as a name on the garment tag, and follow garment-care instructions.
- Lunchboxes: Choose a label suited to a smooth hard surface, then hand wash the container.
- Drink bottles: Find a flat placement area away from seams and grip points.
- Stationery: Match label dimensions to each object, from a pencil case to a book cover.
Before applying a stick-on option, clean and dry the chosen area. Position the label carefully, press it down as directed, and allow any stated curing time before washing. Surface texture, application and washing conditions can affect how well it stays in place. Avoid claiming that any label type suits every lunchbox, bottle or stationery finish.
A quick selection check can prevent mismatches. Separate your school list into fabric items, hard containers and stationery. Note each item’s surface and care routine, then choose a suitable method for that group. A school jacket and a smooth, hard plastic lunchbox need different approaches, even when both need your child’s name.
For hard-surface items, compare personalised label styles and sizes against the flat space available. Choose an option that fits the item and remains easy to read. For uniforms, keep to a garment-suitable method instead.
A broader school-preparation checklist can pair label choices with a simple lost-property step: label school supplies and clothing with a child's name, especially expensive uniform items that may be misplaced during PE or swimming lessons. That makes name labels particularly useful for items carried between activities.
The same checklist recommends checking with the school which device, such as a laptop or tablet, best fits its learning programme. Preparing some lunch ingredients the night before can also make school mornings smoother. These are separate preparations, but they complement sorting labels by item and care routine.
Chlosha Creations: Personalised Name Labels
Chlosha Creations offers personalised labels to help identify children’s school belongings. Choose Personalised Name Labels or School Name Labels for a child’s name, or Personalised Icon + Name Labels when an extra visual cue could help. These UV DTF labels are for suitable smooth, hard surfaces such as drink bottles and lunchboxes, not fabric uniforms.
Chlosha’s labels use UV DTF transfer technology, with a clean, smooth finish and no background. Match the label to the item’s surface, and follow the application and care instructions. Hand wash labelled drink bottles and lunchboxes.
Explore the personalised name labels to find an option for your child’s school gear. Visit chlosha.co.nz to browse the range.
Make school prep easier to keep up with
Think of labelling as a small routine, not just a task for the start of term. When a new item joins the school bag, add it to your list and decide whether it needs a name. A quick check before each school week can also catch belongings that have been replaced, outgrown or moved into a different bag.
Your back-to-school checklist for NZ labels can be a handy reference throughout the year. Keep it somewhere easy to find, such as beside the family calendar, and update it when your child’s school gear changes. You’ll have a clear starting point next time new stationery, sports gear or a lunch container comes home.
If personalised labels are part of your next school-prep step, explore the name label range and choose an option that suits your child’s belongings. A little planning now can make the next round of school preparation feel more manageable.
Frequently Asked Questions
Which school items should be labelled with a child's name in NZ?
Label belongings that travel between home and school or are easily separated from your child. Add names to items such as library books, rain hats, art folders, musical instruments and sports equipment, alongside everyday lunch gear and stationery. Check the school’s stationery list for less obvious items, such as a calculator or recorder. For shared family items, use the child’s name rather than just a household surname.
Are iron-on, stick-on or stamp labels best for New Zealand school uniforms?
For fabric uniforms, choose a labelling method made specifically for clothing. Iron-on labels attach to fabric using heat, while a laundry stamp marks fabric with ink; follow each product’s instructions and the garment’s care label. Stick-on labels, including UV DTF transfers, are for suitable smooth, hard surfaces, not fabric. They can suit a lunchbox or bottle, but aren’t a uniform-label substitute.
