

How to Apply Helmet Name Stickers for a Professional Finish
Imagine picking up your child's expensive cycling helmet from the kindy lost-property bin, only to find the helmet name stickers you carefully applied are already peeling at the edges. It's a common frustration for parents and sports enthusiasts alike. Most standard stickers just aren't designed for the complex curves of protective gear. They often leave behind messy backgrounds or lifting corners that eventually trap dirt and fall off. Getting a professional finish on a curved surface can feel like a losing battle.
We all want our gear to stay organised and look sharp without the eyesore of a tatty label. This guide will show you how to use premium UV DTF transfers to achieve a sleek, printed-on look that actually survives the rough and tumble of the sports field. You'll learn the best way to label your gear with durable, no-background designs that stay put. We will cover specific application techniques for curved surfaces, essential safety advice from Waka Kotahi regarding helmet integrity, and how to ensure your personalised labels stay looking sharp through every weekend adventure.
Key Takeaways
- Prevent expensive gear mix-ups at the local skate park or kindy with clear, professional identification.
- Understand the difference between messy traditional labels and the sleek, no-background finish of UV DTF transfers.
- Master the simple technique for applying helmet name stickers to curved surfaces to ensure they stay put without peeling.
- Learn how to measure the flat areas of your gear correctly to choose the best font and size for a perfect fit.
- Discover essential care tips, including the 72-hour curing time, to help your personalised decals survive the elements.
Why Personalising Your Helmet is a Must for Kiwi Families
Helmets aren't exactly cheap these days. Whether you've just splashed out on a new motocross lid or a sturdy MIPS bike helmet for the kids, it's a significant investment in their safety. It's incredibly frustrating when that expensive gear goes missing or gets swapped by mistake at the skate park. High-quality helmet name stickers provide a simple, professional way to keep track of your equipment. For Kiwi families spending their weekends at the BMX track, the local park, or the school bike shed, clear identification is the easiest way to ensure your gear stays with its rightful owner.
Using a no-background transfer ensures the finish looks sleek rather than like a DIY project. Because these labels are designed to be durable, they can handle the sun, rain, and dirt that come with New Zealand's outdoor lifestyle. It's about protecting your investment while making sure the gear is always ready for the next adventure.
Reducing Lost Property at Sports Clubs
Walk into any sports club or school bike shed and you'll see a sea of identical gear. How many black bike helmets end up in the lost property bin every single term? It's a massive headache for busy parents. When gear is clearly labelled with helmet name stickers, it finds its way back to you much faster after the big game. It saves you the cost and hassle of replacing lost items that were simply misplaced in the excitement.
There's a real social benefit too. Coaches and teammates can quickly see everyone’s name on the field or at the track. This helps build team spirit and makes communication a lot easier during training sessions. It's much more personal when a coach can call a player by name rather than just pointing at a helmet.
Encouraging Safety Gear Ownership
Getting younger kids to keep their helmets on can sometimes be a bit of a battle. We've found that adding a personal touch is a "no dramas" way to encourage them to wear their safety gear. When kids help choose their own personalised name labels, they feel a real sense of ownership over their equipment. Choosing their favourite colours or icons turns a boring piece of plastic into a cool accessory they actually want to show off to their mates at kindy.
This ownership often leads to better habits. Children are much more likely to look after equipment they feel is truly theirs. It’s a great way to start teaching them responsibility for their own gear from an early age. These labels utilise a high-quality Pressure-Sensitive Adhesive that allows the transfer to bond securely to the smooth, curved surface of the helmet shell. Unlike old-fashioned paper stickers that peel or discolour, these modern transfers provide a smooth, raised finish that feels like a part of the helmet itself.
What are UV DTF Helmet Name Stickers?
If you've ever tried to use standard stickers on a bike or scooter helmet, you know the struggle. They often look like a cheap afterthought. UV DTF (Direct-to-Film) technology is the modern solution for families who want professional helmet name stickers without the hassle. These aren't your typical paper or vinyl labels. Instead, they are high-quality transfers that leave only the design behind. The result? A clean, smooth look that appears as if it were printed directly onto the helmet shell itself.
What makes these transfers special is the slightly raised, 3D effect. It gives your gear a tactile, premium feel that stands up to the elements. Because they are designed specifically for hard, smooth surfaces, they bond exceptionally well to the outer casing of protective gear. It's a durable choice for active kids and sports enthusiasts who need their identification to stay put through wind, rain, and mud.
The "No-Background" Advantage
Why do traditional stickers eventually look messy? Most have a clear or white plastic border. Over time, that border catches dust, starts to lift, or even turns a nasty yellow colour. UV DTF transfers completely skip the background. When you apply the transfer, only the name or icon remains. This seamless look is exactly what gives your gear that "pro" edge.
This technology is particularly useful for curved surfaces. Without a thick plastic background to worry about, the transfer can contour to the helmet’s shape much more effectively. It reduces the risk of those annoying creases or bubbles that often ruin a standard label. If you want to dive deeper into how this works, check out our UV DTF Transfers New Zealand: The Complete Guide to Premium No-Background Decals for all the technical details.
UV DTF vs. Traditional Vinyl
While traditional vinyl has its uses, it often has a "stuck-on" appearance. The edges are thicker; this means they are more likely to catch on your bag or clothing and start lifting. UV DTF is different. It provides a "printed-on" look that is much more integrated with the surface. This lower profile means there are fewer edges to snag during a busy day at the skate park or sports club.
Safety is always the priority when modifying protective gear. It's worth checking the OSHA guidelines on helmet alterations to understand how different adhesives and materials can interact with helmet shells. Our transfers are designed to be as non-invasive as possible while providing a secure bond. Are you ready to give your gear a professional upgrade? You can explore our range of personalised name labels to find the perfect style for your family.
Choosing the Perfect Size and Font for Your Gear
Before you place your order, it's worth taking a moment to think about where your helmet name stickers will actually live. Common spots include the back, the sides, or even the peak of the helmet. The back is a classic choice for team sports because it helps coaches and teammates identify players from behind. Side placement is often better for visibility when your child is riding their bike or scooter around the neighbourhood. Each spot has its own challenges, so choosing the right size is the first step toward that professional, "printed-on" finish we all want.
Font choice is just as important as placement. While a delicate script might look lovely on a drink bottle, it can be hard to read from a distance on a sports field. We recommend choosing bold, clean fonts that stand out clearly against the helmet shell. If you want to add a bit more personality, our Icon + Name Packs allow you to pair a name with a fun symbol, making it even easier for younger kids to spot their gear at kindy or school.
Measuring Your Helmet for a Perfect Fit
Helmets are rarely flat, which makes measuring a bit of a mission. Instead of using a rigid ruler, grab a flexible sewing tape measure to follow the curvature of the shell. You need to identify the "dead zone" where cooling vents, ridges, or safety bolts might interfere with the label. If you try to apply a transfer over a vent, the edges won't have enough surface area to bond properly. The ideal surface for application is clean, dry, and smooth. Once you've found a clear patch, measure the width and height carefully to ensure your chosen design fits comfortably within that space.
Selecting Colours for High Visibility
High contrast is the secret to a label that actually does its job. If the helmet is matte black or navy, white or bright yellow text will pop beautifully. For lighter helmets, darker text colours provide the best legibility. Many Kiwi families like to match the label colour to the bike or scooter frame for a coordinated, custom look. Just be careful with clashing patterns on the helmet itself; a busy graphic can make even the boldest name hard to read at a glance.
It's also a good idea to keep helmet safety standards in mind when personalising gear. Official guidance often suggests avoiding large attachments that could interfere with the helmet's performance. Because our UV DTF helmet name stickers are low-profile and have no thick plastic background, they offer a way to personalise without adding unnecessary bulk or weight to the protective shell.
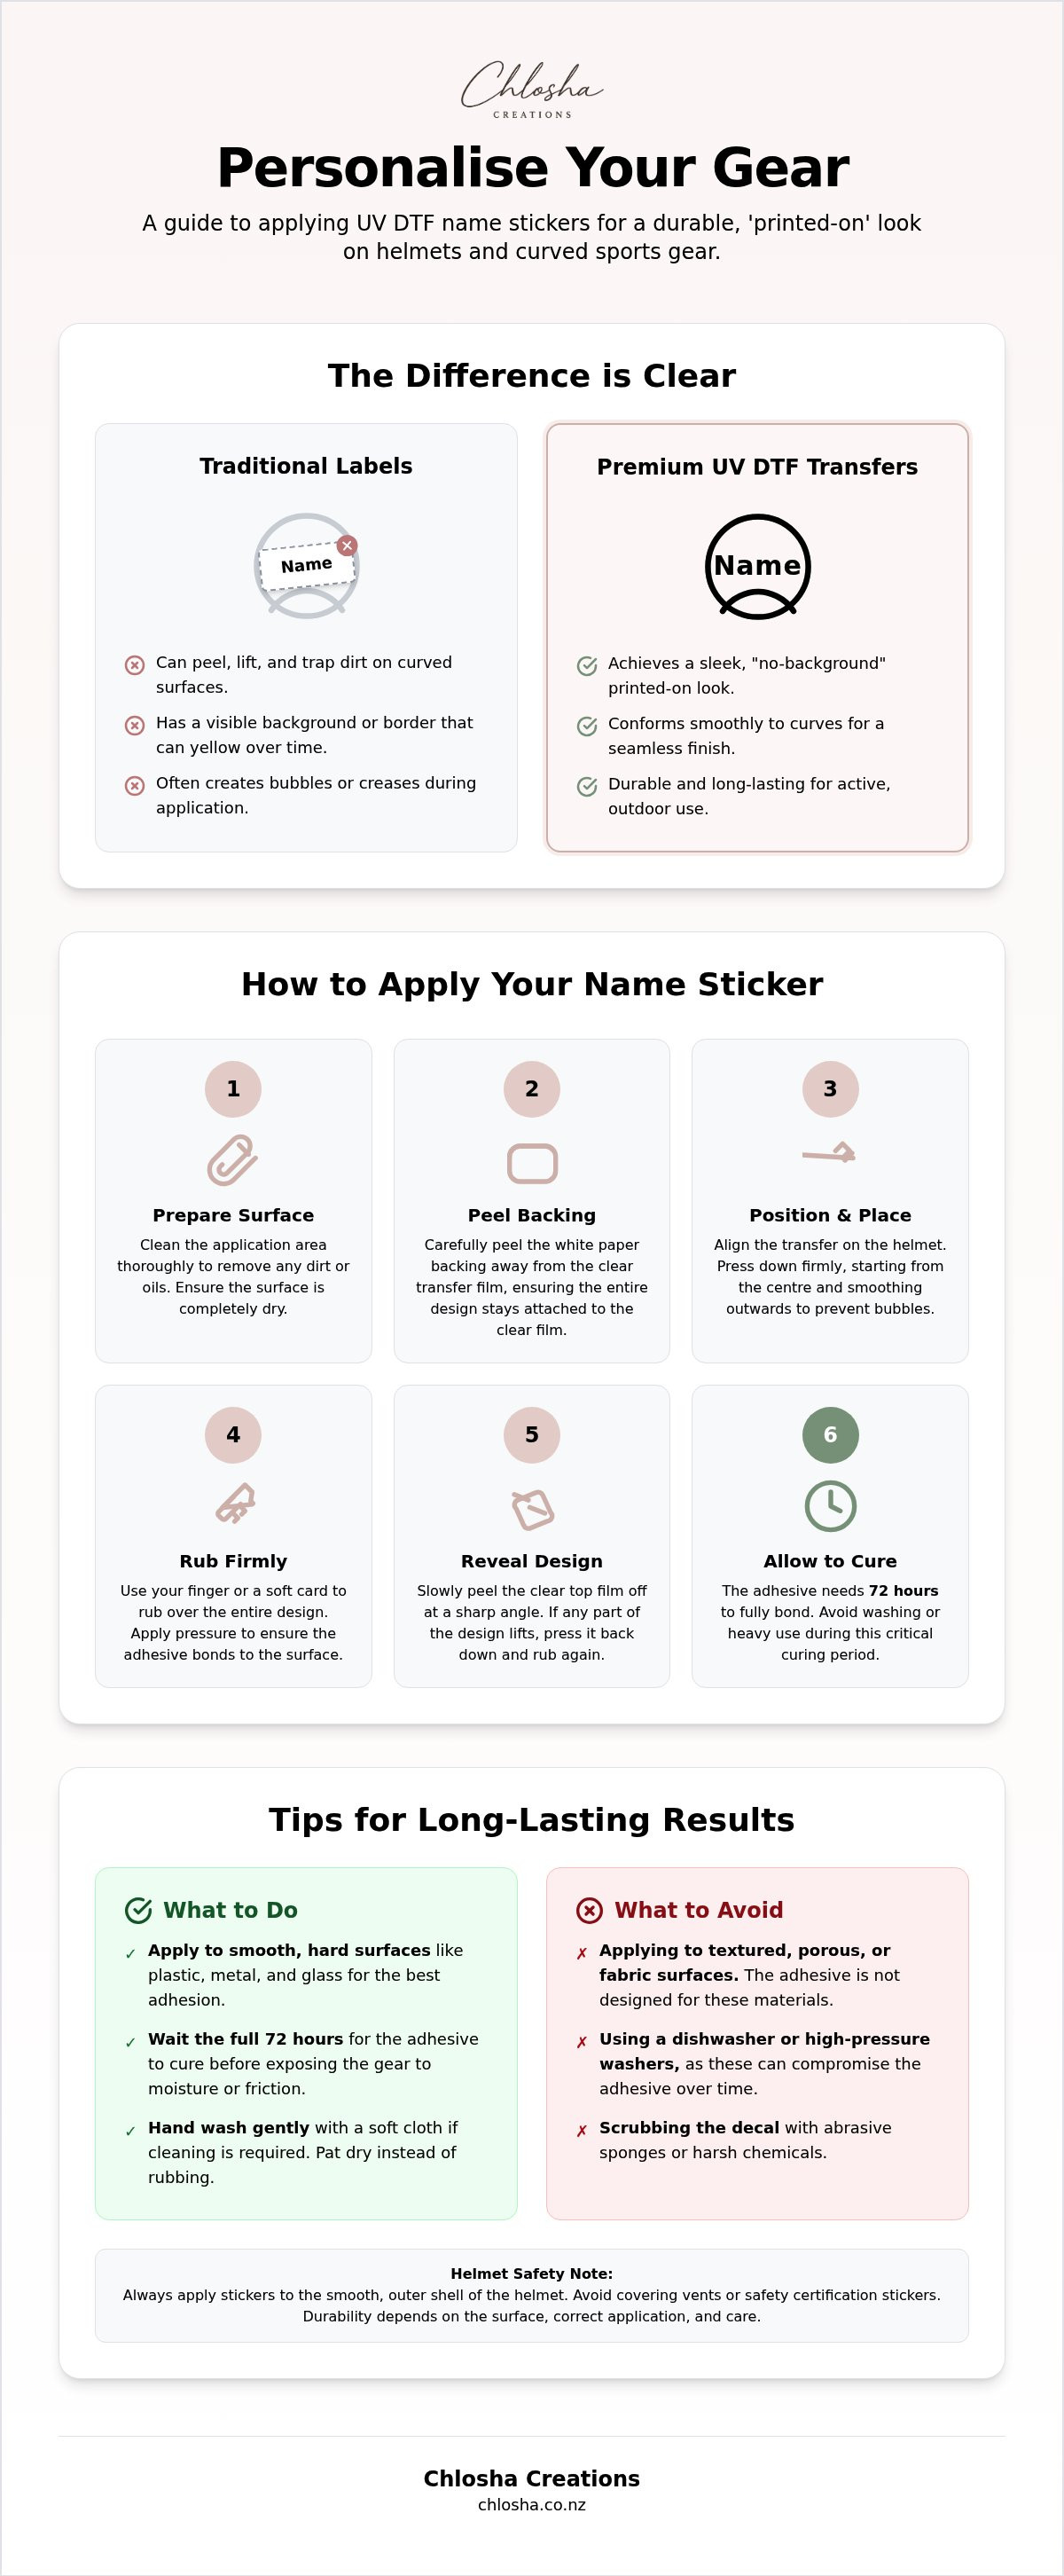
Step-by-Step: How to Apply Your Helmet Name Stickers
Applying labels to a flat lunchbox is easy. Applying helmet name stickers to a curved, spherical shell? That takes a bit more finesse. Proper preparation is the absolute secret to a long-lasting finish. If you rush the process, you risk edges lifting or trapped air bubbles. Set yourself up in a clean, dust-free environment. Have a squeegee or a credit card handy to help with the pressure. A little patience now ensures your gear looks professional for the long haul.
Preparation and Cleaning
You need a surface that is completely free of oils, wax, and road grime. Even a tiny bit of residue will stop the transfer from bonding properly. Skip the harsh industrial chemicals. A simple alcohol wipe or a bit of warm, soapy water usually does the trick. Once clean, dry the area thoroughly with a lint-free microfibre cloth. Any moisture left behind will interfere with the bond. Make sure the surface is bone dry before you even think about reaching for your transfers.
The Application Process
Ready to go? Follow these steps for a professional result:
- 1. Position the label carefully. Use a bit of masking tape to mark the spot if you're nervous. Don't remove the backing yet.
- 2. Press firmly from the centre. Once you're happy, peel the backing and press the transfer firmly from the centre outwards. This pushes air to the edges.
- 3. Ensure total contact. Use your squeegee or firm thumb pressure to rub over the entire design. Pay extra attention to the tips of letters.
- 4. The "low and slow" peel. Remove the clear carrier sheet at a very low angle. Keep it almost flat against the helmet shell. If the design starts to lift, stop. Press it back down and rub firmly before trying again.
The Secret for Curved Surfaces
Spherical surfaces are tricky because the transfer has to stretch slightly to fit the contour. Applying helmet name stickers to these areas requires a steady hand. If you find the carrier sheet is bunching up, use a warm hair dryer on a low setting. The gentle heat helps the transfer settle and become more pliable. Work in small sections. Smooth as you go to prevent creases from forming in the first place.
Once applied, give the label time to settle. We recommend allowing it to "cure" for at least 24 hours before you head out for a ride. This ensures the bond is as strong as possible before it faces the wind and rain. Want to get started on your own gear? You can browse our full range of personalised name labels to find a style that fits your helmet perfectly.
Long-Lasting Results: Caring for Your Personalised Decals
Once you've achieved that professional finish, the goal is to keep your helmet name stickers looking sharp for as long as possible. While our UV DTF transfers are designed for durability against the elements, their longevity really depends on how they are treated, especially in those first few days. The bond between the transfer and the helmet shell continues to strengthen over time. It's vital to avoid picking at the edges or subjecting the gear to heavy use immediately after application.
We recommend a "settling period" of at least 72 hours before you really put the gear through its paces. During this time, the adhesive is curing and forming a secure grip on the smooth surface. For more broad advice on maintaining your labels across all your gear, you can refer to The Ultimate Guide to Personalised Name Labels in NZ. Taking a little extra care early on makes a massive difference to the final result.
Cleaning Around Your Labels
Keeping your helmet clean is a big part of maintenance, but you need to be mindful of your new labels. If you've been out on the trails or at a muddy sports field, resist the urge to use a high-pressure hose directly on the transfers. The force can get under the edges of the raised 3D surface and cause them to lift. Instead, use a soft cloth and a bit of mild detergent for general cleaning. It's much safer for the finish and ensures the name stays clearly visible.
When you're finished washing, don't rub the area vigorously with a towel. This friction can snag the fine details of the lettering. Instead, gently pat the area dry with a microfibre cloth. Avoid using abrasive sponges or "magic" erasers, as these can scratch the premium UV DTF finish. A gentle touch is all that's needed to keep everything looking brand new.
Dealing with Scuffs and Wear
Let's be honest; helmets are designed to take a beating. Whether it's being tossed into a gear bag or a minor tumble at the skate park, scuffs are part of the game. The good news is that UV DTF technology is remarkably scratch-resistant compared to traditional options. However, if you do notice an edge starting to lift due to a heavy impact, you might be able to save it. Catching it early and applying a tiny bit of heat from a hair dryer can sometimes help the transfer re-adhere to the surface.
Eventually, every piece of gear shows its age. If your labels are starting to look a bit tired after a long season of sports, it might be time for a quick refresh. It's easy to remove the old transfers and apply a fresh Name Labels pack to get that "new gear" feeling all over again. Keeping your identification clear and professional ensures your investment remains protected and easy to find in the lost property bin.
Ready for Your Next Outdoor Adventure?
Personalising your family's gear doesn't have to look like a messy DIY project. By choosing the right technology and taking a bit of extra care during application, you can achieve a sleek, printed-on finish that stays put. Our helmet name stickers are specifically designed to contour to curved surfaces; this means no more peeling edges or discoloured backgrounds. We've covered the importance of proper cleaning, the secret of using gentle heat for tricky curves, and the patience required for a full 72-hour cure.
At Chlosha Creations, we take pride in being a family-run business based right here in New Zealand. Every transfer is locally made with a premium UV DTF finish, ensuring your bike, scooter, or sports helmets look professional and remain easy to identify at the local park or kindy. It is the perfect way to protect your investment while encouraging the kids to take ownership of their safety gear. Are you ready to give your equipment a high-quality upgrade that survives the rough and tumble of Kiwi life?
Browse our range of durable Helmet Name Stickers and find the perfect match for your gear today. We can't wait to help you get organised for your next big weekend out!
Frequently Asked Questions
Can I put stickers on a bike helmet without damaging it?
You should always check your helmet manufacturer's specific guidelines before applying any adhesive to the shell. Waka Kotahi NZ Transport Agency advises caution because certain glues can potentially weaken the protective materials of some helmets. While our transfers use a pressure-sensitive adhesive designed for hard surfaces, it is best to apply them to areas away from major impact zones. This helps you maintain safety standards while still keeping your gear organised and easy to identify.
Will these name stickers stay on in the rain?
Yes, our helmet name stickers are designed to be durable against the elements, including typical New Zealand wind and rain. Once the UV DTF transfer has had at least 24 hours to cure, it forms a strong bond with the smooth helmet surface. Unlike traditional paper labels that go soggy or peel when wet, these transfers provide a water-resistant finish that survives outdoor adventures. Just ensure the surface is bone dry during the initial application.
Can I remove the name stickers later if I sell the helmet?
You can remove these transfers, though they are designed to be long-lasting and won't just peel off on their own. If you need to refresh your gear or sell it on, you can gently lift an edge and peel the transfer away. Any remaining adhesive residue can usually be cleaned off with a bit of warm, soapy water or a mild citrus-based cleaner. This makes them a flexible option for families who want to keep gear in top condition.
What is the best font for helmet name stickers?
Bold, clean fonts are the best choice for helmet name stickers because they are much easier to read from a distance. While delicate script fonts look lovely on stationery, they can be hard to see when a child is zooming past on a scooter or bike. Choosing a thick, sans-serif font ensures the name pops against the helmet shell. High-contrast colours, like white text on a dark helmet, also help the identification stand out clearly at the skate park.
Do these stickers work on matte finish helmets?
Our UV DTF transfers work well on most smooth, hard surfaces, which includes many matte finish helmets. As long as the surface isn't heavily textured, grooved, or made of soft-touch silicone, the adhesive should bond effectively. It is essential to clean the matte surface thoroughly to remove any oils or fingerprints that might interfere with the transfer. A quick wipe with an alcohol pad ensures the no-background finish looks seamless and professional, regardless of the base sheen.
How long do I need to wait before using the helmet after applying the sticker?
We recommend waiting at least 24 hours before taking your helmet out for a ride. This initial curing period allows the adhesive to settle and form a secure bond with the helmet shell. For the absolute best results, try to wait up to 72 hours before exposing the gear to heavy rain or rigorous sports. Taking this extra bit of time at the start ensures your personalised name labels stay looking sharp and professional for the long run.
Are these stickers suitable for motocross or MX helmets?
Yes, these transfers are perfect for personalising motocross and MX helmets with a professional, printed-on look. Because they have no thick plastic background, they contour beautifully to the complex curves often found on racing gear. They are a popular choice for riders at the local track who want to stand out without the bulk of traditional vinyl. Just be sure to place them on a smooth area of the shell where they won't be constantly rubbed by straps.
Do I need a special tool to apply the name decals?
You don't need any expensive equipment; a simple credit card or a plastic squeegee is all that's required. The main goal is to apply firm, even pressure across the entire design to ensure total contact with the helmet. Using a firm edge helps push out any air bubbles and secures the fine details of the lettering. Apart from your squeegee and a clean microfibre cloth for preparation, the application process is straightforward enough for any parent to handle.
