

DIY Personalised Gift Ideas NZ: How to Create Professional Custom Gifts
Most DIY projects look like they were made at a kitchen table, but your next gift doesn't have to. We've all been there. You spend ages trying to line up a sticker, only to end up with a wonky edge or a bubble that won't budge. Even worse, that "personalised" drink bottle looks great for exactly one wash before the edges start to lift or the clear borders turn cloudy. It's frustrating when your thoughtful DIY personalised gift ideas NZ end up looking a bit amateur despite your best efforts.
You deserve a result that looks professional and lasts. It's time to ditch the peeling vinyl and visible outlines for something much better. You can actually achieve a sleek, raised finish that feels like it's part of the product. By using high-quality UV DTF decals, you'll transform everyday items into premium, custom gifts that look like they came straight from a boutique shop. We're going to show you how to get that seamless, no-background look with a fail-proof application. You'll learn how to create durable gear for school and sports that stays looking sharp, use after use.
Key Takeaways
- Discover why UV DTF technology creates a premium, raised finish that looks printed directly onto your gift without messy clear borders or peeling edges.
- Explore creative DIY personalised gift ideas NZ by matching the right decal colours and fonts to your specific drink bottles, lunchboxes, or storage items.
- Master a flawless application using simple household tools like a squeegee or hair dryer to ensure your custom decals sit perfectly flat and bubble-free.
- Learn the essential curing times needed to ensure your gifts are ready for daily use and can eventually handle a cycle in the dishwasher.
- Support local craftsmanship by sourcing high-quality, New Zealand-made transfers that offer a professional touch for your next heartfelt project.
The Emotional Value of DIY Personalised Gifts in NZ
Kiwis are a creative bunch. We love the idea of giving something that actually means something. These days, walking into a big-box store and grabbing a generic mug feels a bit hollow. The practice of gift-giving has always been about connection; a personalised touch takes that even further. When you put effort into DIY personalised gift ideas NZ, you're telling the recipient you truly know them. It's about more than just a name. It's about the care you've put into the selection.
Think about those milestone moments that fill our calendars. A kindy graduation isn't just a day. It's a huge step for a little one starting their school journey. A teacher appreciation gift isn't just a box of chocolates. It's a genuine thank you for a year of patience and guidance. Even a simple birthday present feels more significant when it features a custom design tailored to the person's interests. Why settle for generic when you can create something memorable? Personalising an everyday item transforms it from a "thing" into a keepsake. It adds immense value without needing a massive budget. You're creating something that won't just be tossed aside.
The "Homemade" vs. "Professional" Finish
We've all seen the "homemade" look that doesn't quite hit the mark. Paper labels peel after a few touches. Traditional vinyl stickers often have a thick, visible border that ruins the clean lines of a gift. If you're giving a present, you want it to look like it was professionally printed. This is where the "no-background" finish of UV DTF makes the difference. It provides a raised, sleek aesthetic that mimics high-end retail products. It's the secret to making your DIY project look like a premium boutique purchase rather than a craft room experiment. You get the satisfaction of making it yourself with the quality of a professional service.
Gift Ideas That Benefit from Personalisation
What should you personalise? Start with the basics that get used every day. Customised drink bottles and lunchboxes are perfect for helping kids keep track of their gear at school. You can also elevate home decor. Try applying decals to glass jars for candles or pantry organisation. For a smaller gesture, personalised keyrings and bag tags add a thoughtful touch to any set of keys or school bag. These items are practical. With a custom finish, they become special. It's about finding that balance between utility and heart. Small details make the biggest impact when it comes to showing you care.
Understanding UV DTF: The Secret to No-Background Custom Decals
When exploring DIY personalised gift ideas NZ, you quickly realise that the finish makes all the difference. UV DTF stands for Ultra-Violet Direct-to-Film. It's a special printing process where the ink is cured instantly by UV light. This creates a tough, raised texture that you can actually feel with your fingertips. Understanding UV DTF helps you see why it's different from anything you'll find in a standard craft shop. Instead of a flat sticker, you get a premium transfer that looks like it was printed directly on the surface by a professional manufacturer. This 3D effect adds a layer of sophistication that standard labels simply can't match.
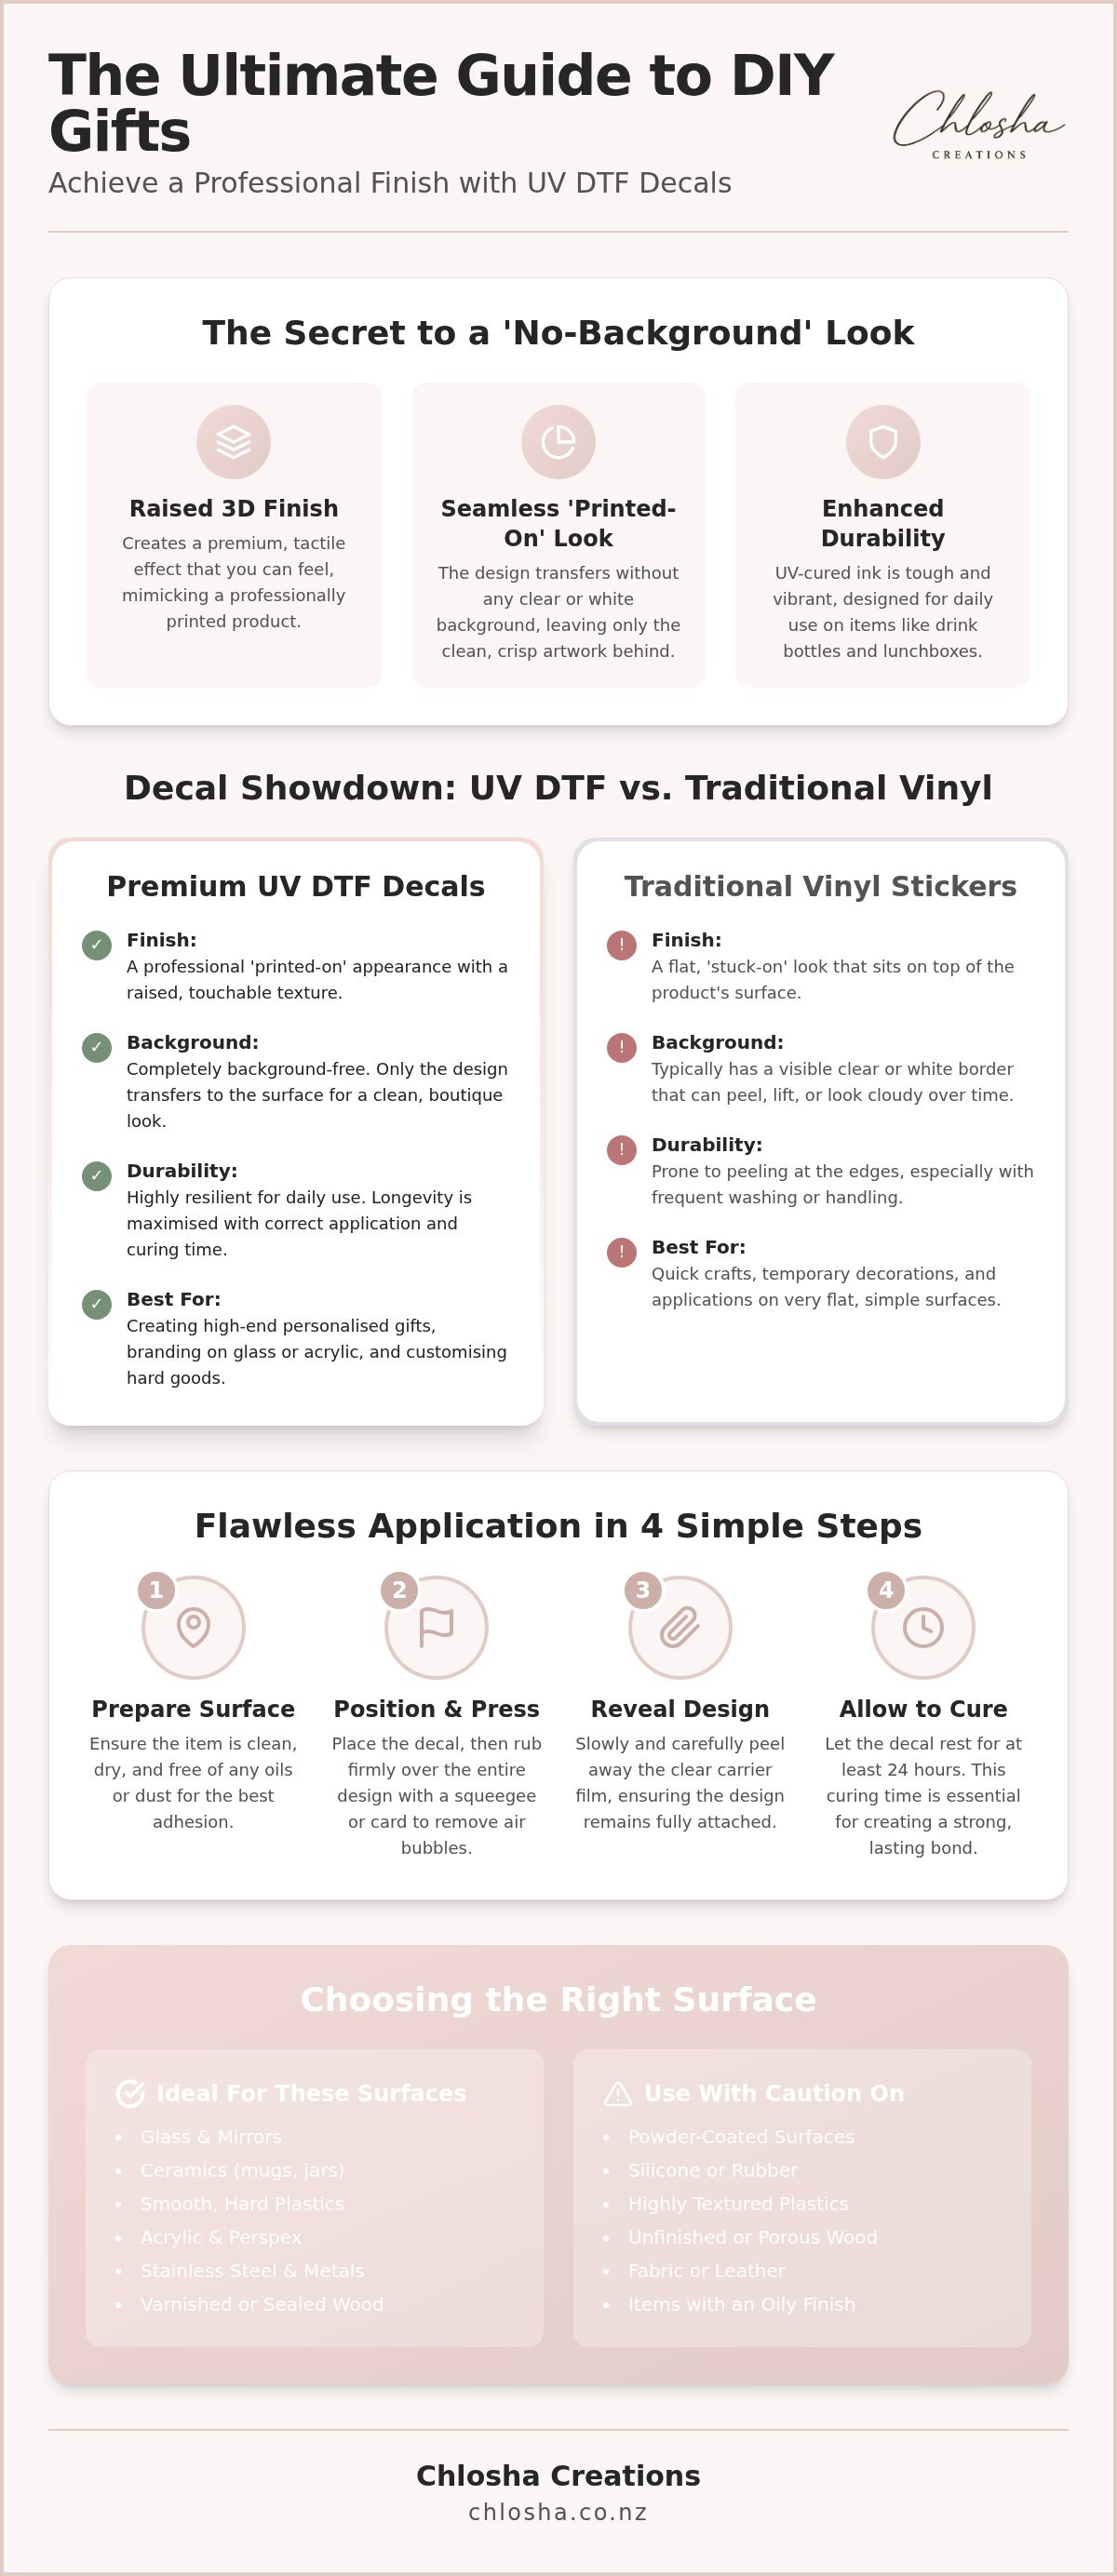
The real magic is the "no-background" finish. Traditional stickers come on a clear or white square of plastic. No matter how carefully you trim them, you can always see that edge. UV DTF transfers only leave the ink behind. When you peel the carrier sheet away, the design stands alone. It's clean, smooth, and incredibly professional. This makes it the perfect choice for high-end gifting where you want the focus on the design, not the sticker material around it.
The Technology Behind the Finish
How does it work? In simple terms, the ink is layered onto a film and then "dried" using high-intensity UV light. This curing process makes the ink hard and durable while maintaining its vibrant colour. When you apply it to a gift, the adhesive bonds strongly to the surface. Only the design itself remains. This looks especially stunning on glass jars, ceramic mugs, or clear plastics where a visible sticker border would usually stand out like a sore thumb. It gives your project a clean, high-end look that stands up to daily handling.
UV DTF vs. Vinyl: Why It Matters for Your Gift
Most people are used to vinyl labels. While vinyl has its place, it often has that "stuck-on" look. It sits on top of the item and can feel a bit thick. In contrast, UV DTF has a "printed-on" feel that is much more integrated. For a deep dive into the technical details, check out our UV DTF Transfers New Zealand: The Complete Guide. It explains why this technology is the premium choice for gifts that need to last.
These transfers are designed for real life. They are scratch-resistant and handle water well, provided they are applied to a clean, dry surface. For the best results, let the decal cure for 24 hours before use and wait 72 hours before any dishwasher exposure. If you're ready to start your next project, our personalised name labels are a great way to see this quality for yourself.
Selecting the Best Surfaces for Your Personalised Gift Decals NZ
Choosing the right surface is the secret to a gift that stays looking sharp for years. While generic advice often claims stickers work on "anything," that isn't quite the case for premium finishes. To make your DIY personalised gift ideas NZ really pop, you need a smooth, non-porous base. It's about finding that perfect match between the item and the transfer. Why spend time on a beautiful design if the surface won't let it shine? Think about contrast and scale. A white decal on a dark stainless steel bottle looks incredibly crisp. A delicate script font might look elegant on a glass candle jar, while a bold icon works better for a kid's lunchbox. Always measure your item before ordering. You want to ensure the decal doesn't wrap awkwardly around tight curves or get lost on a large surface.
Top Surfaces for Professional Results
For the best adhesion and that "printed-on" look, stick to hard, smooth materials. Hard plastics found in premium lunchboxes and school gear are ideal. They provide a stable surface that allows the UV-cured ink to bond tightly. Glass and ceramics are also top-tier choices. Whether it's a sleek spice jar or a personalised mug, the no-background aesthetic shines here. There's no cloudy sticker border to distract from your design. Metal surfaces, like stainless steel drink bottles or decorative tins, offer a modern, high-end feel. These materials are durable enough to handle the 24-hour curing period required before use, ensuring the bond is set before the gift is handled.
Materials to Avoid and Tricky Surfaces
Not every surface is a winner. You should avoid silicone and very soft, flexible plastics. These materials often have what's known as "low surface energy," meaning they naturally repel adhesives. If you can squeeze a bottle and it deforms easily, the decal will likely struggle to stay put. Textured, grooved, or "hammered" finishes are also problematic. The ink needs a flat plane to grip; tiny gaps in the surface can lead to lifting edges over time. This is why personalised name labels require specific smooth surfaces to perform their best. Fabric and raw wood are also unsuitable, as the UV DTF ink won't find the grip it needs on porous or fibrous materials. Stick to the "smooth and hard" rule, and your DIY projects will maintain that professional boutique look for much longer.
How to Apply Your Gift Decals for a Flawless Finish
Applying your transfers is the most rewarding part of the process. It's the moment your vision finally comes to life. While the technology is advanced, the method is simple enough to do at your kitchen table. Getting a professional result for your DIY personalised gift ideas NZ depends on patience and a few simple tricks. You don't need fancy equipment; a standard credit card or a plastic squeegee will do the job perfectly. The goal is to ensure the adhesive makes full contact with the surface, leaving you with that raised, premium finish we've discussed. It's about being methodical rather than rushing the result.
Step-by-Step Application Guide
Start by preparing your item. Even a tiny bit of dust or oil from your fingers can weaken the bond. Clean the area thoroughly with isopropyl alcohol or warm, soapy water. Dry it completely with a lint-free cloth. Once the surface is ready, position your decal carefully. It's often easier to line up one edge first. Press down firmly from the centre outward using your squeegee or credit card to push out any trapped air. Take your time with this step to ensure every detail is pressed flat against the surface.
The real secret to a professional look is the peel. Instead of pulling the carrier sheet straight up, use a low-angle technique. Fold the sheet back on itself and peel slowly, keeping it as flat against the surface as possible. If any part of the design lifts, simply press it back down and rub firmly before trying again. This ensures only the vibrant ink stays behind, creating that flawless, no-background aesthetic that makes your gift look like a custom retail purchase.
Pro Tips for Longevity and Care
If you're working with curved items like drink bottles or mugs, a little bit of heat goes a long way. Use a hair dryer on a low setting for a few seconds to help the decal conform to the shape. This softens the adhesive just enough to create a tighter grip on those tricky contours. For more inspiration on what you can create, our guide on DIY Personalised Gifts NZ: How to Create Premium Customised Gifts offers plenty of practical examples for home projects.
Patience is your best friend when it comes to durability. While the bond is immediate, the decal needs time to cure properly. Wait at least 24 hours before using the item normally. If the gift is likely to see water, give it a full 72 hours before any dishwasher exposure. This waiting period allows the transfer to set firmly. Ready to put these skills to the test? Browse our personalised name labels to find the perfect design for your next project.
Start Your DIY Project with Chlosha Creations
Choosing the right partner for your creative projects makes all the difference. Chlosha Creations is a family-run business based right here in Auckland. We take pride in helping you bring your DIY personalised gift ideas NZ to life with professional-grade materials. Every transfer we produce uses premium UV DTF technology, ensuring you get that raised, no-background finish every single time. It isn't just about labels; it's about providing the tools you need to create gifts that people will actually want to keep. By supporting a local business, you're getting craftsmanship you can trust and a personal touch that faceless retailers just can't match.
We understand that different projects require different solutions. That's why we've designed our packs to be as flexible as possible. Whether you're looking for our Classic pack for a few items or the Mega pack for a full household reorganisation, we have you covered. Our transfers are specifically designed for durability on items like drink bottles and lunchboxes, making them a reliable choice for busy families. Because we manufacture everything in Auckland, we maintain strict quality control over every sheet that leaves our workshop. You aren't just buying a sticker; you're investing in a finish that lasts.
Our Range of Personalised Gift Solutions
If you're creating gifts for the little ones in your life, you'll love our Personalised Icon + Name Packs. These combine clear, easy-to-read text with fun graphics that kids recognise instantly. It's the perfect way to add personality to school gear or kindy supplies. We also cater to professionals. Our custom business logo transfers are ideal for corporate gifting, allowing you to brand premium items without the cost of large-scale factory printing. For those who love to experiment, our DIY decal sheets provide a variety of designs to use across multiple home projects. There's a solution for every creative spark.
Easy Online Ordering and National Delivery
We've made the ordering process as simple as possible. Just choose your design, enter your custom names, and we'll handle the rest. We offer reliable shipping across New Zealand, so you can get started on your project no matter where you're located. If you're based in Auckland, we also offer a local pickup option for those who want to get their hands on their decals even faster. We're here to support your gifting journey from the initial idea to the final application. Ready to see the difference for yourself? Browse our range of Personalised Gift Decals NZ and start your next project today!
Elevate Your Gifting with Professional Touches
Personalising a gift is about making a genuine connection. By choosing UV DTF technology, you can ditch the "stuck-on" look of traditional stickers for a premium, raised finish. This no-background aesthetic transforms ordinary items into boutique-quality keepsakes that your friends and family will cherish. It's the simplest way to ensure your projects look like they were made by a professional manufacturer rather than at a kitchen table.
Success comes down to the details. Focus on smooth surfaces and respect the curing times to ensure your designs stay looking sharp through daily use. As a family-run Auckland business, Chlosha Creations provides the high-quality transfers you need for all your DIY personalised gift ideas NZ. With national NZ shipping and local Auckland pickup available, your next creative project is closer than you think. You have the tools and the knowledge; now it's time to let your creativity shine.
Ready to get started? Browse our range of Personalised Gift Decals NZ and start your next project today! We look forward to helping you create something truly special.
Frequently Asked Questions
Are personalised gift decals dishwasher safe?
Our decals are durable enough for dishwasher use once they've had sufficient time to bond. You must wait at least 72 hours before exposing your customised items to a dishwasher cycle. This ensures the adhesive has fully set on the smooth, hard surface. While they handle water well, we don't claim they're indestructible; longevity always depends on the surface type and how carefully the application steps were followed.
Can I apply these decals to curved surfaces like drink bottles?
You can certainly apply these decals to curved items like drink bottles and mugs. The flexible nature of the transfer film allows it to conform to rounded shapes quite easily. If you find the design is fighting a tight curve, a quick blast from a hair dryer on a low heat setting will help it settle. This is a popular choice for many DIY personalised gift ideas NZ projects involving school gear.
What is the difference between UV DTF and regular vinyl stickers?
The main difference is the finish and the material. Regular vinyl stickers often have a visible clear or white border around the design, giving them a "stuck-on" look. UV DTF transfers leave only the ink behind, resulting in a clean, no-background appearance. They also feature a slightly raised, 3D texture that feels more integrated into the product. We don't sell traditional vinyl or paper stickers because we prefer this premium aesthetic.
How long do the decals need to cure before I can use the gift?
Patience is vital for a long-lasting result. You should wait approximately 24 hours before using your gift for normal daily activities. If the item needs to be washed, wait a full 72 hours before it goes near water or a dishwasher. This curing period allows the adhesive to reach its maximum strength on the surface. Rushing this process might lead to the edges lifting earlier than expected.
Will the decal peel off if it gets wet?
Our transfers are designed to be water-resistant and durable, so they won't simply peel off when they get wet. However, their performance depends heavily on the surface they are applied to. They bond best to smooth, hard materials like glass or high-quality plastic. If applied to unsuitable materials like silicone or textured surfaces, the bond won't be as strong. Correct cleaning before application is the best way to prevent peeling.
Can I use these decals on wooden gift boxes?
We don't recommend applying these decals to raw or textured wooden surfaces. The ink needs a smooth, non-porous base to grip properly; the fibres in wood can prevent a total bond. If your gift box has a very smooth, high-gloss lacquered finish, it might work, but generally, it's safer to stick to glass, metal, or hard plastics. Always test a small area if you're unsure about a specific material.
What happens if I make a mistake during application?
If you notice the decal isn't sitting straight or a bubble has formed during application, try to address it before peeling the carrier sheet. Use a squeegee or credit card to firmly push the air out toward the edges. If the design starts to lift while you are peeling the sheet, stop immediately. Lay the sheet back down, rub the area firmly with your thumb, and try peeling again at a much lower angle.
Do you offer local pickup for Auckland customers?
Yes, we offer a local pickup option for our Auckland-based customers. This is a great way to save on shipping costs and get your order sorted quickly for last-minute gifting. When you check out online, simply select the pickup option rather than national delivery. We'll send you a notification as soon as your personalised decals are ready to be collected from our family-run workshop. It's a convenient way to support local craftsmanship.
