

How to Choose Name Label Dimensions for Clear, Visible Text
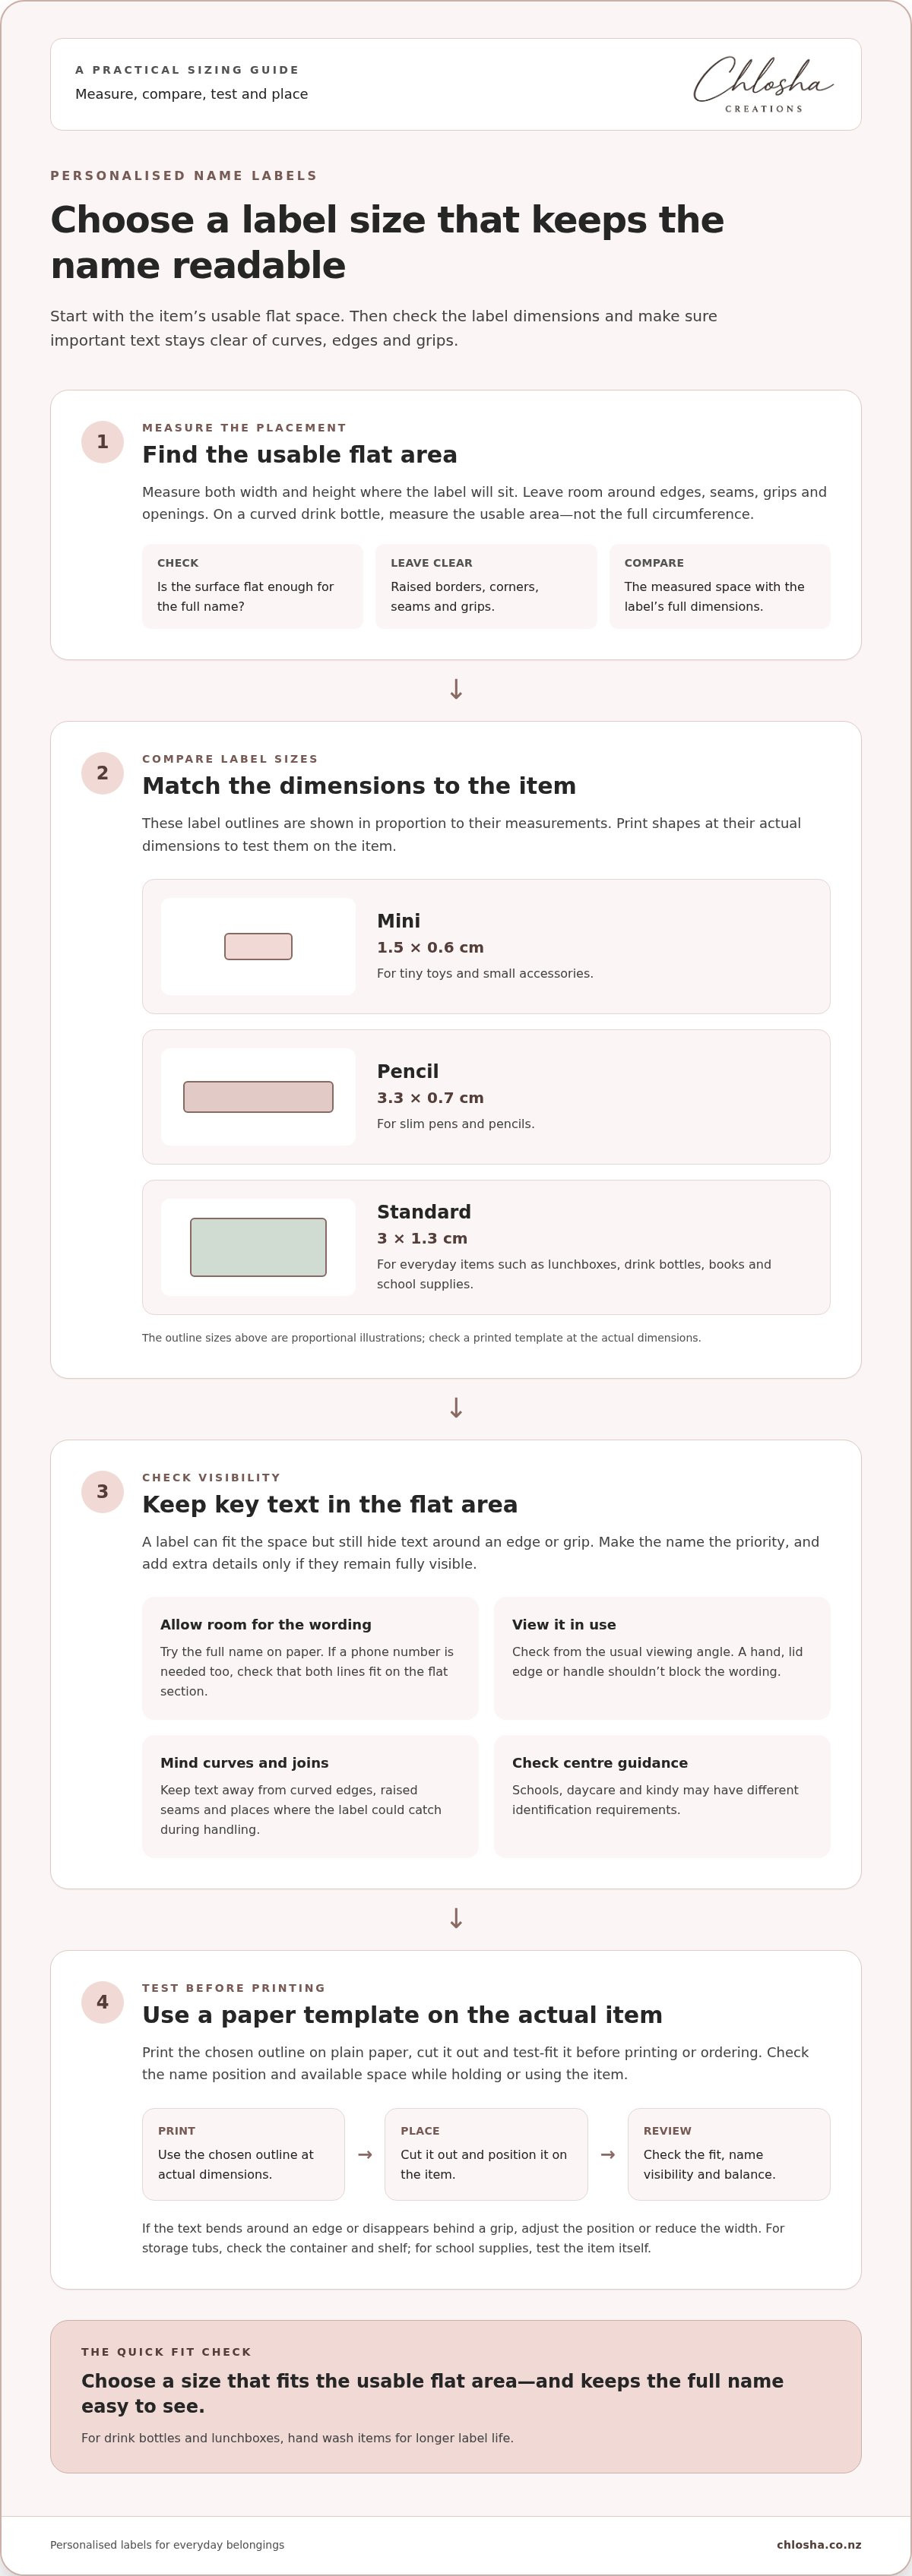
Choosing the right size name label starts with the item it needs to fit. Mini labels measure 1.5 x 0.6 cm for small belongings, pencil labels measure 3.3 x 0.7 cm for slim items, and standard labels measure 3 x 1.3 cm for everyday items such as lunchboxes, drink bottles, books and school supplies. The best fit leaves key text visible on a flat area without wrapping around tight curves or folds.
A label that looks roomy on paper can feel cramped on a curved bottle, while a small one may not leave enough space for a name and extra detail. Choosing the right size name label is a practical decision, especially when one set needs to suit different school and daycare belongings.
This guide explains how to measure the usable space, keep important text visible and choose a consistent size. You’ll also learn how to test a paper template on the item and position the label so curves and edges don’t crowd the text.
Key Takeaways
- Match the label shape and dimensions to the item, and test a paper template on it before ordering.
- Keep names and other important details within the flat, visible area, clear of edges, seams and grips.
- Use one clear sizing format consistently so each label is easy to understand at a glance.
- For curved or folding surfaces, check how the label sits in place and adjust its position to keep text readable.
- Choose a label size that suits the belongings being named, from small accessories to school essentials.
What Size Name Labels Should You Choose?
For items that are washed, handled or used outdoors, choose a size that fits a stable flat area and keeps the name visible. New Zealand schools and early childhood centres may have different identification needs, so follow their instructions and match the label to each item.
-
Measure placement with a printable ruler
Print a ruler at its intended scale, then measure the flat space where the label will sit. Check both width and height, and leave room around edges, seams, grips or openings. On a curved drink bottle, measure the usable area rather than the full circumference; a label that wraps too far may be harder to read. Compare the space with the label’s full dimensions before choosing.
-
Compare sizes using printable shapes
Print label shapes at their actual dimensions, cut them out and place them on the item. Compare the options side by side: mini labels at 1.5 x 0.6 cm suit tiny toys or small accessories, while pencil labels at 3.3 x 0.7 cm fit slim pens and pencils. A standard label measuring 3 x 1.3 cm gives more room for a name on lunchboxes, books or school supplies.
Check that a paper mock-up sits neatly without crossing a curved edge. A larger label can hold more text, but it shouldn’t crowd the item or extend onto a surface that interrupts the name.
-
Weigh item use and school guidance
Choose a position and size that keeps the name easy to spot during everyday use. On drink bottles and lunchboxes, leave space around curves and grips, and hand wash the items for longer label life. Avoid placing labels where their edges may catch during regular handling. Ask the school, daycare or kindy what identification details it expects. There isn’t one label size that suits every item or centre.
For storage tubs or inventory, a printed label can identify contents, categories or ownership. Keep the wording brief enough to read from where the container is stored.
-
Test a paper template before printing
Print the chosen label outline on plain paper, cut it out and test-fit it on the actual item before printing or ordering. Check the name’s position, available text space and how the outline sits when the item is held or used. For custom packaging or garment size information, test a sample on the intended hang tag or packaging first. Printed size information belongs on a suitable tag or package, not directly on fabric.
Use the test to refine the dimensions before a larger printing run. For home storage, try the same paper outline on the container and shelf; for school supplies, test it on the item itself. This simple check helps show whether the label looks balanced and leaves the important text clear.
Keeping key text in the visible flat area
Place the name and essential details within the item’s flat, visible area. A label may fit the space but still hide text around an edge or grip.
- Measure the full flat section before settling on label dimensions. On a lunchbox lid, measure the usable width and height, not the whole lid. Keep the name away from raised borders and corners. Treat curved edges as outside the main text area. That keeps the central wording clear when the lunchbox is viewed from above or held during everyday use.
- Allow space for the name before adding extra details. Write the full name on paper and place it over the measured area. If the label also needs a phone number, check that both lines fit within the flat section. Don’t let the final letter or digit fall onto a curve. A short name may fit comfortably, while a longer surname may need more width.
- Leave space beside seams, grips and joins. A raised seam on a drink bottle can interrupt a line of text, while a hand may cover the label when the bottle is picked up. Position the wording so it remains visible in use. On a storage container, make sure a lid edge or handle won’t block the name.
- Check visibility from the angle people will use to identify the item. A label on a lunchbox lid should be readable from above; a storage tub label may need to face forward on a shelf. Place a paper mock-up on the item and view it from the usual direction. If the text bends around an edge or disappears behind a grip, adjust the position or reduce the width.
- Keep the most important wording in the flattest area, then use any remaining space for secondary details. For example, make the name the central line and place an additional detail beneath it only if both lines remain fully visible. This helps someone identify the item quickly without turning it to find the rest of the text. Once the layout fits, explore personalised name label options for everyday belongings.
Keeping size formats consistent
Use one clear sizing system across related garments or products. Consistency helps people compare sizes quickly and reduces confusion when labels appear together.
- Choose a format for each product range, then use it consistently. A children’s clothing range might show height in centimetres, while dresses may use numeric sizes such as 2, 4, 6, 8 and 10. Avoid switching between formats on similar items without a clear reason. A consistent approach makes a label easier to scan and helps customers compare garments within the same range.
Record the chosen format in a simple style guide. Include the order of information, capitalisation and spacing. For example, if a label uses a number followed by a height measurement, keep that order across every size.
- Match the size format to the information people need. A children’s clothing tag may use a height measurement such as 110 CM. A hat label may show a head measurement such as 56-58 CM. These examples communicate different measurements, so name or position each one clearly. Don’t present a measurement as though it were a garment size; the number needs to make sense for that product.
Keep the same unit and style across a product group. If one hat label uses centimetres, use centimetres on the others too. This makes comparisons straightforward.
- Consider where garments will be sold before finalising a sizing format. Clothing makers should keep sizing consistent within their brand and consider the standards in the countries where they sell. If a range is intended for different markets, decide how to make size information clear across them. Use the selected format consistently on product labels and packaging.
Avoid changing the meaning of a size between garments in the same range. If the format needs an explanation, use the same brief wording wherever that size appears.
- Separate size information from other details so readers can find it quickly. On a clothing tag, use a clear size line and put material or care details elsewhere. Make the size easy to distinguish from the product name, colour or fabric description. When space is limited, prioritise the size information people need to choose or sort the item.
Review a group of labels together before printing. Compare several sizes, from smallest to largest, and check for consistent units, spacing and information order. Correcting differences before production keeps the range coherent.
Label dimensions and folding
Folds, rounded sides and tapered shapes can change how much label area stays flat. For clothing care information, use a suitable hang tag or packaging rather than applying a label directly to fabric. A 3 x 1.3 cm name label fits only if the tag has enough flat space for it.
- Keep the full label on one flat panel, away from a fold or crease. On a folded garment tag, place the wording where it won’t bend when the tag is tucked inside clothing. A crease through the text can distort letters and make it harder to read. Leave the fold clear, and use a separate flat section if the tag has more than one panel.
Check how the tag sits when the garment is worn and folded for storage. Keep the label on the tag’s flat face rather than wrapping it around an edge.
- Allow for the way a container narrows or curves. A bottle that tapers towards its neck has less usable space near the top than around its middle. Choose a shorter label for that section and keep its corners away from tight curves. This helps prevent the edges from crossing onto a sharply curved surface.
On a rounded surface, measure across the curve and make the label slightly narrower than the full curved area. Keep its edges resting on the surface instead of forcing them around the sides.
- Keep seams and joins outside the label’s footprint. A seam can create a ridge beneath a label, while a corner can stop an edge from sitting flat. On a small container, allow room for seams and any narrowing near the base or lid. Don’t place a label across a corner, where bending it around the edge can affect adhesion.
Choose a position where the whole label rests on one continuous, smooth surface. For example, move a bottle label away from a moulded join so its edge doesn’t cross it.
- Consider how folding affects tags and packaging, not just the label’s initial position. A hang tag may bend during handling, and a folded package may crease across its printed information. Keep essential wording on a section that stays flat in normal use. If the package folds through the intended label area, move the information to a panel that remains visible and uncreased.
For clothing size details, keep the printed information legible when the tag is turned or handled. Place it away from the tag’s fold line, and keep the fabric itself free of the label.
Label readability and visibility
Readability depends on more than label dimensions. Clear wording, strong contrast and a simple layout help people understand names and size details quickly.
- Choose lettering that remains easy to distinguish at the intended size. Print a sample with the actual name and check whether any letters merge or become hard to recognise. Names with narrow letters or long surnames may need a simpler typeface and less decoration. A clean, familiar font is often easier to scan on a small label.
- Use clear contrast between the text and its background. If the colours are too similar, the name can be difficult to spot at a glance. Compare the text against the label colour before finalising the design. Don’t rely on subtle colour differences to separate a name from an icon or other detail.
- Keep the wording concise so every detail remains readable. A first name may be enough for a lunchbox, while a shared item might need a surname too. Add a phone number only if it serves a practical purpose and remains legible. Remove decorative wording that doesn’t help identify the item.
- An icon can help younger children who aren’t yet reading confidently recognise their belongings. Pair a familiar icon with the child’s name for items used at kindy or school. Keep the icon distinct from the lettering so neither competes for attention. Mini and pencil label formats don’t include icons, so prioritise readable text on these smaller styles.
- For clothing size information, make the size identifiable in one quick glance. Use a consistent, uncluttered presentation so the size stands apart from the brand name or other wording. For example, a clear “6-7Y” or “110 CM” size line is easier to scan than a dense block of mixed details. Choose one format and apply it consistently across the garment range.
For names and icons on everyday belongings, explore personalised name label options and choose a design that keeps the wording easy to recognise.
Chlosha Creations: Personalised Name Labels
Chlosha Creations offers personalised name labels for families organising school, daycare and everyday belongings. Once you’ve measured the available space and decided what needs to be visible, choose a label size and style that suit the item and the child using it.
Personalised Name Labels provide a simple way to identify belongings, while Personalised Icon + Name Labels pair a name with an icon. Kids Name Labels and School Name Labels are useful for marking items headed to class or kindy. Chlosha’s premium UV DTF transfers have a clean, smooth, no-background finish for suitable surfaces. For drink bottles and lunchboxes, hand washing is recommended.
Ready to find an option that fits your measured space? Visit chlosha.co.nz to explore personalised name labels.
Make your next label choice with confidence
As school and family routines change, the belongings that need identifying can change too. Revisit what your child uses, replace labels when needed and choose designs they can recognise easily. Choosing the right size name label can make the next update simple and purposeful.
When you’re ready to find labels for the items you use now, explore personalised name label options. A considered choice can help make the next school day feel that little bit more organised.
Frequently Asked Questions
What Sizes Are Available?
Name labels come in different dimensions and shapes, rather than one universal set of sizes. Common examples include mini labels at 1.5 x 0.6 cm, pencil labels at 3.3 x 0.7 cm, and standard labels at 3 x 1.3 cm. Some packs also provide several dimensions together. Check the actual measurements and intended surface, as size names such as “small” can differ between label ranges.
Which Label Size Works Best for Everyday Situations?
A mix of sizes can help when labelling belongings with different shapes and available spaces. A slim label may suit a pencil case or pen, while a wider one can provide more room on a lunchbox or storage container. Before choosing, consider what information needs to fit and where people will identify the item. A shared family storage tub may need more text than a child’s drink bottle.
What size name labels are best for school uniforms and clothing in New Zealand?
For clothing, put printed information on a suitable garment tag or packaging, not directly on fabric. UV DTF transfers are intended for smooth, hard surfaces, not uniforms, fabric or clothing seams. For a hard accessory used with a uniform, such as a smooth lunch container, measure its flat surface. Keep garment size information on an appropriate hang tag or package.
What size name labels fit school stationery, lunchboxes, and drink bottles?
For stationery, a slim pencil label measuring 3.3 x 0.7 cm is a useful shape to compare with pens or pencils. A standard 3 x 1.3 cm label offers more room on a flat lunchbox area or school supply. For drink bottles, check the material and shape: UV DTF transfers are for smooth, hard surfaces, and a flatter area is easier to label than a tapered or textured section.
How do I measure an item to choose the right name label size?
Measure the usable space, not the whole item. On a bottle, use a flexible tape to follow the curve, noting where the surface tapers or becomes textured. On a lunchbox, measure the flat panel between raised edges. You can also cut a paper shape to the intended dimensions and place it on the item. Check the fit from the angle someone will use to read the name.
What are the standard dimensions of small, medium, and large name labels?
There’s no single size standard for every label range. As one specific example, a Classic Name Pack uses large labels measuring 120 x 32 mm, medium labels measuring 55 x 15 mm, and small labels measuring 33 x 8 mm, on a 140 x 200 mm sheet. An Icon + Name Pack has different dimensions for its three sizes. Compare the individual label measurements, not just the size names.
Are iron-on, stick-on, and sew-on name labels available in different sizes?
These terms describe different ways of attaching labels, so their sizes don’t mean they’re interchangeable. Chlosha’s UV DTF name labels are transfers for suitable smooth, hard surfaces, such as compatible bottles or lunchboxes. They aren’t iron-on or sew-on clothing labels and shouldn’t be applied to fabric. Put garment size information on a suitable hang tag or package instead.
How do name label sizes compare for readability and available text?
A larger label usually gives more room for a full name or extra detail, while a compact one may suit a small item with limited space. Choosing the right size name label means considering the actual wording, not just the item’s dimensions. Test the longest surname or any extra text with a paper mock-up. If you add an icon, leave enough clear space so it doesn’t crowd the name.
