

How to Choose QR Code Decal Size and Placement for Your Business
A QR code decal can turn a small patch of packaging, a window or a counter into a direct route to your website, promotion or other business content. For custom QR code decals for businesses, the code should be around 2 x 2 centimetres at minimum to scan, with the final size guided by viewing distance and placement. Test it from different angles and in different lighting before putting it to work.
It’s easy to focus on the code itself, but a useful scan starts with a clear reason for customers to reach for their phone. A discount, product details, a booking page or social channels can all work, depending on where the decal is placed and what you want people to do.
This guide covers choosing a scan incentive, sizing and positioning your decal, and checking that the code works in real conditions. It also shares practical ways to use QR codes on shopfronts, products, packaging and at events, so you can choose an approach that suits your business and customers.
Key Takeaways
- Choose a clear destination for each QR code, such as a website page, review form or promotion, and give customers a reason to scan.
- Add UTM tags to the destination URL before generating the code if you want to track scan activity.
- Keep the QR code at least 2 x 2 centimetres, then adjust its size to suit the viewing distance and available space.
- Place the code where it’s easy to notice and reach, and test it from different angles and in different lighting before use.
- Match the placement to the purpose, from product information on packaging to event details at a venue.
What’s a QR code sticker?
A QR code decal carries a scannable pattern that opens digital content on a phone. A custom code can lead to your website, a review page, a promotion or an online shop. For example, a code on a product box can connect the item with its instructions or further details. Make sure the destination matches the message beside the code.
Materials vary across the wider decal market. One general example is 2.5 mil polished flexible calendered vinyl, but that material description does not describe UV DTF transfers. For any decal, consider the surface, finish and setting together. A code on a smooth counter panel has different needs from one exposed on an outdoor display.
For New Zealand advertising, make the reason to scan clear before anyone uses their phone. Add a short description beside the code, such as “View the menu” or “See the offer”, and ensure the linked page delivers on that message. On packaging or vehicle decals, keep claims accurate and never place instructions where they could distract people on the road.
Outdoor performance depends on the material and printing. Water-resistant printing material may suit outdoor or damp settings, but that description alone does not confirm UV resistance or weatherproof performance. Choose material to suit the conditions and test the printed decal where you intend to use it.
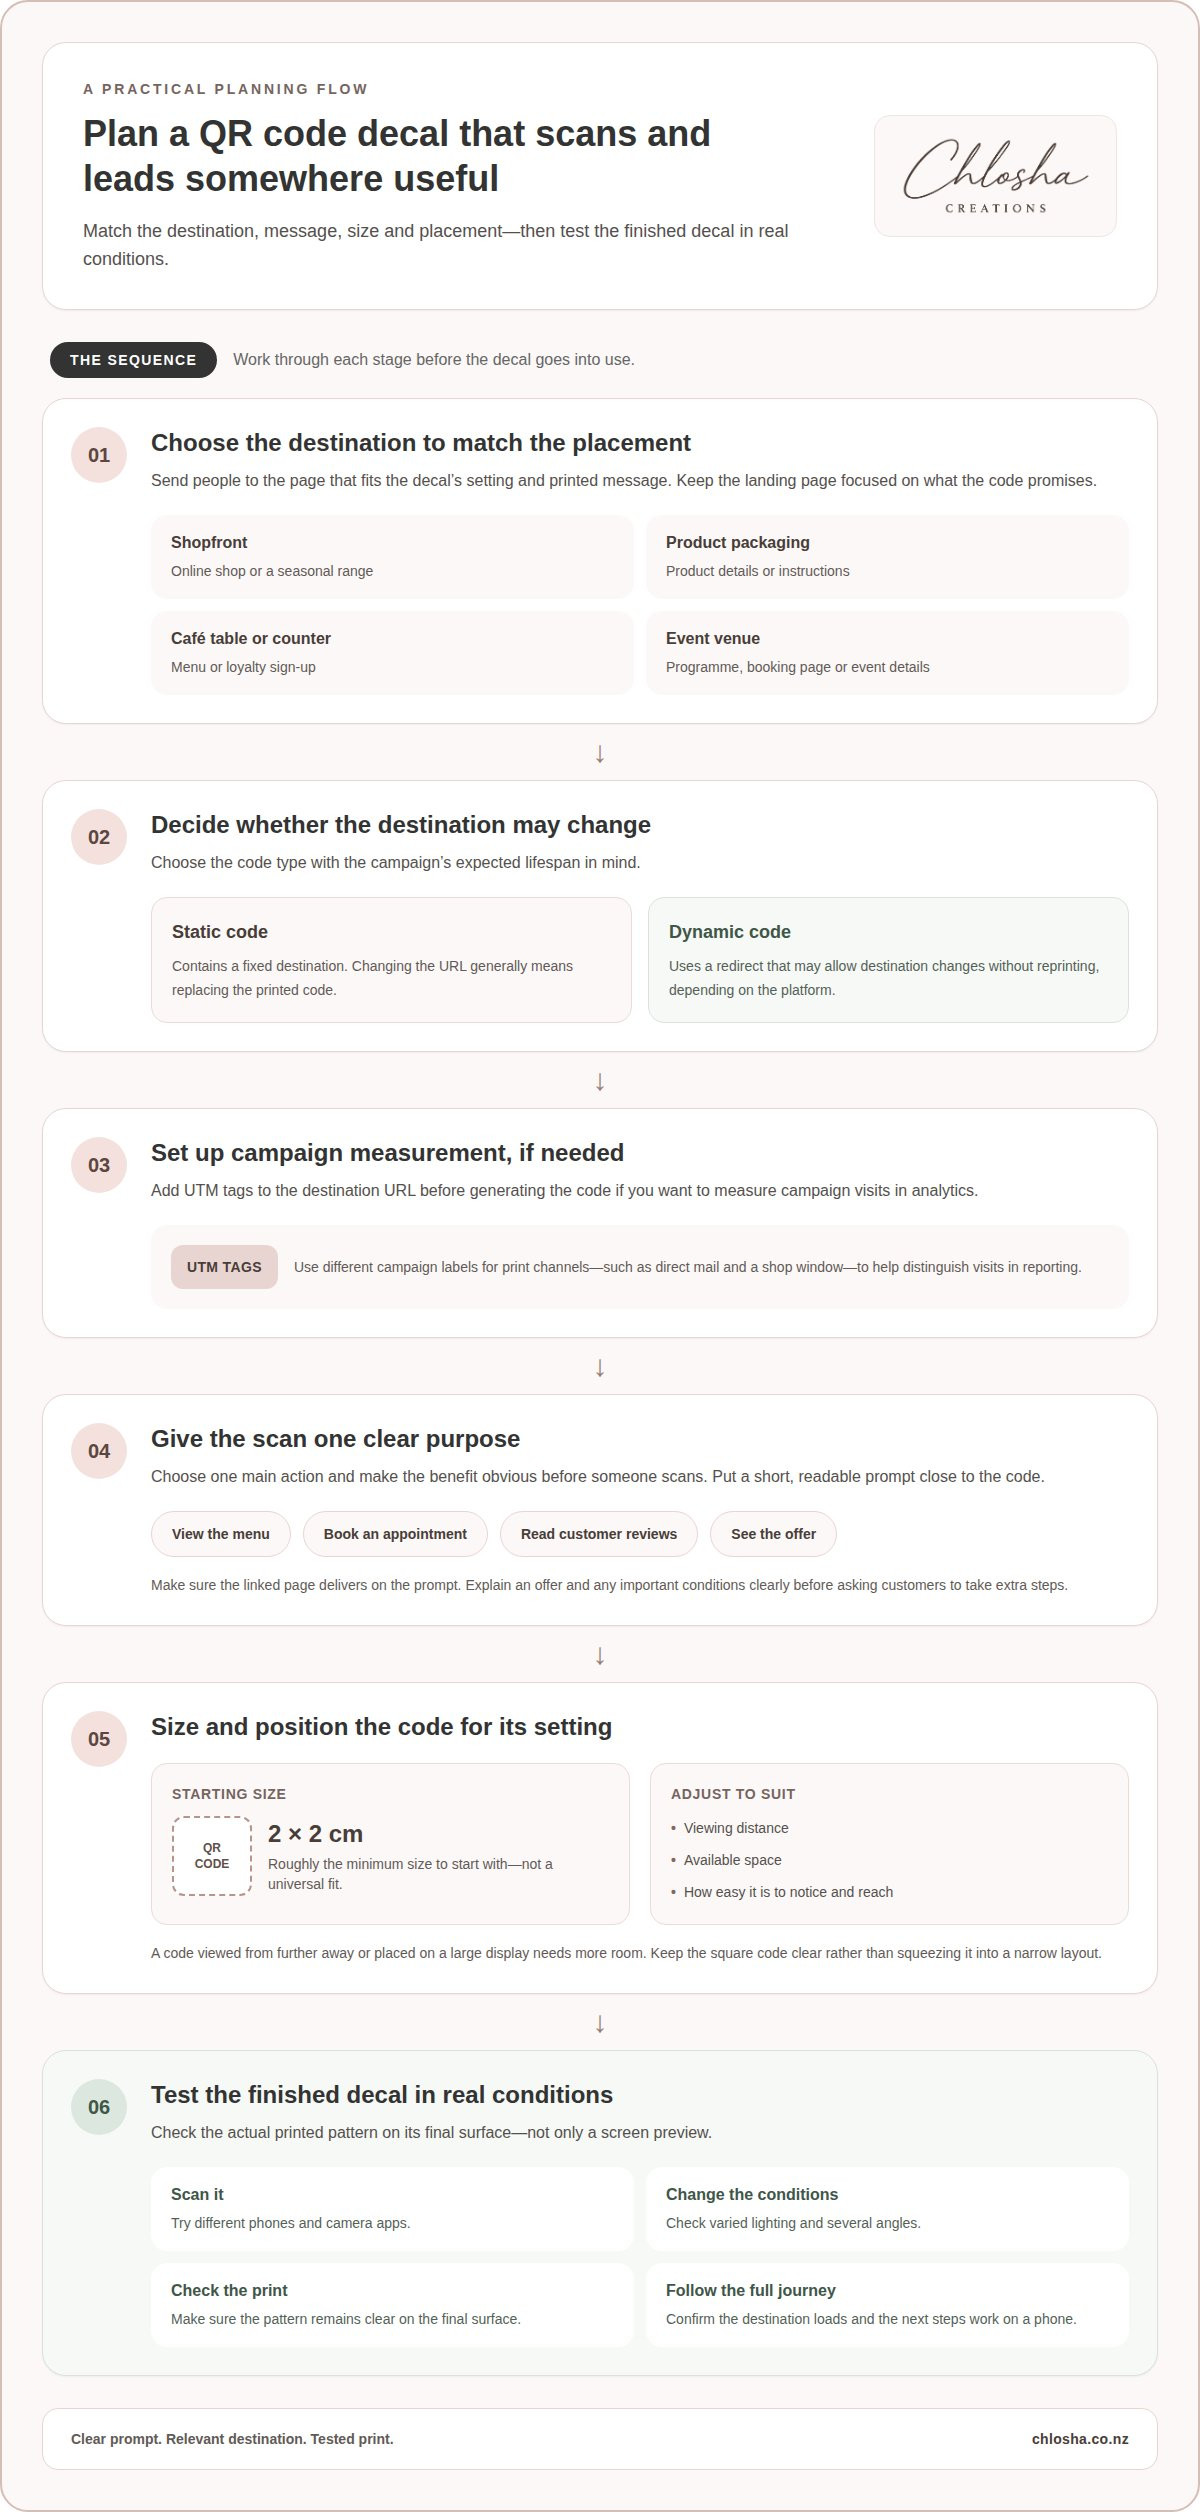
- Choose the destination. Send a shopfront code to your online shop, a product-packaging code to product details, or a direct-mail code to a campaign page. Keep the landing page focused on the printed message. A postcard promoting a new product, for example, should lead to that product rather than an unrelated page.
- Decide whether the destination may change. A static QR code contains a fixed destination, so changing the URL generally means replacing the printed code. A dynamic code uses a redirect that may allow destination changes without reprinting, depending on the platform. Consider the campaign’s expected lifespan before choosing.
- Prepare campaign measurement. Add UTM tags to the destination URL before generating the code if you want to measure campaign visits in analytics. Use different campaign labels for print channels, such as direct mail and a shop window. This can help distinguish visits from each placement in reporting.
- Give the scan a clear purpose. Pair the code with a concise prompt, such as “Book an appointment” or “Read customer reviews”. On a flyer, explain what opens before the recipient scans. Avoid a vague prompt that leaves people guessing about the destination.
- Test the final design. Scan the code with different phones and camera apps, in varied lighting and from several angles. Check the destination loads correctly and the printed pattern remains clear on its final surface. Test the actual print, not only a screen preview.
Calls to action and scan incentives
A QR code earns attention when the offer is useful and the next step is obvious. Match the prompt to the customer’s situation: a café menu belongs on a table, while a product guide should sit beside the item it explains. These steps help make each scan worthwhile.
- Choose one action. Decide what you want the customer to do after scanning. Examples include viewing a menu, booking an appointment, joining an email list or entering a promotion. Give each decal one main job. Sending people to a page with several competing offers can make the next step less clear.
- Make the incentive specific. Offer something relevant to the location and audience. A shop window could promote a seasonal range, while a café counter could link to a loyalty sign-up. State the benefit beside the code, such as “See the new arrivals” or “Get the weekly specials”. Avoid vague prompts like “Scan me”.
- Keep the landing page consistent. If a postcard advertises a product launch, take scanners directly to that launch information, not a general homepage. Repeat the offer and explain any important conditions on the page. A clear match between the printed message and digital destination helps people understand they’ve reached the right place.
- Give customers a low-effort next step. A review request should open the review process, while an event decal should lead to practical details such as the programme or booking page. Keep forms focused on the information needed for that action. For a promotion, explain how to redeem it before asking customers to complete extra steps.
- Make the prompt readable at a glance. Use concise wording and place it close to the code. “View the menu” tells a diner more than “Learn more”; “Book a table” sets a clearer expectation than “Visit us”. On packaging, a short prompt such as “See how to use this” can connect the product to helpful instructions.
- Check the full customer journey. Scan the code as a first-time visitor and follow every step, from the offer to the final action. Confirm that buttons work on a phone and that key details are easy to find. For a school fundraiser, make the donation or event information straightforward to reach. If you’re offering an incentive, check its instructions and conditions are easy to understand before printing.
QR code size and placement
QR codes are square, but there is no single standard size for every decal. Start with the minimum size, then choose a position and scale that suit how customers will approach it.
- Start with a scannable code size. A QR code intended for a sticker should be roughly 2 x 2 centimetres at minimum. Treat that as a starting point, not a universal fit. A code viewed from further away or placed on a large display needs more room. Keep the square code clear and avoid squeezing it into a narrow layout.
- Match the decal to the location. Think about the available surface before choosing dimensions. A small product package has different space from a shop window or freestanding display. Custom decal sizes can range from 9x15 inches to 28x46 inches, but the QR code itself should remain square. Plan the code area within the wider design.
- Consider how customers will approach it. Put a counter decal where someone standing nearby can comfortably point a phone at it. For a window, choose a clear section visible from the footpath. A code positioned too high, low or around a corner may be awkward to scan, even when its printed size looks generous.
- Keep the code unobstructed. Avoid placing it across joins, handles, textured sections or areas covered by product displays. On packaging, leave the code visible after the item is stocked or wrapped. On a shop window, check that signs, reflections and display items don’t compete with the pattern.
- Give the code breathing room. Leave clear space around the square so nearby text, logos and decorative details don’t crowd its edges. Keep the accompanying prompt close enough to explain the scan, but separate it visually. For example, place “View the menu” beside a café counter code rather than over its pattern.
- Check the site in real conditions. Stand where a customer would stand and assess whether the decal is easy to see and reach. Test the placement with the final printed design, not just a screen preview. For a busy checkout, make sure the queue doesn’t block access; for a window, consider both indoor and footpath viewing.
- Choose a placement that suits the action. Put product information near the item, booking details near the service point, and event information near the entrance. A code on a moving vehicle is less practical for scanning than one encountered while parked. Let the customer’s likely position guide both decal size and placement.
QR codes are square, but there is no standard size for QR code decals. Choose the dimensions to suit each decal’s setting and viewing distance.
QR code sizing and scan distance
- Start with the viewing position. Decide where a customer will stand before setting the code dimensions. Someone scanning a counter decal is close by; someone approaching a shop window may be further away. Sketch the customer’s likely position and line of sight. This helps you choose a code that suits its real setting.
- Scale up as the viewing distance grows. The 2 x 2 centimetre minimum is a starting point for sticker codes, not a promise of easy scanning from every distance. A code on a counter can be smaller than one intended for a window viewed from the footpath. Increase its size when people need to scan from further away.
- Allow room for the code’s pattern. A QR code has individual squares that carry its information. Longer or more complex destinations can create a denser pattern, which may need clearer reproduction to scan well. Keep the code square and avoid shrinking it to make room for a large logo, extra wording or decorative details.
- Protect contrast and clear space. Use a distinct difference between the code and its background, such as a dark pattern on a light area. Keep text, borders and graphics away from the pattern’s edges. On a coloured shop window design, reserve a plain section for the code instead of placing it over a busy image.
- Check the final printed dimensions. Review the QR code after it has been placed in the complete decal artwork. A code that looks large on a computer screen may print smaller than expected beside a logo or call to action. Measure the printed square itself, not the full decal, and inspect its sharpness before installation.
- Test from the customer’s distance. Put the proof or finished decal where it will be used, then scan from the expected position. Try a nearby counter and a shop entrance separately; success at close range doesn’t show how the code performs further away. Test different angles and lighting, including reflections on window glass.
- Adjust one factor at a time. If a phone struggles to scan, first move closer and try again. Then improve the lighting or viewing angle. If the code remains difficult, enlarge it or simplify its design. Retest after each change, because a new size or print layout can affect how the whole code scans.
QR code uses for campaigns, products and events
- Turn a shopfront into an always-available entry point. A strategically placed storefront QR code can capture leads 24/7, including outside trading hours. Link it to a short enquiry form, appointment booking page or online catalogue. Add a clear prompt, such as “Browse the range”, so passers-by know what opens. Keep the page useful on a phone, with the next action easy to find.
- Connect packaging with useful product information. Put a code on a box, tag or display card to open care guidance, setup instructions, ingredients or a product story. For example, a homewares brand could link a product label to cleaning advice. Keep the printed product name visible beside the code, so customers can tell which item the page describes.
- Make a campaign easier to follow. Use a separate QR code for each campaign placement, such as a window decal, printed flyer or event handout. For custom QR code decals for businesses, connect each placement to the campaign page that matches its message. This gives customers a direct route from the promotion they saw to its relevant offer, registration form or details.
- Support in-person events. At a market, exhibition or school fundraiser, a code can open the event programme, stall map, registration page or donation information. Place it where visitors naturally pause, such as a welcome desk or display board. Include a short instruction, like “View today’s programme”, rather than expecting people to guess what the scan contains.
- Help customers find reviews after a purchase. A post-purchase card or counter decal can link to the business’s review page. Keep the wording neutral and explain that the link opens a place to share feedback. For example, “Tell us about your visit” sets a clear expectation without suggesting a particular rating or response.
- Use campaigns to answer common questions. A café code could open allergen information or the current menu; a service-business decal could lead to booking details. Put the most useful information first on the linked page. A customer scanning at a counter shouldn’t need to search through several menus before finding the answer.
- Plan a clear path from scan to result. Before printing, follow the entire journey on a phone: scan, landing page, then action. For a product launch, check that the featured item appears on the page. For a ticketed event, make registration steps easy to understand. A set of custom QR code decals for businesses works best when every code has a relevant destination and a clear role in the campaign.
Chlosha Creations: Personalised Name Labels
A QR campaign works best as part of a consistent business identity. Chlosha Creations offers Business Branding Decals and Custom Business Logo Transfers for branding suitable hard surfaces alongside a QR code campaign. Keep the code distinct and easy to scan, and position your logo and other design elements so they do not crowd its pattern.
These options help businesses carry their branding across physical touchpoints while the code directs customers to digital content. Explore Chlosha Creations at chlosha.co.nz to see its personalised decal options.
Put your next idea into action
Before commissioning a decal, decide what a successful scan should help someone do. That decision can guide the landing page, message and placement, giving your campaign a clear purpose from the outset. For custom QR code decals for businesses, treat the code as one part of the customer experience, not the whole experience.
For schools and families, clear identification can meet a different everyday need. Chlosha Creations offers Personalised Name Labels, Personalised Icon + Name Labels and Kids Name Labels for belongings heading to school or kindy. They’re useful when families need to identify items, rather than direct customers to a digital page.
Explore personalised name labels for a simple way to support organised school and family routines. Choose the next step that best fits your customers, and build from there.
Frequently Asked Questions
How do you create and test a QR code before printing it on a decal?
Choose the landing page first, then generate the code using its full web address. Open the destination on a phone to confirm it is correct and loads properly. Save a clear, high-resolution code file and add it to the decal artwork without stretching or cropping it. Before approving the design, scan a printed proof to make sure the whole code is visible and the page works on mobile.
What size should a QR code decal be for reliable scanning at different distances?
Use roughly 2 x 2 centimetres as the minimum code size, then enlarge it as the scanning distance increases. A small counter decal is used nearby, while a shop window may be scanned from further back. Test at the customer’s expected standing position, not just close to the print. If the code takes effort to scan, increase its size or move it closer to the intended audience.
What are the risks of QR codes becoming unreadable or linking to outdated or unsafe pages?
A damaged, blurred or obscured pattern may not scan. An outdated destination could also lead to a missing page or irrelevant offer, while an altered or covered code may take customers to an unexpected website. Check the printed code and its destination regularly, especially when a campaign changes. Show the business name beside the code and use a secure, recognisable domain.
How should businesses install and maintain QR code decals for best scanning results?
Apply the decal to a clean, dry, smooth hard surface in a place where people can pause and use a phone safely. Avoid seams, heavy texture, glare and areas that stock or signage could cover. Keep the code visible during routine cleaning, and use a soft cloth rather than abrasive materials that could mark the print. Inspect it periodically and replace it if fading, peeling, dirt or damage affects the pattern.
What materials and finishes are available for QR code decals?
A listed option is 2.5 mil polished flexible calendered vinyl. Printable vinyl offers a more durable finish for outdoor use, and water-resistant printing material is suitable for outdoor or moist settings; check that the material suits the conditions.
How much do custom QR code decals cost in New Zealand?
Printing costs can also depend on the printer’s pricing model and any third-party printing fees.
