

Classic Name Labels for School and Children's Belongings
The right classic name labels depend on what you’re naming: choose a stick-on option for suitable school supplies and belongings, and a label designed for clothing or shoes for those items. Matching the label to the surface helps you choose a practical fit for the school day.
A drink bottle, lunchbox, uniform and shoes each have different surfaces and care needs. Using a label on a surface it is not designed for can lead to poor adhesion or damage, so check compatibility first.
This guide explains which label types to consider for school and kindy essentials, how to apply them carefully, and what to keep in mind when cleaning labelled belongings. You’ll also learn how personalised labels and no-background UV DTF transfers can help identify suitable everyday items, so it’s easier to choose a neat, personal option for your whānau.
Key Takeaways
- Match the label type to the item and its surface, rather than expecting one option to suit every school belonging.
- Consider label size and placement so names are easy to read on smaller items such as pencils and shoes.
- Apply labels to clean, dry surfaces and follow suitable care steps to help them stay looking neat.
- Hand wash labelled drink bottles and lunchboxes, as wear can depend on the surface, application and washing conditions.
- Personalised name and icon options can make it easier to identify a child’s everyday school gear.
Stick-on and iron-on label options
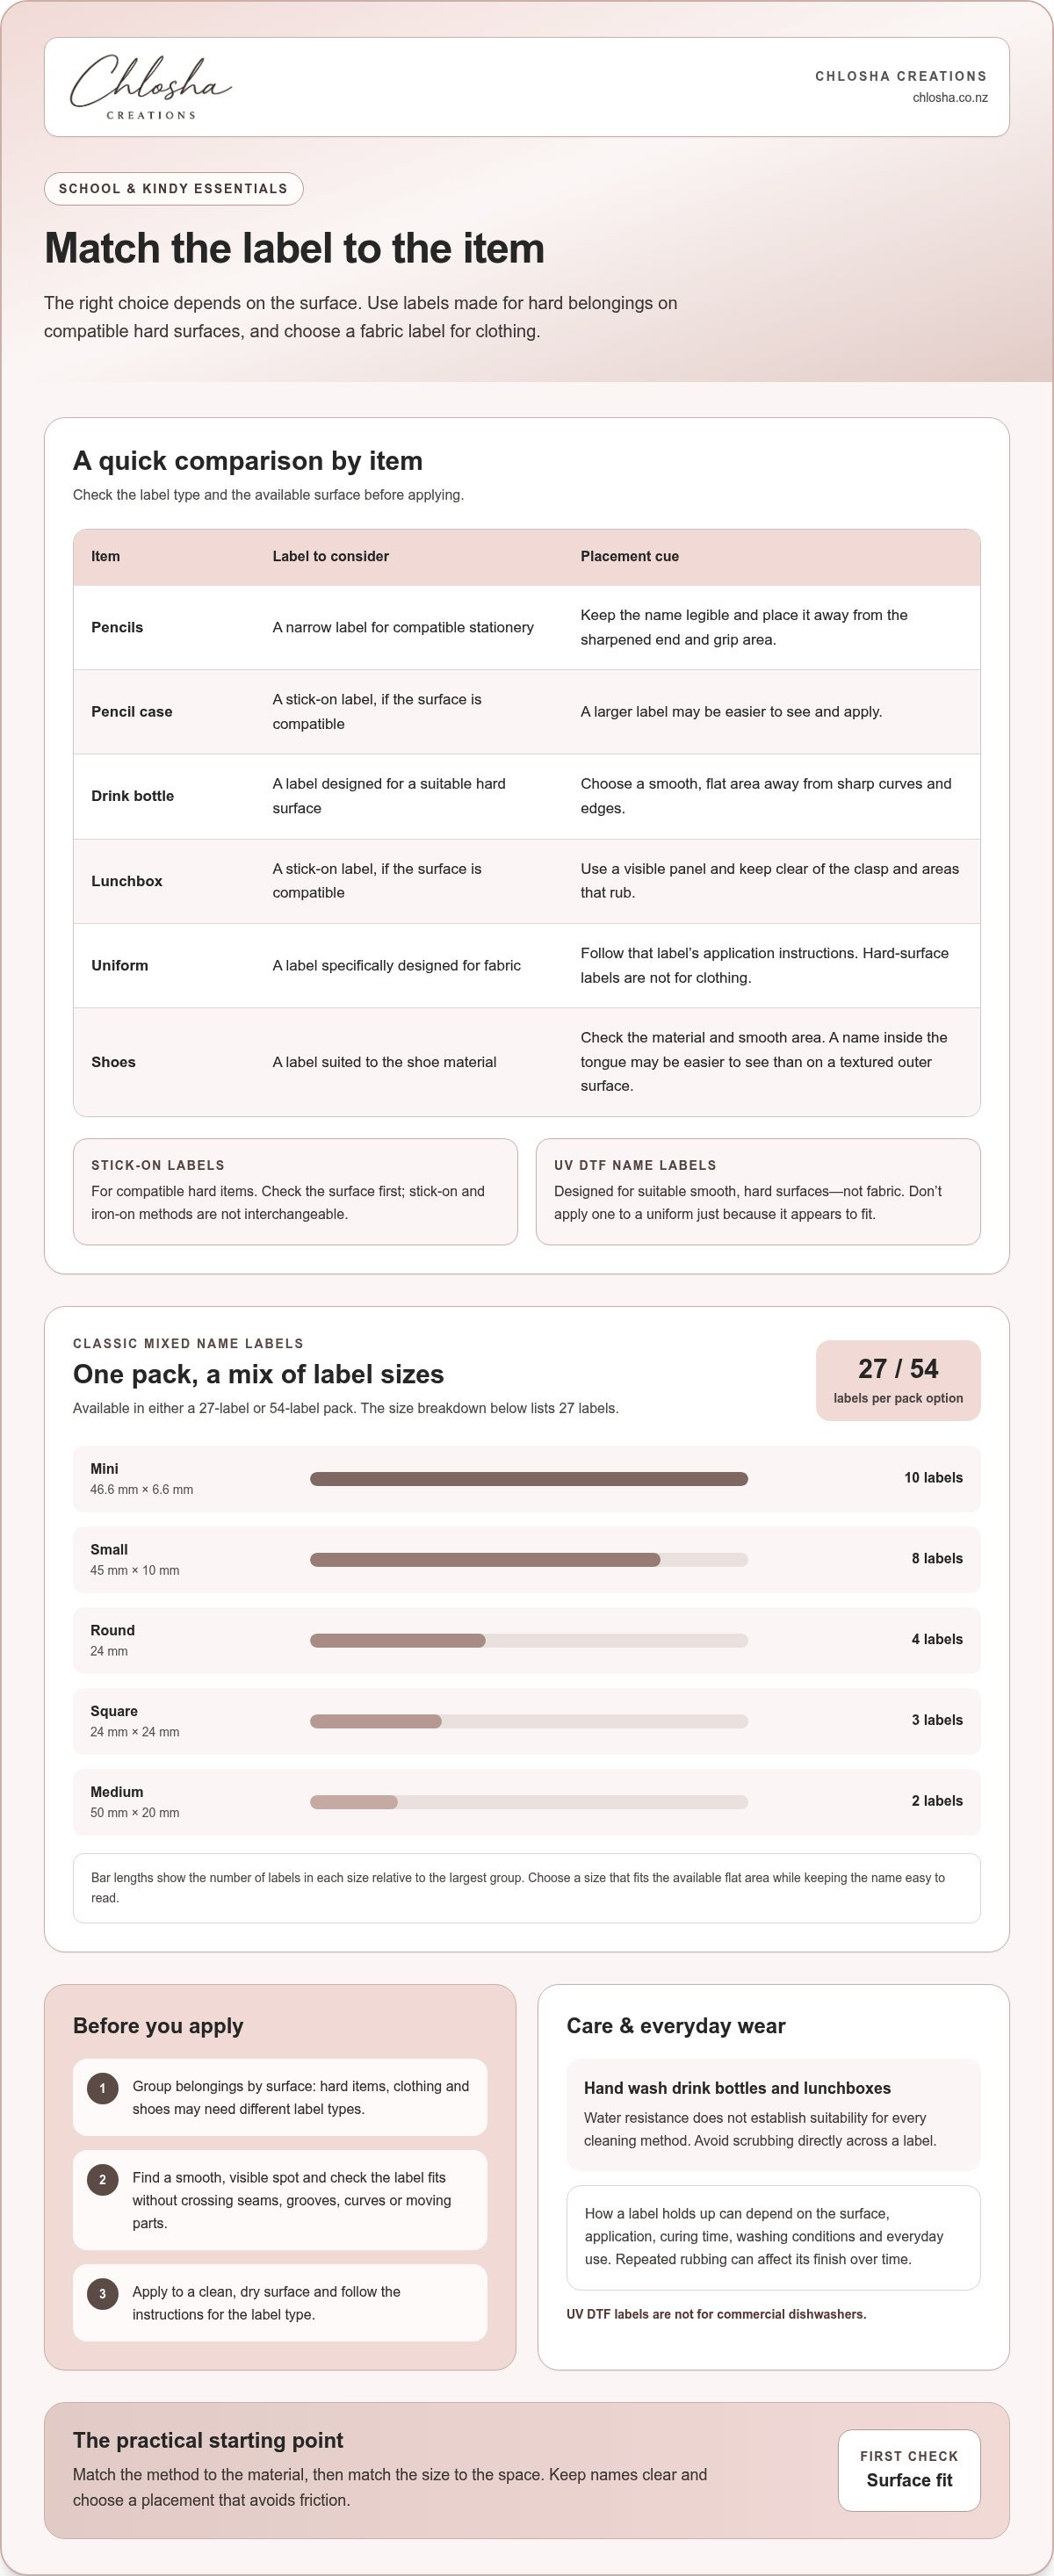
Classic name labels usually use a set layout, while personalised options can offer more choice in how a child’s name appears. In New Zealand, compare the label’s intended surface first: a stick-on label suits compatible hard items, while an iron-on type is made for clothing application. These methods aren’t interchangeable.
A mixed stick-on pack can be handy when school gear comes in different shapes. The Classic Mixed Name Labels pack is available with either 27 or 54 labels. Its mix includes small, medium, mini, square and round shapes, so you can match the label size to the space available.
- Eight small labels measure 45 mm by 10 mm.
- Two medium labels measure 50 mm by 20 mm.
- Ten mini labels measure 46.6 mm by 6.6 mm.
- Three square labels measure 24 mm by 24 mm.
- Four round labels measure 24 mm.
A name label can suit a pencil case, lunchbox or drink bottle if the surface is compatible. Choose a size that fits the available flat area and keeps the name easy to read. A shorter name layout may work better in a narrow space, while a wider label can accommodate more text.
UV DTF name labels are not suitable for clothing. Chlosha Creations’ Personalised Name Labels are designed for suitable smooth, hard surfaces, not fabric. Choose a clothing label designed for fabric instead, and follow its application instructions. Don’t apply a hard-surface label to a uniform just because it appears to fit.
A classic design keeps the focus on the name, while an icon can add a visual cue to help a child recognise their belongings. Chlosha Creations offers Personalised Icon + Name Label Packs in children’s themes and designs. Whichever style you choose, check that the name will remain clear and legible at the label size.
Before selecting a pack, list the belongings that need names and group them by surface: hard items, clothing and shoes. Then estimate the space available on each item and consider whether a mixed-size pack will cover those needs. For a wider look at name-label options in New Zealand, compare label styles with the belongings you want to mark. Matching method, size and surface is the practical starting point.
Choose a clothing label specifically designed for fabric, and follow its application instructions. UV DTF labels are for suitable smooth, hard surfaces, not garments.
Labels for pencils, bottles, clothing and shoes
The label’s size and intended surface matter as much as the name. A pencil barrel has little room, while a lunchbox lid may offer a larger flat area. Find a smooth, visible spot on each item, then choose a label that fits without crossing seams, grooves, curves or moving parts.
For pencils, choose a narrow label that fits the stationery and keeps the name readable. Position it away from the sharpened end and grip area. A larger label on a pencil case may be easier to see and apply.
For drink bottles and lunchboxes, check that the intended spot is smooth, clean and dry. Avoid textured areas and sharp curves. A bottle base or lid may be too curved for a neat application; a broad lunchbox panel can offer more space. Keep the label clear of clasps and areas that rub.
Clothing and shoes need a different decision. Don’t assume a stick-on label for hard belongings will suit a uniform or fabric shoe panel. Look for a label specifically designed for clothing, and follow its application instructions. For shoes, check the material and available smooth area. A name inside the tongue may be easier to see than one placed on a textured outer surface.
- Pencils: choose a narrow format and keep the name legible.
- Drink bottles: select a suitable flat area, away from curves and edges.
- Lunchboxes: use a visible panel that won’t interfere with the clasp.
- Clothing and shoes: choose a type intended for the material and placement.
Before labelling, sort belongings by material: smooth hard surfaces, fabric and other materials need different label types. A drink bottle and school jumper, for example, require separate choices. Keep names easy to read at a glance, especially on small items children handle during a busy school day.
For drink bottles and lunchboxes, hand washing is a sensible care choice. Avoid placing a label where frequent handling or friction could catch an edge. If you’re choosing a personalised design, a small icon beside the name can help children recognise their own gear. Explore classic label options as you match label styles to everyday school belongings.
Waterproof and scratch-resistant properties
“Waterproof” and “scratch-resistant” describe different kinds of exposure. Waterproof refers to contact with moisture; scratch-resistant describes how a surface handles rubbing or scraping. Some name-label descriptions use both terms, but neither means a label is immune to every condition. A drink bottle, lunchbox and pencil case each face different wear during a school day.
On a bottle, repeated handling and contact with a bag can rub the label’s edges. A lunchbox may be wiped, stacked or knocked against other items. On a pencil case, zips and stationery can cause friction. Choose a smooth, protected spot rather than a raised seam or edge.
Water resistance does not mean a label is suitable for every cleaning method. It does not establish that a label can go in a dishwasher, microwave or steriliser. Hand washing is recommended for the longest life. Avoid scrubbing directly across the label, and do not use UV DTF labels in a commercial dishwasher.
How well a label holds up depends on the surface, application, curing time, washing conditions and everyday use. A label on a clean, smooth bottle panel may experience different wear from one placed on a textured area. Repeated rubbing against a bag can also affect its finish over time.
- Moisture: consider whether the item gets splashed or regularly washed.
- Friction: check if bags, zips or hands will rub the label’s edges.
- Surface: choose a clean, smooth area that allows good contact.
- Care: hand wash labelled drink bottles and lunchboxes.
Scratch-resistant does not mean scratch-proof. Sharp objects, rough handling and repeated scraping can still mark a label or the item beneath it. Where practical, keep labelled school gear away from abrasive surfaces. On a lunchbox, choose a broad area that does not regularly scrape against a zip or hard edge.
Before applying a label, follow its instructions and allow the recommended curing time before washing or heavy use. Then check the label’s edges during routine cleaning. If an edge begins lifting, avoid picking at it; continued catching can worsen the lift. These small choices help set realistic expectations for labels on everyday school belongings.
Application and care instructions
UV DTF transfers are designed for clean, dry, smooth, hard surfaces such as glass, acrylic, metal, stainless steel, ceramic, smooth plastic and coated surfaces. They are not suitable for fabric, silicone, rubber, soft plastics or heavily textured surfaces. Check the product instructions before preparing an item, especially if it has grooves or a coating.
For a suitable hard surface, follow these steps:
- Choose a smooth spot. Avoid seams, edges, grooves and textured areas that can interrupt contact.
- Clean and dry it. Remove dust or residue, then let the surface dry fully before application.
- Position the transfer. Check the alignment on a lunchbox lid or bottle panel before pressing.
- Press firmly. Apply even pressure across the design, then peel the carrier away at a low angle.
- Allow it to cure. Wait at least 24 hours before heavy washing.
No heat press is required to apply a UV DTF transfer. Position it on a clean, dry, smooth surface, press firmly and peel away the carrier at a low angle. If needed, use a warm hair dryer on a low setting. On a curved bottle, choose a section where the design can sit smoothly without folding around a sharp curve.
Hand washing is recommended for the longest life of labelled drink bottles and lunchboxes. If you choose to use a household dishwasher on a suitable item, wait at least 72 hours after application before its first wash. Don’t use commercial dishwashers. Label durability can depend on the surface, correct application, curing time, washing conditions and ongoing use.
After washing, dry the item and check the transfer’s edges. Don’t pick or pull at an edge that begins to lift, as catching it can worsen the lift. Avoid scrubbing directly across the design or using abrasive tools on a lunchbox. Gentle cleaning helps limit wear from repeated friction.
Keep the application directions with your school-prep notes, so you can follow them when labelling a new bottle or replacing a transfer. Match the care routine to the item’s material, and allow the full curing period before regular washing or dishwasher exposure.
Personalised classic labels for school and children's belongings
Personalised labels can help children identify everyday belongings, but the label must suit the item. Check the name, design, size and surface before choosing.
Labels for school and children's belongings
List the belongings that need identifying, such as a drink bottle, lunchbox, stationery or sports gear. Choose a name layout that stays readable in the space available. An icon beside the name can help a child recognise their gear, especially when classmates have similar items. Check the label’s intended surface before applying it.
Label materials
“Classic” describes a style, not a specific material. UV DTF transfers have a clean, no-background finish and are designed for suitable smooth, hard surfaces, not clothing or fabric. Check the product details for the intended surface and care instructions rather than assuming that labels with a similar appearance use the same material.
How much do these labels cost in NZ? Prices depend on the pack and what it includes. Compare the listed label count, sizes and personalisation options to find a pack that suits the belongings you need to label.
What materials are they made from? Material and application depend on the label type. Chlosha Creations’ UV DTF transfers are for suitable smooth, hard surfaces. A classic look alone does not identify a label’s material, so check the product details for its intended surface and care instructions.
What shipping costs and delivery times apply in New Zealand? Shipping charges and delivery timing can vary with the destination and delivery option. Review the order’s shipping information to understand the available methods and applicable costs before completing your purchase.
Match the label style to the child’s belongings and the available surface. Keep the name clear at a glance; an icon can also help younger children recognise their gear. You can use a consistent design across a lunchbox and drink bottle, but check that each surface is suitable for the label.
Prices can help narrow the options, but check each product listing for its details before deciding which suits the belongings on your list. These listed prices make it possible to compare the named options, but they don’t establish what each pack contains or which surfaces its labels suit.
Before ordering, confirm the pack contents, label sizes and personalisation choices in the relevant product information. Consider whether the available name layout will be easy to read on the belongings you want to mark, and check the stated application surface and care guidance. A value kit may be worth considering when its listed contents match the items you need to identify; a smaller label option may suit a different need. Let the product details, rather than the word “classic” alone, guide your choice. This helps keep the label appropriate for the item and avoids assuming that products with a similar style share the same material or use.
Chlosha Creations: Personalised Name Labels
Chlosha Creations offers personalised name labels for identifying children’s school and everyday belongings. Choose Personalised Name Labels for a clear name, or Personalised Icon + Name Labels when a visual cue may help a child recognise their gear. Kids Name Labels and School Name Labels suit family and school routines, including labelling suitable hard-surface items such as drink bottles and lunchboxes.
The labels use UV DTF transfers, with a clean, smooth, no-background finish. Match each label to the item’s surface and follow the application and care instructions, especially for belongings that need regular washing. For a personalised option that fits your child’s school gear, explore the name label range.
You’re welcome to visit Chlosha Creations online to explore the options.
Make labelling part of your school-prep routine
Before the next school term, set aside a few minutes to identify which belongings need labels. Let your child choose a name layout they can recognise, then list the items to label. Planning ahead makes it easier to choose suitable labels and keep school gear organised as routines change.
Treat classic name labels as part of getting belongings ready, rather than a last-minute task. Keep the name consistent across items, and update your list when your child gets new gear or changes schools. A personalised design can also give children a familiar visual cue among shared classroom belongings.
When you’re ready to explore options for your child’s belongings, browse classic label designs from Chlosha Creations. Choose the style that feels right for your family, and make school preparation a little more personal.
Frequently Asked Questions
What are classic-style name labels?
Classic name labels have a simple, name-focused design for identifying belongings. The label type must match the item’s surface. Chlosha Creations’ UV DTF name labels are for suitable smooth, hard surfaces, such as compatible drink bottles and lunchboxes. They are not clothing labels, so choose a different method for uniforms and fabric items.
Which styles and sizes can I choose?
Styles and dimensions vary by pack, so check the product details against the space available on the item. A Classic Name Pack, for example, includes 12 labels in three sizes: large, medium and small. If a child finds pictures easier to recognise, an icon-and-name design may be a useful alternative. Compare the name length and label dimensions before choosing classic name labels for smaller belongings.
Are the labels waterproof, dishwasher-safe or laundry-safe?
UV DTF labels are water-resistant, but that doesn’t mean they’re permanently waterproof or suitable for every cleaning method. Hand washing is recommended. If a compatible item is put in a dishwasher, wait at least 72 hours after application before its first wash. These transfers aren’t designed for fabric, so they aren’t suitable for laundry or clothing.
How do I apply them to clothing and belongings?
UV DTF transfers are for clean, dry, smooth, hard surfaces, not clothing. For a suitable item, such as a glass container, clean and dry the area, position the transfer, press firmly, then peel the carrier at a low angle. A warm hair dryer on a low setting can help if needed. Wait at least 24 hours before heavy washing.
How long do the labels last, and how can I remove them?
There is no set lifespan for every label. Surface compatibility, application, curing, washing and everyday wear all affect how it holds up. Hand washing is recommended for the longest life. Before removing a label, consider the item’s material and care instructions; use a gentle approach and avoid sharp or abrasive tools that could mark the surface.
How much do classic name labels cost in NZ?
Pricing for classic name labels varies depending on the specific pack size, design options, and quantity ordered from Chlosha Creations. Because our UV DTF packs offer a range of sizes to suit different belongings, check our current product listings for up-to-date pricing in New Zealand dollars to find an option that fits your budget.
