

Scratch Resistant Name Labels for Clothing and Belongings
A label suited to a drink bottle may not work on a school jumper. For hard surfaces, choose a label designed to stick to them; clothing needs a label method intended for fabric. When choosing scratch resistant name labels, match the label to the item and its use. “Scratch resistant” does not mean scratch-proof.
It’s easy to focus on the design and overlook the surface. A smooth lunchbox, a curved drink bottle and a garment each call for a different label type. Matching the label to the item makes it easier to identify school and everyday belongings.
This guide explains which labels suit clothing and hard surfaces, how to apply and care for them, and what to consider before using labelled items with household appliances. It also covers where UV DTF labels fit and when a surface calls for a different label type. Follow the item’s care instructions, and hand wash labelled containers rather than assuming they’re suitable for a dishwasher or microwave.
Key Takeaways
- Choose labels by surface: stick-on options suit hard belongings, while clothing labels are best placed on a care label rather than directly on fabric.
- For a better application, start with a clean, dry, smooth surface and press firmly to help remove air bubbles.
- Hand wash labelled drink bottles and lunchboxes; don’t assume a label or item is suitable for a dishwasher, microwave, freezer or steriliser.
- Understand the difference between labels for fabric and UV DTF transfers, so you can choose the right type for the item you’re naming.
- Think beyond the classroom: name school supplies, sports gear and everyday belongings to make them easier to identify.
Name labels for clothing and hard surfaces
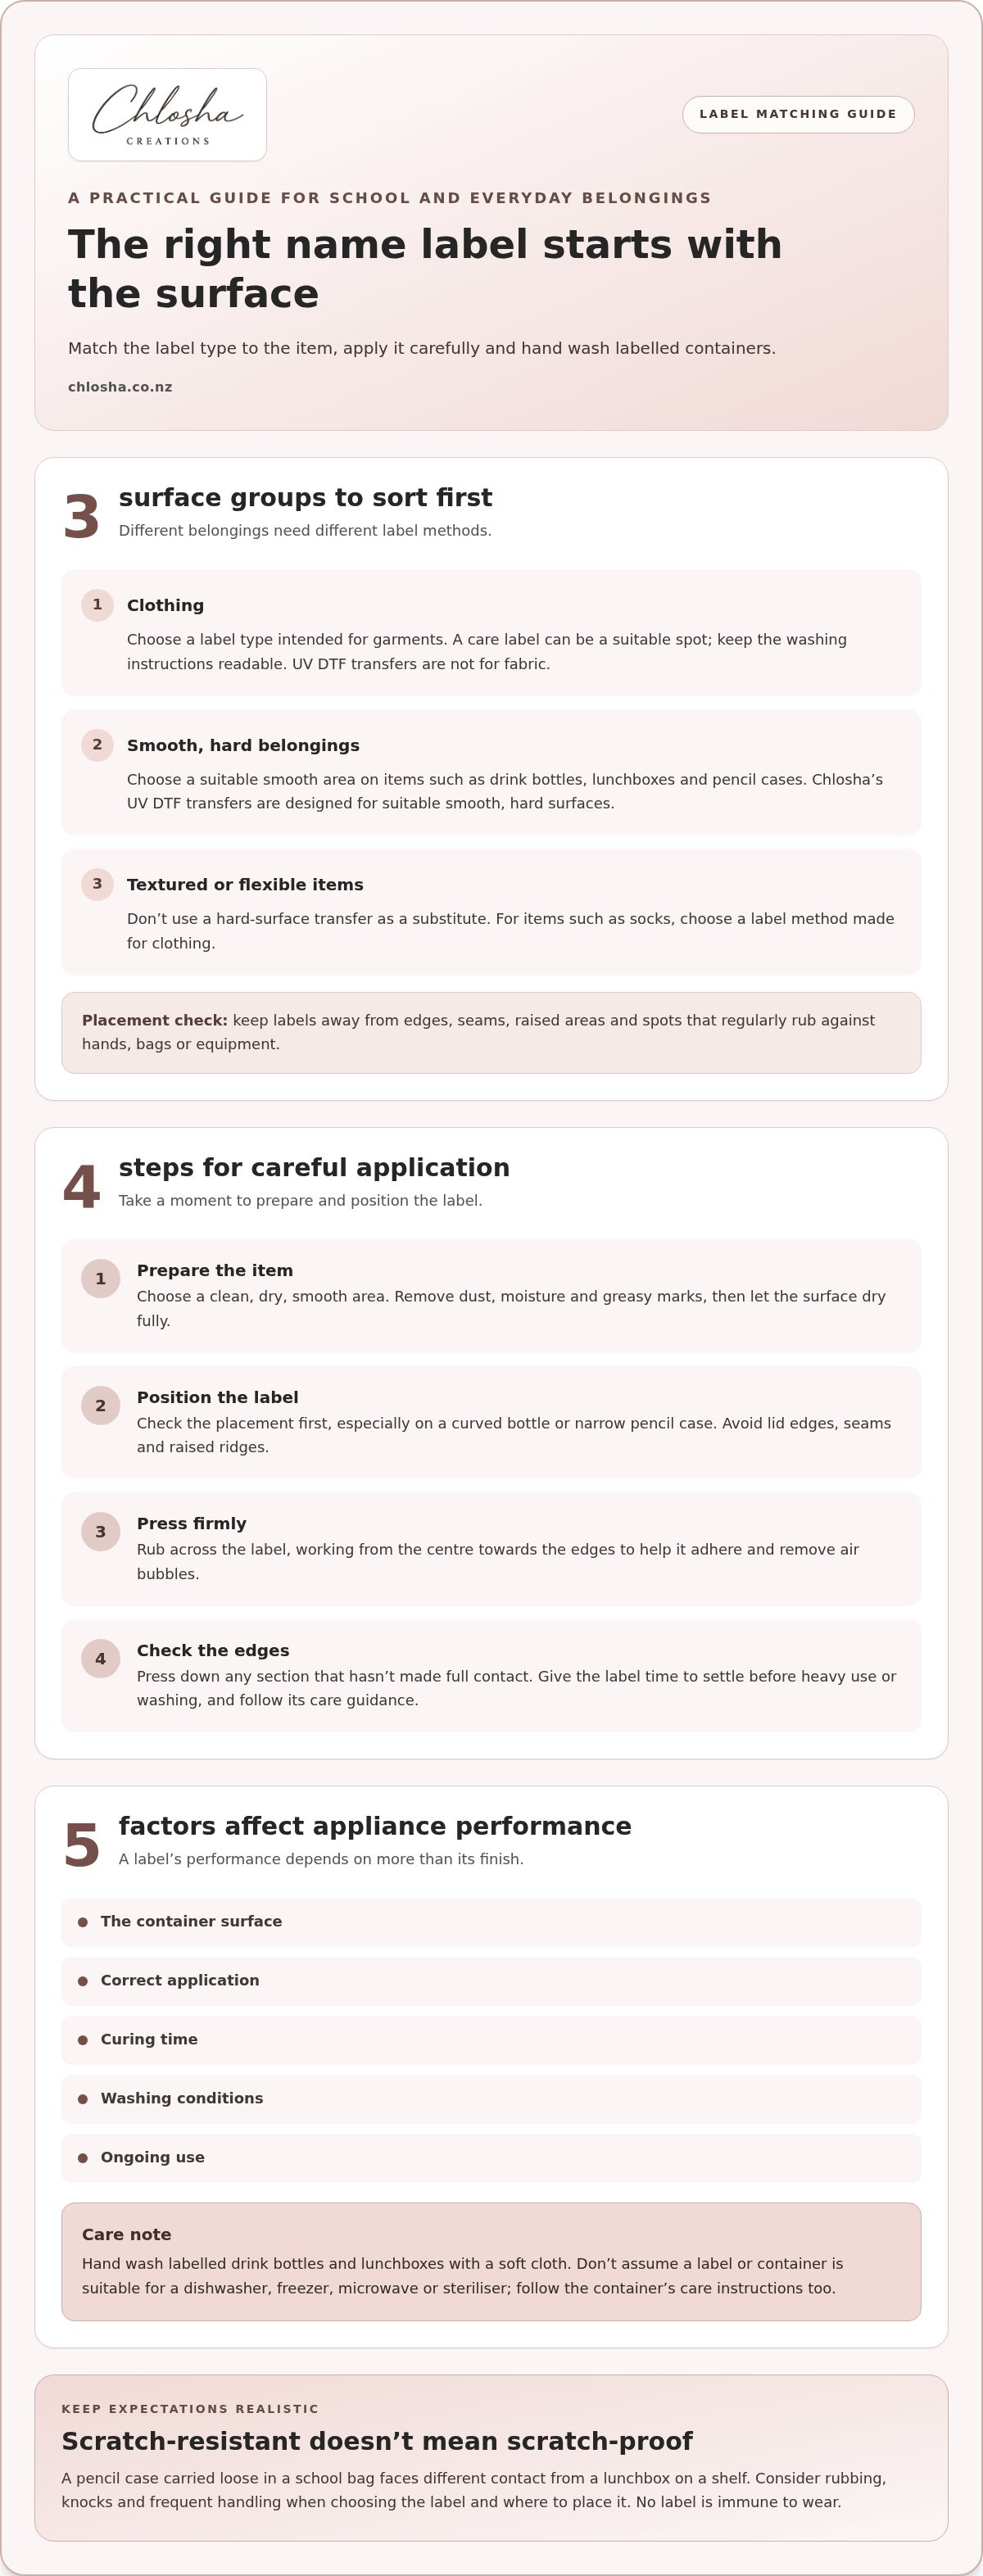
Start by matching the label to the surface. Labels designed for hard items suit belongings such as smooth drink bottles, plastic lunchboxes and pencil cases. Some other label types can go on a garment’s care label, but that advice does not apply to UV DTF transfers. Chlosha’s UV DTF transfers are designed for suitable smooth, hard surfaces, not fabric.
For a school uniform, check inside the garment for its care label and choose a label intended for that spot. Keep the washing instructions readable. If the garment has no care label, as with a sock, don’t use a hard-surface transfer as a substitute. Socks stretch and rub during wear, so choose a label method made for clothing.
Hard surfaces vary, too. A flat lunchbox lid offers a different placement area from a curved drink bottle. Look for a smooth spot away from edges, seams, raised areas and places that rub against other belongings. On sports gear, consider where hands grip the item or equipment scrapes against it. Placement can affect how well a label stays attached during everyday use.
“Scratch resistant” does not mean “scratch-proof”. A pencil case carried loose in a school bag faces different contact from a lunchbox stored on a shelf. Consider rubbing, knocks and how often the item is handled. Choose a label made for the surface and place it where routine contact is less likely to catch an edge. No label is immune to wear.
For a school set, sort belongings by surface: clothing, hard items and anything with a textured or flexible finish. Identify a suitable label type and placement for each. Chlosha’s personalised name labels are UV DTF transfers for suitable smooth, hard surfaces, such as a compatible bottle or lunchbox. They aren’t for garments or other fabric items.
- Clothing: use a label type intended for garments, and keep care instructions visible.
- Hard belongings: choose a suitable smooth area on items such as a lunchbox or drink bottle.
- Frequently handled gear: avoid edges and spots that regularly rub against hands, bags or equipment.
Care and application advice
Good application starts before the label leaves its backing. Choose a clean, dry, smooth area, and remove dust, moisture and greasy marks. A damp lunchbox lid or a drink bottle with condensation can interfere with adhesion. Let washed items dry fully before applying a label.
Use a flat, well-lit spot so you can see the label’s position clearly. Hold it over the item first, especially on a curved bottle or narrow pencil case. Keep it away from seams, corners and raised edges, where daily handling can catch it. Once you’re happy with the position, apply it steadily rather than shifting it repeatedly.
- Prepare the item. Clean the area and let it dry completely. Avoid applying over crumbs, dust or water droplets.
- Position the label. Align it with the flat area, checking that it won’t cross a lid edge or raised ridge.
- Press firmly. Rub across the label to help it adhere and remove air bubbles. Work from the centre towards the edges.
- Finish carefully. Check the edges and press down any section that hasn’t made full contact.
Take extra care with small items. On a narrow lunchbox compartment, a label overlapping a seam may lift as the lid opens. On a curved drink bottle, position the name where fingers won’t constantly rub across it. On a clothing care label, keep the name visible without covering the washing instructions.
After applying a label, give it time to settle before the item gets heavy use or washing. Follow the care guidance supplied with the label, since products can differ. For bottles and lunchboxes, hand washing is the sensible routine. Use a soft cloth and avoid scrubbing directly across the label with an abrasive sponge or brush.
Dishwashers, microwaves and other appliances expose labelled items to conditions that vary by appliance, surface and use. Don’t assume a name label or container is suitable for them. Hand wash labelled drink bottles and lunchboxes. Follow the container manufacturer’s care instructions as well.
For everyday care, check labels as part of packing school bags. If an edge begins to lift, don’t pull at it while the item is in use. Reassess the surface and placement before applying another label. To compare options for belongings that need clear identification, browse the personalised name label range.
Dishwasher, freezer, microwave and steriliser suitability
A label’s performance in an appliance depends on more than its printed finish. The container’s surface, application, curing time, washing conditions and ongoing use all matter. A label on a lunchbox can face different conditions from one on a drink bottle, even in the same dishwasher. Hand washing is recommended for labelled items.
Dishwasher: Don’t assume a labelled lunchbox or drink bottle is dishwasher-safe. Heat, water movement, detergent and contact with other dishes can affect the label and its adhesion. Durability can depend on the surface, correct application, curing time, washing conditions and ongoing use. Hand wash the item with a soft cloth instead of placing it in a dishwasher.
Freezer: Freezing an item doesn’t automatically mean its label is suitable for freezer conditions. A container may become damp when removed, and moisture can affect the labelled area. For example, a frozen lunch container may develop condensation as it warms. Consider the label’s placement and the container’s care instructions, and hand wash the item after use.
Microwave: Don’t treat a name label as evidence that a container is microwave-safe. The label and the container are separate considerations, and the container’s own instructions determine whether it can be microwaved. Hand wash a labelled lunchbox, and don’t put it in the microwave unless the manufacturer’s guidance allows it. Never rely on a label’s appearance to judge appliance safety.
Steriliser: Sterilising equipment can expose belongings to conditions unlike everyday handling. A drink bottle lid, small container or lunch item may have different care requirements from its label. Don’t assume a name label can go through a sterilising cycle. Follow the container’s care instructions and hand wash labelled belongings instead.
These distinctions matter in school and daycare routines. A child’s bottle might be hand washed each evening, while a lunchbox is put away after use. A simple routine can reduce unnecessary appliance exposure. Use a soft cloth and avoid scrubbing across the label with an abrasive sponge or brush.
Before using any appliance, consider these points:
- Read the container’s care instructions for dishwasher, freezer, microwave or steriliser use.
- Follow the label’s application and curing guidance before washing the item.
- Choose hand washing for labelled drink bottles and lunchboxes.
- Check the label and its edges during regular cleaning, especially after repeated use.
“Scratch resistant” doesn’t mean scratch-proof or suitable for every appliance. Repeated handling, rubbing against other items and cleaning methods can all affect a label. Hand washing a school lunchbox avoids relying on a dishwasher claim; it also lets you control how you clean a labelled bottle.
Label materials and weaving
A label’s construction affects how it feels, attaches and wears. Before choosing a name label, compare its application method, the item’s surface and the care it will need.
Scratch Resistance by Label Type
Scratch resistance depends on the label’s material, placement and contact with other objects, not its name alone. Iron-on labels sit on fabric, while stick-on labels attach to a surface; neither is automatically scratch-proof. Labels described as dishwasher-safe still need to suit the item and washing conditions. Check the intended use and care advice, and hand wash labelled belongings.
Label Wear on Clothes and Containers
There’s no single lifespan for every garment, bottle or lunchbox. Clothing labels experience washing, stretching and friction, while a drink bottle may be handled often or rub against a school bag. Placement, surface condition, application and ongoing care all affect wear. Follow the label’s instructions and hand wash containers to reduce avoidable wear.
Materials also affect how a label behaves. A transfer applied to a smooth, hard surface works differently from a label intended for fabric. A lunchbox lid provides a stable area, while a knitted sock stretches as it’s worn. Match the label construction to the item rather than expecting one type to suit every belonging.
Weaving describes how threads form a fabric label. A woven label is made from interlaced threads, so its name or design forms part of the textile surface. That differs from a transfer or adhesive label, which sits on another surface. For a school uniform, consider whether a woven label’s sewn-in format suits the garment and its care routine.
For hard items, look beyond the label’s material name. Check that the surface is smooth, clean and dry, and consider whether the label will cross a curve or edge. A label on a flat lunchbox panel faces different wear from one on a bottle’s curved side. Keep it away from spots that repeatedly scrape against zips, sports gear or other items in a bag.
Use these questions to compare options:
- Where will it go? Clothing, a bottle and a lunchbox have different surfaces and care routines.
- How is it attached? Fabric labels, iron-on options and stick-on labels use different application methods.
- How will it be cleaned? Follow the item’s and label’s care instructions, and hand wash labelled containers.
“Scratch resistant” doesn’t promise that a label can’t mark or wear. Choose according to its construction, placement and everyday use, then care for the item accordingly.
Label materials and weaving
Scratch resistance varies with attachment, surface and use; “dishwasher-safe” describes intended washing conditions, not immunity to scratches. There’s no fixed lifespan for clothes, bottles or lunchboxes, because placement, washing, rubbing and everyday handling all affect wear.
Scratch Resistance by Label Type
Iron-on labels bond to fabric, so washing, stretching and friction against skin or clothing affect how they wear. Stick-on labels sit on a surface and may catch at an edge if placed on a curve or seam. “Dishwasher-safe” labels are intended for particular cleaning conditions, but repeated washing and contact can still affect them. Compare the attachment method and care instructions with the item’s use.
Label Wear on Clothes and Containers
A name label on a school shirt faces laundering and fabric movement; one on a drink bottle may rub against hands or a bag. A lunchbox can be handled and cleaned every day. No single lifespan applies to all three. Consider the label’s placement, how often the item is washed and whether it rubs against zips, other containers or clothing.
Material and construction matter, too. A woven label uses interlaced threads to form its design and name, making it a textile label rather than a transfer applied to another surface. Iron-on labels attach through heat, while stick-on labels rely on adhesion. These methods suit different surfaces, so a fabric label isn’t a substitute for one made for a smooth bottle or lunchbox.
For clothing, consider where the label will sit and what moves against it. A school shirt’s care label is relatively stable, while a sock stretches and rubs during wear. For containers, examine the surface and cleaning routine. A smooth, flat lunchbox panel differs from a curved bottle or textured lid. Edges, grooves and frequent contact can all affect how securely a label stays in place.
Use the item’s routine to guide the choice:
- Uniforms: account for washing, fabric movement and contact with other clothing.
- Drink bottles: consider curved surfaces, handling and friction inside a school bag.
- Lunch boxes: consider repeated cleaning and rubbing against other packed items.
- Woven labels: assess whether a textile label suits the garment and its care routine.
For school belongings with smooth, hard surfaces, explore personalised name label options and choose placements that avoid edges and regular rubbing. Hand wash labelled bottles and lunch boxes, and follow the label’s care instructions.
Chlosha Creations: Personalised Name Labels
Chlosha Creations offers personalised name labels for children’s school and everyday belongings. Its UV DTF transfers have a clean, no-background finish and are designed for suitable smooth, hard surfaces such as drink bottles and lunchboxes. Apply them to a clean, dry surface, press firmly and follow the care guidance. Hand washing is recommended for the longest life.
Choose Kids Name Labels or School Name Labels for a child’s belongings, or Personalised Icon + Name Labels when a visual cue may help distinguish items. These labels are for compatible hard surfaces, not direct application to clothing. Use a garment label method designed for fabric.
Explore Chlosha Creations’ personalised name labels for school items and compatible hard belongings at chlosha.co.nz.
Make your next school-year reset simpler
Use your next pack-up to create a naming system that works across the household. Decide how to identify each child’s belongings, then use the same name format on school supplies, sports gear and everyday items. If siblings share similar drink bottles or lunchboxes, a clear name or distinctive icon can help tell them apart.
Choose scratch resistant name labels for compatible surfaces, and consider how they fit into your everyday routine. As children move between school, daycare, kindy and after-school activities, a consistent approach can make it easier to spot which belongings need a name. Keep the item’s use and care in mind when choosing a label.
Ready to organise the belongings that travel between home and school? Explore personalised name labels and find an option that suits your family’s everyday labelling needs.
Frequently Asked Questions
What type of labels should I use?
Choose according to the item and how it will be handled. For a child’s school kit, a readable name label can identify shared-use belongings, while an icon alongside the name can help younger children recognise their items. For clothing, choose a label method specifically intended for garments. For hard belongings, select a transfer designed for compatible surfaces, not a fabric label.
Why do I need name labels?
Name labels make personal belongings easier to identify in shared settings such as school, kindy, daycare or sports practice. They can also help families sort similar items at home, such as lunch containers for different children. A clear name on frequently misplaced belongings gives anyone returning an item a simple way to identify its owner, without relying on colour or appearance alone.
What are scratch-resistant name labels made of?
There isn’t one material behind every product described as a name label. The term can refer to its format or attachment method, not its exact composition. Chlosha uses UV DTF transfer technology for its hard-surface labels. When comparing options, consider the intended surface, attachment method and care guidance together; a material name alone won’t tell you whether a label suits a particular item.
Which name labels are most resistant to scratching, rubbing and wear?
Scratch resistance and resistance to rubbing aren’t identical. A sharp object may mark a finish, while repeated friction can catch an edge or wear a surface. Chlosha’s UV DTF transfers have a scratch-resistant finish, but that doesn’t make them scratch-proof. For a school bag or sports kit, consider how the item is stored and what it regularly presses against, not just the label’s finish.
Are laminated or engraved name labels better for scratch resistance?
The right choice depends on the item and the result you want. Lamination puts a clear protective layer over printed information, while engraving marks the item itself. Engraving may suit a personal item that can be permanently marked; lamination keeps a printed-label format. Compare readability, the item’s material and whether you want its surface altered. Neither approach guarantees immunity from damage or wear.
Do scratch-resistant name labels withstand washing machines, dishwashers and microwaves?
Appliance suitability depends on both the label and the item, so a scratch-resistant finish doesn’t establish that either can go through an appliance cycle. A washing machine is relevant to garment labels, not hard-surface UV DTF transfers. Dishwasher and microwave use involve different conditions. Treat the container maker’s instructions and the label’s care guidance separately, and don’t infer appliance approval from a label’s appearance.
How do you apply name labels so they resist scratching and peeling?
Choose a label size that fits the available area without crossing a seam, ridge or lid joint. On a child’s lunch container, leave the lid’s opening and closing surfaces clear; on a bottle, keep the name away from areas that contact a bottle holder. A legible name and uncluttered placement make the label easier to identify and reduce the chance of edges catching during everyday handling.
Are name labels safe to use on children’s drink bottles, food containers and clothing?
Apply labels to the outside of compatible belongings, away from drinking openings, food-contact areas and container seals. This helps avoid interfering with how a bottle or lunch container is used. UV DTF transfers aren’t clothing labels, so don’t apply them to garments. For a child’s item, ensure the label doesn’t cover important instructions or prevent a lid from closing properly.
